Episode 2: Stage 3/Guide: Difference between revisions
Richardian (talk | contribs) (Created page with "==== Area 1 ==== {| |style="vertical-align: top;"|left|frameless|644x644px |style="vertical-align: top;"| 1. Clear, go south 2. Clear, go south 3. Press sw...") |
Richardian (talk | contribs) No edit summary |
||
| Line 1: | Line 1: | ||
==== Area | ==== Area 15 ==== | ||
{| | {| | ||
|style="vertical-align: top;"|[[File: | |style="vertical-align: top;"|[[File:2ca15.png|left|frameless|645x645px]] | ||
|style="vertical-align: top;"| | |style="vertical-align: top;"| | ||
The 4 Red buttons are all that’s necessary to proceed to the next area. No requirement to clear any mobs. | |||
The first three are blocked by a gate and a corresponding pressure switch right in front of it, while the last one is only obstructed by some floor traps. | |||
Navigate the stage and press all the red switches while avoiding all enemies then proceed to the next area. | |||
|} | |} | ||
==== Area | ==== Area 16 ==== | ||
{| | {| | ||
|style="vertical-align: top;"|[[File: | |style="vertical-align: top;"|[[File:2ca16.png|left|frameless|630x630px]] | ||
|style="vertical-align: top;"| | |style="vertical-align: top;"| | ||
1. Clear, go east | 1. Clear, go east | ||
| Line 41: | Line 25: | ||
|} | |} | ||
==== Area | ==== Area 17 ==== | ||
{| | {| | ||
|style="vertical-align: top;"|[[File: | |style="vertical-align: top;"|[[File:2ca17.png|left|frameless|630x630px]] | ||
|style="vertical-align: top;"| | |style="vertical-align: top;"| | ||
1. Clear, go north | 1. Clear, go north | ||
| Line 92: | Line 76: | ||
|} | |} | ||
==== Area | ==== Area 18 ==== | ||
{| | {| | ||
|style="vertical-align: top;"|[[File: | |style="vertical-align: top;"|[[File:2ca18.png|left|frameless|630x630px]] | ||
|style="vertical-align: top;"| | |style="vertical-align: top;"| | ||
Choose one player each for the following routes: | Choose one player each for the following routes: | ||
| Line 137: | Line 121: | ||
|} | |} | ||
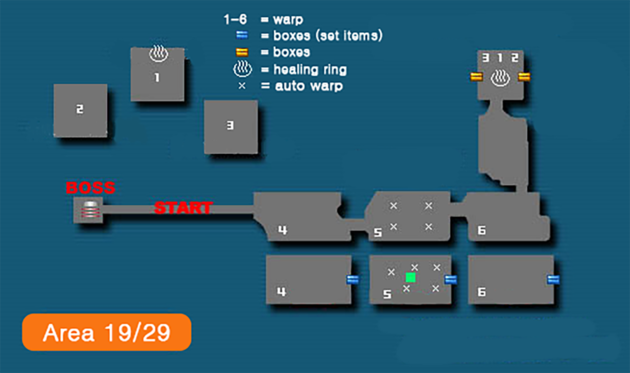
==== Area | ==== Area 19 ==== | ||
{| | {| | ||
|style="vertical-align: top;"|[[File: | |style="vertical-align: top;"|[[File:2ca19.png|left|frameless|630x630px]] | ||
|style="vertical-align: top;"| | |style="vertical-align: top;"| | ||
1. Clear, go south (only need to kill rappy to west?) | 1. Clear, go south (only need to kill rappy to west?) | ||
| Line 152: | Line 136: | ||
6. Clear, go east to exit (ignore hallway Hilde) | 6. Clear, go east to exit (ignore hallway Hilde) | ||
|} | |} | ||
__NOTOC__ | __NOTOC__ | ||
Revision as of 20:36, 6 February 2022
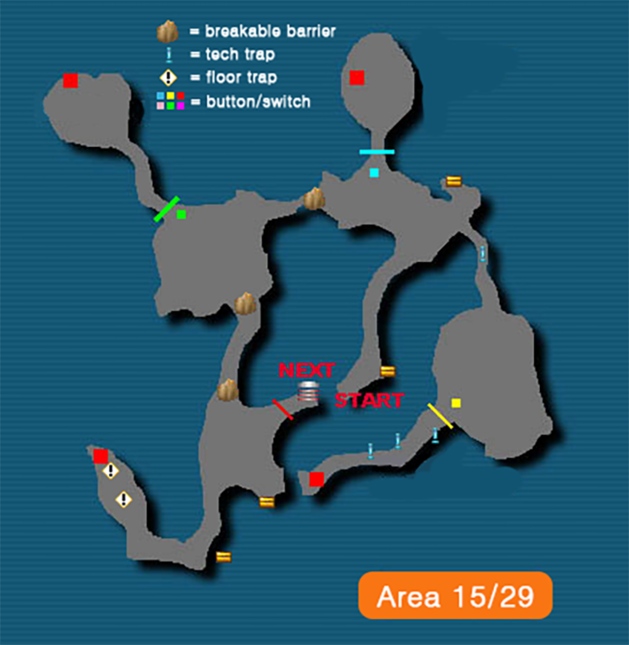
Area 15
|
The 4 Red buttons are all that’s necessary to proceed to the next area. No requirement to clear any mobs. The first three are blocked by a gate and a corresponding pressure switch right in front of it, while the last one is only obstructed by some floor traps. Navigate the stage and press all the red switches while avoiding all enemies then proceed to the next area. |
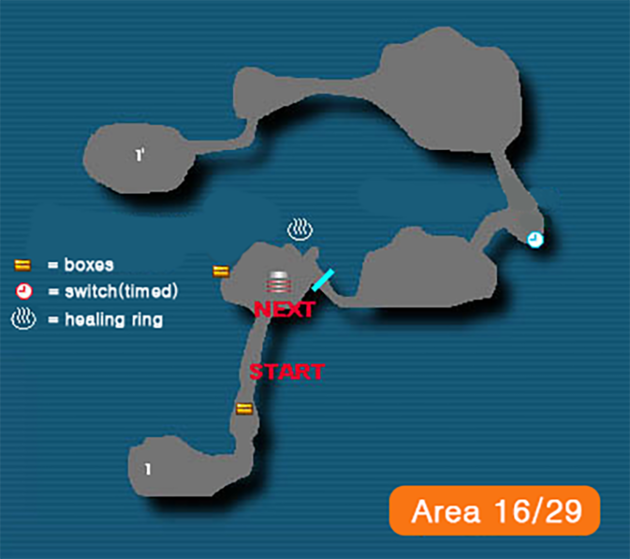
Area 16
|
1. Clear, go east 2. Clear, go north (ignore hallway enemies) 3. Clear, go east, warp 4. Clear, go east 5. Clear, go north to exit |
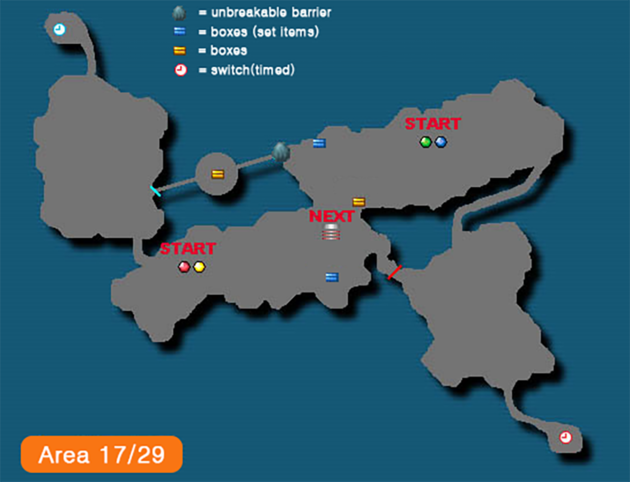
Area 17
|
1. Clear, go north 2. Clear, go north 3. Clear, go northeast 4. Clear, go southwest 5. Press button to allow two players through south, then those players press button to allow first two players through north Team A (north): 6a. Clear, go west (ignore hallway Hilde) 6b. Press button to raise bridge (this triggers floor traps). Clear and go west Team B (south): 6c. Press four corner buttons and go west 6d. Clear, go west 6e. Clear, go north 6f. Clear, go northwest 7. Clear, go north 8. Clear, go east 9. (see map for color coded key) 9.1 Press first button to allow Player 1 through the gate. 9.2 Player 1 presses the east button to allow all three players through the gate on the west wall. 9.3 Players 2-4 press the next button on the west wall to allow the Player 1 through their gate. 9.4 Player 1 presses the first switch to the west to allow Players 2-4 through the next gate 9.5 Player 1 presses the last switch to the east to allow Players 2-4 through the next gate. 9.6 Players 2-4 press the switch on the north wall to allow Player 1 through their last gate (do not warp). All players go east 10. Clear, go north to exit |
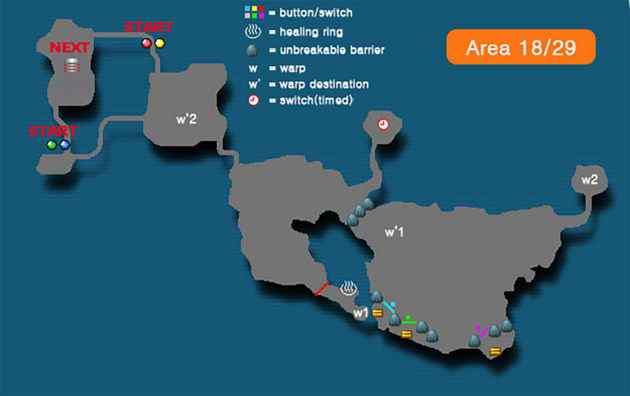
Area 18
|
Choose one player each for the following routes: 1.1 Go west 1.2 Clear, go south 1.3 Go south 1.4 Clear, go west 1.5 Clear, go north 1.6 Clear, go north, press switch and warp 2.1 Press four corner buttons and go north 2.2 Clear, go east 2.3 Clear, go south 2.4 Clear, go south 2.5 Clear, go west, press switch and warp 3.1 Clear, go south 3.2 Clear, go east 3.3 Clear, go south, press switch and warp 4.1 Clear, go south 4.2 Clear, go south 4.3 Clear, go east, press north switch to unlock gate and continue. Press switch and warp After warping, all players go to room 5 5. Press switch to raise bridge, Clear, go north to exit |
Area 19
|
1. Clear, go south (only need to kill rappy to west?) 2. Clear, go west 3. Clear, go south and warp 4. Clear, go north 5. Clear, go north 6. Clear, go east to exit (ignore hallway Hilde) |
