Episode 2: Stage 2/Guide: Difference between revisions
Richardian (talk | contribs) mNo edit summary |
Richardian (talk | contribs) No edit summary |
||
| Line 1: | Line 1: | ||
==== Area | ==== Area 8 ==== | ||
{| | {| | ||
|style="vertical-align: top;"|[[File:2ca8.png|left|frameless|630x630px]] | |style="vertical-align: top;"|[[File:2ca8.png|left|frameless|630x630px]] | ||
| Line 32: | Line 32: | ||
|} | |} | ||
==== Area | ==== Area 9 ==== | ||
{| | {| | ||
|style="vertical-align: top;"|[[File: | |style="vertical-align: top;"|[[File:2ca9.png|left|frameless|768x768px]] | ||
|style="vertical-align: top;"| | |style="vertical-align: top;"| | ||
1. Clear, go east | 1. Clear, go east | ||
| Line 47: | Line 47: | ||
|} | |} | ||
==== Area | ==== Area 10 ==== | ||
{| | {| | ||
|style="vertical-align: top;"|[[File: | |style="vertical-align: top;"|[[File:2ca10.png|left|frameless|630x630px]] | ||
|style="vertical-align: top;"| | |style="vertical-align: top;"| | ||
Team A (southwest): | |||
1a. Clear, go east | |||
1b. Clear, go north | |||
Team B (north): | |||
1c. Go to south of room to trigger spawn, Clear, go west | |||
1d. Clear, go south | |||
2. Take warp in center of room | |||
3. Clear 2 Wolves and 1 Pan Arms, go west | |||
4. Go north to press timed switch, then go south | |||
5. Clear, go south (ignore hallway enemies) | |||
6. Clear, go south to press timed switch, then go west | |||
7. Light switch is in middle of room surrounded by walls and must be held. Clear, one team go east and one team go west | |||
8. One person kill boxes while the other goes north | |||
9. Press switch and return to room 8, avoiding hallway Garanz | |||
Everyone return to room 7 and go north to exit | |||
|} | |} | ||
Revision as of 20:12, 6 February 2022
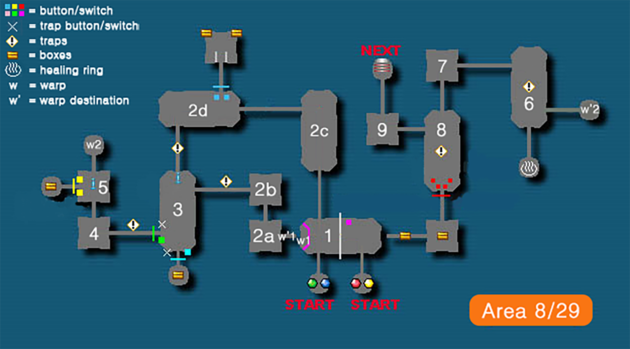
Area 8
|
1. Clear, then press button to allow one team to warp and other team go north Warp route: 2a. Clear, go north 2b. Clear, go west Door route: 2c. Clear, go west 2d. Clear, go south 3. Clear, attack left switch on west door to open and go west 4. Clear, go north 5. Clear, go north and warp 6. Clear, go west 7. Clear, go south 8. Clear, go west 9. Clear, go north to exit |
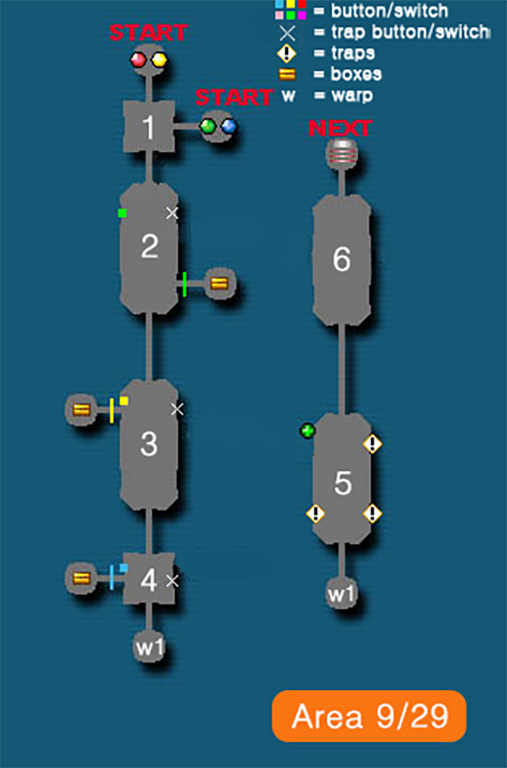
Area 9
|
1. Clear, go east 2. Clear, go north (ignore hallway enemies) 3. Clear, go east, warp 4. Clear, go east 5. Clear, go north to exit |
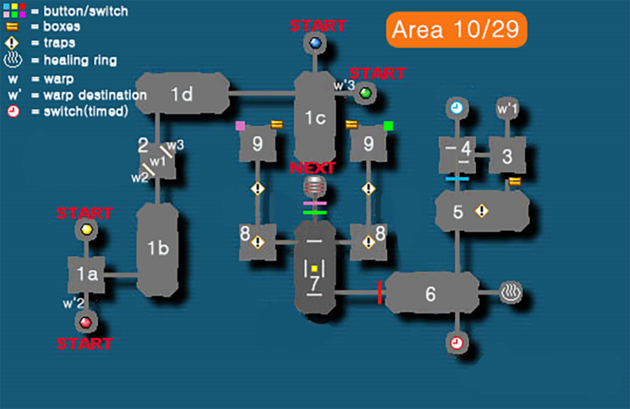
Area 10
|
Team A (southwest): 1a. Clear, go east 1b. Clear, go north Team B (north): 1c. Go to south of room to trigger spawn, Clear, go west 1d. Clear, go south 2. Take warp in center of room 3. Clear 2 Wolves and 1 Pan Arms, go west 4. Go north to press timed switch, then go south 5. Clear, go south (ignore hallway enemies) 6. Clear, go south to press timed switch, then go west 7. Light switch is in middle of room surrounded by walls and must be held. Clear, one team go east and one team go west 8. One person kill boxes while the other goes north 9. Press switch and return to room 8, avoiding hallway Garanz Everyone return to room 7 and go north to exit |
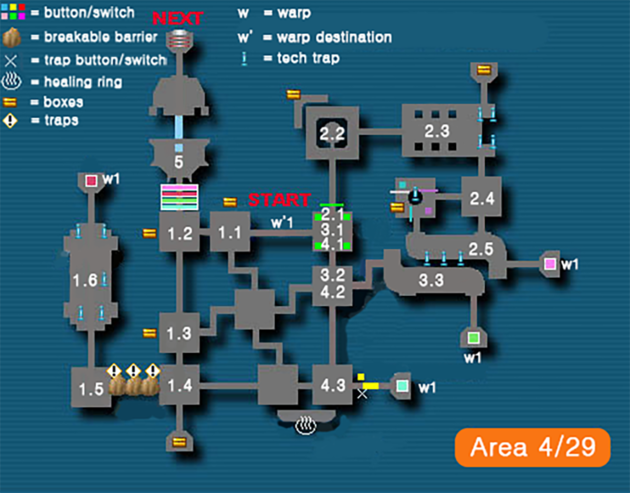
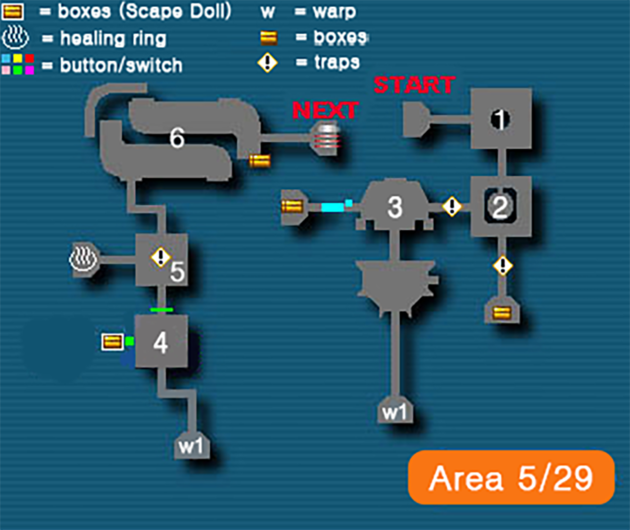
Area 4
|
Choose one player each for the following routes: 1.1 Go west 1.2 Clear, go south 1.3 Go south 1.4 Clear, go west 1.5 Clear, go north 1.6 Clear, go north, press switch and warp 2.1 Press four corner buttons and go north 2.2 Clear, go east 2.3 Clear, go south 2.4 Clear, go south 2.5 Clear, go west, press switch and warp 3.1 Clear, go south 3.2 Clear, go east 3.3 Clear, go south, press switch and warp 4.1 Clear, go south 4.2 Clear, go south 4.3 Clear, go east, press north switch to unlock gate and continue. Press switch and warp After warping, all players go to room 5 5. Press switch to raise bridge, Clear, go north to exit |
Area 5
|
1. Clear, go south (only need to kill rappy to west?) 2. Clear, go west 3. Clear, go south and warp 4. Clear, go north 5. Clear, go north 6. Clear, go east to exit (ignore hallway Hilde) |
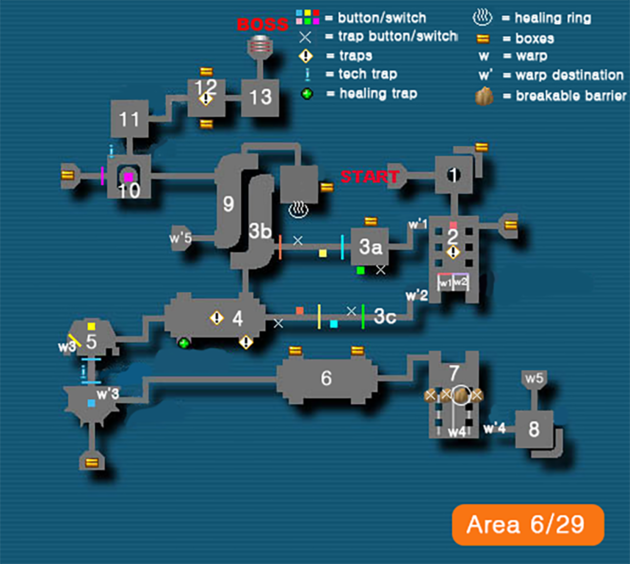
Area 6
|
1. Clear, go south 2. Press button, have one team use the west warp which allows the other team to use the east warp Team A (west warp/w1): 3a. Press southwest switch, Clear. Go west when door opens and press south switch, then continue west when door opens 3b. Clear, go south Team B (east warp/w2): 3c. Go west when door opens, then press south switch. Continue west when next door opens and press north switch, then continue west to 4 4. Clear, go west 5. Press switch to allow one player to warp, then that player presses switch to allow others to cross bridge. Clear, go southeast 6. Clear, go east 7. Break the third barrier from the door to proceed to the south wall and warp 8. Clear, go north, warp 9. Clear, go west 10. Clear, go north 11. Clear, go east (ignore hallway Monest) 12. Clear, go east 13. Clear, go north to boss |
