Random Attack Xrd REV 4: Difference between revisions
From Ephinea PSO Wiki
(Added best route for each enemy chart) |
|||
| Line 426: | Line 426: | ||
|- | |- | ||
|[[Ze Boota]] (69) | |[[Ze Boota]] (69) | ||
|[[Crater East]] (<span style="color:#EE4B2B">Red</span>) → [[Crater West]] (<span style="color:#00FF00">Green</span>) → [[Crater South]] (<span style="color:#00FF00">Green</span>) / [[Crater North]] (<span style="color:#EE4B2B">Red</span>) → [[Crater Interior]] (<span style="color:#EE4B2B">Red</span>) | |[[Crater East]] (<span style="color:#EE4B2B">Red</span>) → [[Crater West]] (<span style="color:#00FF00">Green</span>) → ''[[Crater South]] (<span style="color:#00FF00">Green</span>)'' / [[Crater North]] (<span style="color:#EE4B2B">Red</span>) → [[Crater Interior]] (<span style="color:#EE4B2B">Red</span>) | ||
|- | |- | ||
|[[Ba Boota]] (53) | |[[Ba Boota]] (53) | ||
|[[Crater East]] (<span style="color:#00FF00">Green</span>) → [[Crater West]] → [[Crater South]] (<span style="color:#00FF00">Green</span>) → [[Crater North]] (<span style="color:#EE4B2B">Red</span>) / [[Crater Interior]] | |[[Crater East]] (<span style="color:#00FF00">Green</span>) → [[Crater West]] → [[Crater South]] (<span style="color:#00FF00">Green</span>) → ''[[Crater North]] (<span style="color:#EE4B2B">Red</span>)'' / [[Crater Interior]] | ||
|- | |- | ||
|[[Astark]] (55) | |[[Astark]] (55) | ||
| Line 435: | Line 435: | ||
|- | |- | ||
|[[Dorphon]] (30) | |[[Dorphon]] (30) | ||
|[[Crater East]] (<span style="color:#00FF00">Green</span>) → [[Crater West]] (<span style="color:#00FF00">Green</span>) / [[Crater South]] (<span style="color:#00FF00">Green</span>) → [[Crater South]] (<span style="color:#00FF00">Green</span>) / [[Crater North]] → [[Crater Interior]] (<span style="color:#00FF00">Green</span>) | |[[Crater East]] (<span style="color:#00FF00">Green</span>) → ''[[Crater West]] (<span style="color:#00FF00">Green</span>)'' / [[Crater South]] (<span style="color:#00FF00">Green</span>) → [[Crater South]] (<span style="color:#00FF00">Green</span>) / ''[[Crater North]]'' → [[Crater Interior]] (<span style="color:#00FF00">Green</span>) | ||
|- | |- | ||
|[[Satellite Lizard]] (64) | |[[Satellite Lizard]] (64) | ||
| Line 441: | Line 441: | ||
|- | |- | ||
|[[Yowie]] (39) | |[[Yowie]] (39) | ||
|[[Crater East]] (<span style="color:#00FF00">Green</span>) → [[Crater West]] (<span style="color:#EE4B2B">Red</span>) → [[Crater North]] (<span style="color:#00FF00">Green</span>) / [[Crater Interior]] (<span style="color:#00FF00">Green</span>) → [[Subterranean Desert 3]] (<span style="color:#00FF00">Green</span>) | |[[Crater East]] (<span style="color:#00FF00">Green</span>) → [[Crater West]] (<span style="color:#EE4B2B">Red</span>) → ''[[Crater North]] (<span style="color:#00FF00">Green</span>)'' / [[Crater Interior]] (<span style="color:#00FF00">Green</span>) → [[Subterranean Desert 3]] (<span style="color:#00FF00">Green</span>) | ||
|- | |- | ||
|[[Sand Rappy]] (56) | |[[Sand Rappy]] (56) | ||
| Line 468: | Line 468: | ||
|} | |} | ||
<br><br><br><br><br> | Note: Areas marked with ''Italic'' is considered an alternative route. <br><br><br><br><br> | ||
==Quest Maps== | ==Quest Maps== | ||
Revision as of 18:31, 20 November 2025
| Episode 4 | |||||||||||||||||
|---|---|---|---|---|---|---|---|---|---|---|---|---|---|---|---|---|---|
| Category: | |||||||||||||||||
| Info: | Fight off swarms of monsters in various areas. Can you make it to the end? | ||||||||||||||||
| Description: | Venture through a randomized series of maps. | ||||||||||||||||
| Reward: | Normal: 1200 Hard: 2900 Very Hard: 7800 Ultimate: 19000 |
||||||||||||||||
| Author: | Ender | ||||||||||||||||
| Languages: | English | ||||||||||||||||
| Total XP | |||||||||||||||||
|
|
|||||||||||||||||
Routing
Each floor in this quest has a randomized split. This quest always starts in Crater East, and 3 other areas are randomly chosen from the rest. The quest always ends in the Meteor Impact Site with either Saint-Milion or Shambertin (chosen at random).
Enemy Counts
- Note: Bracketed numbers indicate potential range encountered per run. Only one of Saint-Milion or Shambertin will be encountered, and either may spawn as Kondrieu as usual.
| Crater East | |
|---|---|
| Enemy | Count |
| Boota | 6 + (7/0) [13] |
| Ze Boota | 4 + (4/6) [14] |
| Ba Boota | 6 + (4/3) [13] |
| Satellite Lizard | 4 + (4/4) [12] |
| Yowie | 1 + (5/2) [8] |
| Sand Rappy | 5 + (4/4) [13] |
| Zu | 1 + (1/1) [3] |
| Astark | 3 + (0/6) [9] |
| Dorphon | 0 + (1/0) [1] |
| Crater West | |
|---|---|
| Enemy | Count |
| Boota | 8 + (12/7) [27] |
| Ze Boota | 4 + (9/2) [15] |
| Ba Boota | 4 + (5/5) [14] |
| Satellite Lizard | 0 + (18/13) [31] |
| Yowie | 0 + (9/11) [20] |
| Sand Rappy | 0 + (9/6) [15] |
| Zu | 2 + (1/1) [4] |
| Astark | 6 + (9/4) [19] |
| Dorphon | 2 + (1/0) [3] |
| Crater South | |
|---|---|
| Enemy | Count |
| Boota | 4 + (8/2) [14] |
| Ze Boota | 0 + (10/5) [15] |
| Ba Boota | 6 + (12/4) [22] |
| Satellite Lizard | 2 + (5/8) [15] |
| Yowie | 0 + (5/6) [11] |
| Sand Rappy | 0 + (2/3) [5] |
| Zu | 2 + (2/5) [9] |
| Astark | 0 + (5/3) [8] |
| Dorphon | 0 + (4/3) [7] |
| Crater North | |
|---|---|
| Enemy | Count |
| Boota | 1 + (4/3) [8] |
| Ze Boota | 6 + (2/4) [12] |
| Ba Boota | 0 + (0/2) [2] |
| Satellite Lizard | 4 + (7/4) {15] |
| Yowie | 3 + (7/3) [13] |
| Sand Rappy | 2 + (2/2) [6] |
| Zu | 9 + (6/2) [17] |
| Astark | 5 + (0/4) [9] |
| Dorphon | 2 + (1/1) [4] |
| Crater Interior | |
|---|---|
| Enemy | Count |
| Boota | 3 + (9/0) [12] |
| Ze Boota | 4 + (3/6) [13] |
| Ba Boota | 2 + (0/0) [2] |
| Satellite Lizard | 7 + (11/16) [34] |
| Yowie | 4 + (6/5) [15] |
| Sand Rappy | 8 + (0/0) [8] |
| Zu | 1 + (1/15) [17] |
| Astark | 1 + (3/4) [8] |
| Dorphon | 4 + (10/1) [15] |
| Subterranean Desert 1 | |
|---|---|
| Enemy | Count |
| Goran | 4 + (2/19) [25] |
| Pyro Goran | 0 + (28/10) [38] |
| Goran Detonator | 3 + (5/8) [16] |
| Satellite Lizard | 3 + (8/10) [21] |
| Yowie | 0 + (1/9) [10] |
| Sand Rappy | 0 + (5/17) [22] |
| Zu | 0 + (2/1) [3] |
| Merissa A | 0 + (13/6) [19] |
| Girtablulu | 1 + (1/0) [2] |
| Subterranean Desert 2 | |
|---|---|
| Enemy | Count |
| Goran | 7 + (6/11) [24] |
| Pyro Goran | 2 + (6/7) [15] |
| Goran Detonator | 0 + (4/3) [7] |
| Satellite Lizard | 5 + (4/10) [19] |
| Yowie | 2 + (2/7) [11] |
| Sand Rappy | 0 + (6/0) [6] |
| Zu | 1 + (4/0) [5] |
| Merissa A | 10 + (4/20) [34] |
| Girtablulu | 1 + (3/1) [5] |
| Subterranean Desert 3 | |
|---|---|
| Enemy | Count |
| Goran | 8 + (4/10) [22] |
| Pyro Goran | 3 + (6/10) [19] |
| Goran Detonator | 4 + (5/3) [12] |
| Satellite Lizard | 5 + (3/8) [16] |
| Yowie | 4 + (8/7) [19] |
| Sand Rappy | 6 + (6/15) [27] |
| Zu | 3 + (2/14) [19] |
| Merissa A | 7 + (6/3) [16] |
| Girtablulu | 1 + (6/0) [7] |
| Bosses | |
|---|---|
| Meteor Impact Site | |
| Enemy | Count |
| Shambertin | 1 |
| Saint-Milion | 1 |
| Total | |||
|---|---|---|---|
| Enemy | Count | Enemy | Count |
| Boota | 6-57 [74} | Goran | 0-59 [71] |
| Ze Boota | 8-43 [69] | Pyro Goran | 0-50 [72] |
| Ba Boota | 9-39 [53] | Goran Detonator | 0-24 [72] |
| Astark | 3-34 [55] | Merissa A | 0-56 [69] |
| Dorphon | 0-22 [30] | Girtablulu | 0-13 [14] |
| Saint-Milion | 0-1 [1] | ||
| Sand Rappy | 15-56 [102] | Shambertin | 0-1 [1] |
| Satellite Lizard | 31-64 [167] | Box Type | Count |
| Yowie | 13-39 [107] | Box | 33-80 [145] |
| Zu | 6-50 [77] | ||
| Boxes | |
|---|---|
| Box Type | Count |
| Crater West | |
| Box | 8 + (0/8) [16] |
| Crater South | |
| Box | 10 + (14/6) [30] |
| Crater North | |
| Box | 0 + (8/6) [14] |
| Crater Interior | |
| Box | 0 + (7/9) [16] |
| Subterranean Desert 1 | |
| Box | 0 + (10/11) [21] |
| Subterranean Desert 2 | |
| Box | 14 + (5/0) [19] |
| Subterranean Desert 3 | |
| Box | 11 + (10/8) [29] |
| Meteor Impact Site | |
| Box (Meseta) | 2 |
| Box (Tool) | 2 |
| Box (Tool) | 2 |
| Box (Armor) | 8 |
| Box (Weapon) | 8 |
Note: Areas marked with Italic is considered an alternative route.
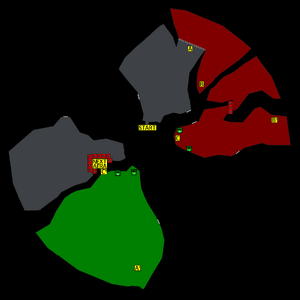
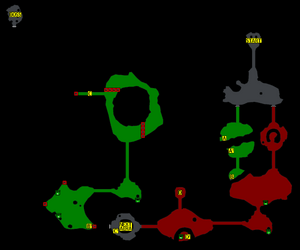
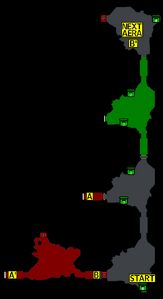
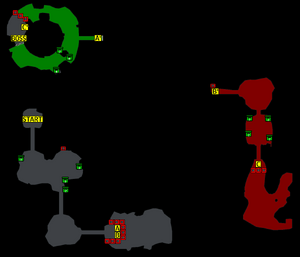
Quest Maps
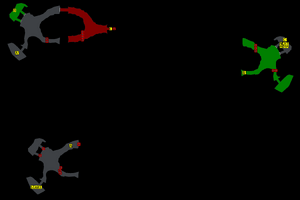
Crater (Eastern Route)
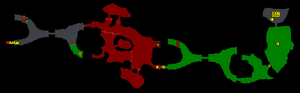
Crater (Western Route)
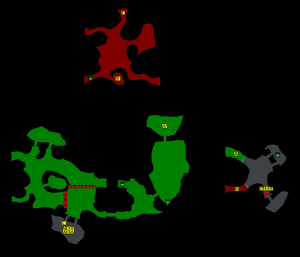
Crater (Southern Route)
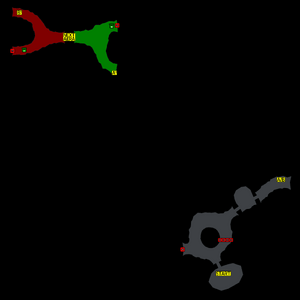
Crater (Northern Route)
Crater Interior
Subterranean Desert 1
Subterranean Desert 2
Subterranean Desert 3
).png)
).png)
).png)
).png)
.png)
.png)
.png)
.png)