Random Attack Xrd REV 4
| Episode 4 | |||||||||||||||||
|---|---|---|---|---|---|---|---|---|---|---|---|---|---|---|---|---|---|
| Category: | |||||||||||||||||
| Info: | Fight off swarms of monsters in various areas. Can you make it to the end? | ||||||||||||||||
| Description: | Venture through a randomized series of maps. | ||||||||||||||||
| Reward: | Normal: 1200 Hard: 2900 Very Hard: 7800 Ultimate: 19000 |
||||||||||||||||
| Author: | Ender | ||||||||||||||||
| Languages: | English | ||||||||||||||||
| Total XP | |||||||||||||||||
|
|
|||||||||||||||||
Routing
In this quest, the player(s) will progress through four out of eight possible areas (chosen randomly) in order. This quest always starts in Crater East, and 3 other areas are randomly chosen from the rest. The quest always ends in the Meteor Impact Site with either Saint-Milion or Shambertin (chosen at random). The full order is the same as the intended area progression through Episode 4, which is as follows:
- Crater East (Start of Quest)
- Crater West
- Crater South
- Crater North
- Crater Interior
- Subterranean Desert 1
- Subterranean Desert 2
- Subterranean Desert 3
When selecting areas, it is not possible for a later area to come before an earlier one. For example, this means that if the first two areas the quest selects are Crater East then Crater North, neither of Crater West or Crater South can be selected, as Crater North is later than both of those.
Enemy Counts
- Note: Each area that you encounter has two routes which only one route will be used per run. The enemy count is color coded with the quest maps below. Only one of Saint-Milion or Shambertin will be encountered, and either may spawn as Kondrieu as usual.
| Crater East | |
|---|---|
| Enemy | Count |
| Boota | 6 + (7/0) [13] |
| Ze Boota | 4 + (4/6) [14] |
| Ba Boota | 6 + (4/3) [13] |
| Satellite Lizard | 4 + (4/4) [12] |
| Yowie | 1 + (5/2) [8] |
| Sand Rappy | 5 + (4/4) [13] |
| Zu | 1 + (1/1) [3] |
| Astark | 3 + (0/6) [9] |
| Dorphon | 0 + (1/0) [1] |
| Crater West | |
|---|---|
| Enemy | Count |
| Boota | 8 + (12/7) [27] |
| Ze Boota | 4 + (9/2) [15] |
| Ba Boota | 4 + (5/5) [14] |
| Satellite Lizard | 0 + (18/13) [31] |
| Yowie | 0 + (9/11) [20] |
| Sand Rappy | 0 + (9/6) [15] |
| Zu | 2 + (1/1) [4] |
| Astark | 6 + (9/4) [19] |
| Dorphon | 2 + (1/0) [3] |
| Crater South | |
|---|---|
| Enemy | Count |
| Boota | 4 + (8/2) [14] |
| Ze Boota | 0 + (10/5) [15] |
| Ba Boota | 6 + (12/4) [22] |
| Satellite Lizard | 2 + (5/8) [15] |
| Yowie | 0 + (5/6) [11] |
| Sand Rappy | 0 + (2/3) [5] |
| Zu | 2 + (2/5) [9] |
| Astark | 0 + (5/3) [8] |
| Dorphon | 0 + (4/3) [7] |
| Crater North | |
|---|---|
| Enemy | Count |
| Boota | 1 + (4/3) [8] |
| Ze Boota | 6 + (2/4) [12] |
| Ba Boota | 0 + (0/2) [2] |
| Satellite Lizard | 4 + (7/4) [15] |
| Yowie | 3 + (7/3) [13] |
| Sand Rappy | 2 + (2/2) [6] |
| Zu | 9 + (6/2) [17] |
| Astark | 5 + (0/4) [9] |
| Dorphon | 2 + (1/1) [4] |
| Crater Interior | |
|---|---|
| Enemy | Count |
| Boota | 3 + (9/0) [12] |
| Ze Boota | 4 + (3/6) [13] |
| Ba Boota | 2 + (0/0) [2] |
| Satellite Lizard | 7 + (11/16) [34] |
| Yowie | 4 + (6/5) [15] |
| Sand Rappy | 8 + (0/0) [8] |
| Zu | 1 + (1/15) [17] |
| Astark | 1 + (3/4) [8] |
| Dorphon | 4 + (10/1) [15] |
| Subterranean Desert 1 | |
|---|---|
| Enemy | Count |
| Goran | 4 + (2/19) [25] |
| Pyro Goran | 0 + (28/10) [38] |
| Goran Detonator | 3 + (5/8) [16] |
| Satellite Lizard | 3 + (8/10) [21] |
| Yowie | 0 + (1/9) [10] |
| Sand Rappy | 0 + (5/17) [22] |
| Zu | 0 + (2/1) [3] |
| Merissa A | 0 + (13/6) [19] |
| Girtablulu | 1 + (1/0) [2] |
| Subterranean Desert 2 | |
|---|---|
| Enemy | Count |
| Goran | 7 + (6/11) [24] |
| Pyro Goran | 2 + (6/7) [15] |
| Goran Detonator | 0 + (4/3) [7] |
| Satellite Lizard | 5 + (4/10) [19] |
| Yowie | 2 + (2/7) [11] |
| Sand Rappy | 0 + (6/0) [6] |
| Zu | 1 + (4/0) [5] |
| Merissa A | 10 + (4/20) [34] |
| Girtablulu | 1 + (3/1) [5] |
| Subterranean Desert 3 | |
|---|---|
| Enemy | Count |
| Goran | 8 + (4/10) [22] |
| Pyro Goran | 3 + (6/10) [19] |
| Goran Detonator | 4 + (5/3) [12] |
| Satellite Lizard | 5 + (3/8) [16] |
| Yowie | 4 + (8/7) [19] |
| Sand Rappy | 6 + (6/15) [27] |
| Zu | 3 + (2/14) [19] |
| Merissa A | 7 + (6/3) [16] |
| Girtablulu | 1 + (6/0) [7] |
| Bosses | |
|---|---|
| Meteor Impact Site | |
| Enemy | Count |
| Shambertin | 1 |
| Saint-Milion | 1 |
| Total | |||
|---|---|---|---|
| Enemy | Count | Enemy | Count |
| Boota | 6-57 [74] | Goran | 0-59 [71] |
| Ze Boota | 8-43 [69] | Pyro Goran | 0-50 [72] |
| Ba Boota | 9-39 [53] | Goran Detonator | 0-24 [72] |
| Astark | 3-34 [55] | Merissa A | 0-56 [69] |
| Dorphon | 0-22 [30] | Girtablulu | 0-13 [14] |
| Saint-Milion | 0-1 [1] | ||
| Sand Rappy | 15-56 [102] | Shambertin | 0-1 [1] |
| Satellite Lizard | 31-64 [167] | Box Type | Count |
| Yowie | 13-39 [107] | Box | 33-80 [145] |
| Zu | 6-50 [77] | ||
| Boxes | |
|---|---|
| Box Type | Count |
| Crater West | |
| Box | 8 + (0/8) [16] |
| Crater South | |
| Box | 10 + (14/6) [30] |
| Crater North | |
| Box | 0 + (8/6) [14] |
| Crater Interior | |
| Box | 0 + (7/9) [16] |
| Subterranean Desert 1 | |
| Box | 0 + (10/11) [21] |
| Subterranean Desert 2 | |
| Box | 14 + (5/0) [19] |
| Subterranean Desert 3 | |
| Box | 11 + (10/8) [29] |
| Meteor Impact Site | |
| Box (Meseta) | 2 |
| Box (Tool) | 2 |
| Box (Tool) | 2 |
| Box (Armor) | 8 |
| Box (Weapon) | 8 |
Note: Areas marked with Italic is considered an alternative best route.
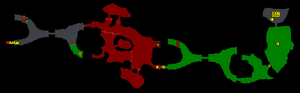
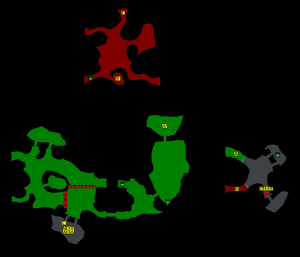
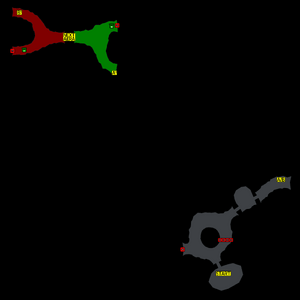
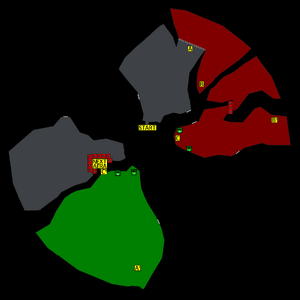
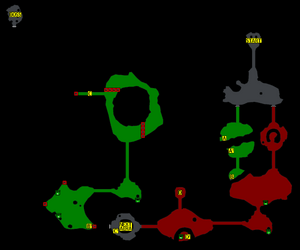
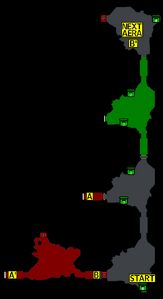
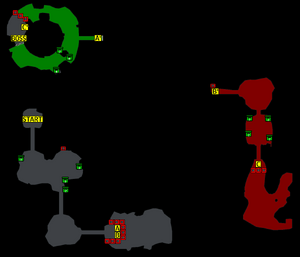
Quest Maps
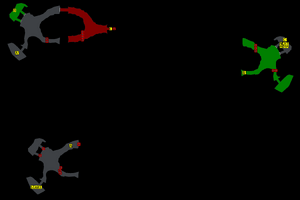
Crater (Eastern Route)
Crater (Western Route)
Crater (Southern Route)
Crater (Northern Route)
Crater Interior
Subterranean Desert 1
Subterranean Desert 2
Subterranean Desert 3
).png)
).png)
).png)
).png)
.png)
.png)
.png)
.png)