Episode 2: Stage 1/Guide
General Information
- Ignore enemies in the hallways unless otherwise directed.
- HUcasts can use a Handgun at Level 6 instead of Level 7 if they feed their Mag a combination of 7 Antidotes/Antiparalysis. Since HUcasts start with only 3 Antidotes and 3 Antiparalysis, they will need another player to drop one of these items, or to find an additional Anti type item to feed their Mag.
- Save Monogrinders/Digrinders/Trigrinders for the best set of Daggers you can find with hit or A.Beast to use in the boss fight against Barba Ray.
- Zonde and Resta Techniques can be useful for a Force if found. As Resta 3 does not drop in this stage, other players will have to rely on Monomates to heal.
- Keep track of how many Knight/Power units your party has and make sure they are distributed accordingly. On a similar note, keep track of how many slots each player has available. Even Forces can benefit from the increased ATP, as a Saber is preferable for them to techniques during the fight against Barba Ray.
- The pillars that stomp deal 50 set damage. There is one stomping pillar in Area 6 that deals 100 set damage.
Area 1
|
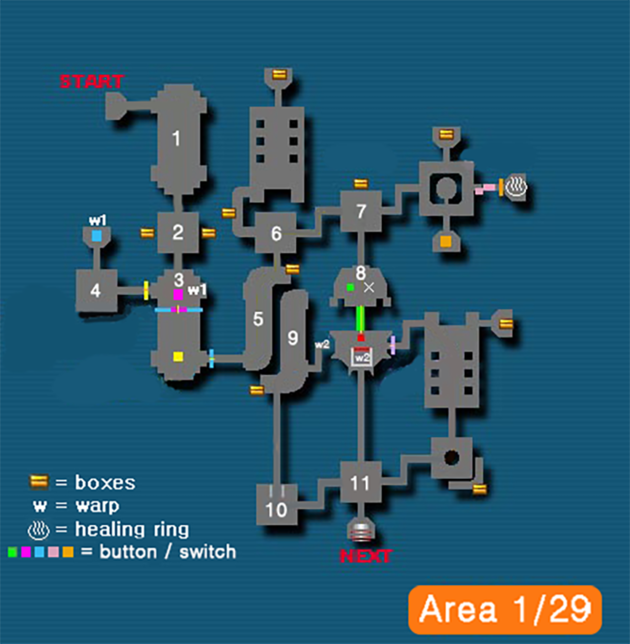
1. Clear the following spawns:
2. Clear 2 Poison Lilies and loot the boxes 3. Stand on the button to let one player go south through the fence. All remaining players wait at the west door. Once through the fence, the solo player breaks the walls and stands on the button briefly to let the main party through the western door. Standing on the button spawns foie traps from the ground. The solo player destroys the Southern, Western, then Northern foie traps in that order, then waits at the eastern door. 4. Clear Monest and Mothmants; loot boxes in the southwest; head north, press the button, and warp. 5. Clear the following spawns, then loot the boxes:
6. Clear the following spawns, then head East:
7. Clear 3 Dimenians, then go South 8. Press west switch to raise bridge. One player stands on the switch to let the others warp, then waits for the south exit to open 9. Clear 2 Grass Assassins, then go South 10. Clear 1 Hildebear, then head East. 11. Clear 3 La Dimenians, then head South to the next area. |
Area 2
|
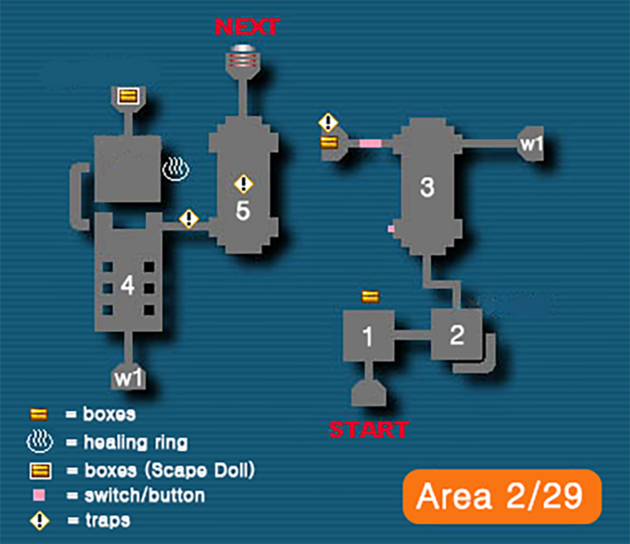
This area is identical to the Temple portion of the quest Respective Tomorrow. 1. Clear the following spawns and loot the boxes:
2. Watch out for a foie trap to the left upon entering. Clear 1 La Dimenian and 2 Dimenians before heading North. 3. Clear the following spawns:
4. Clear the following spawns:
If desired, there is a ring and a group of boxes containing a Scape Doll to the North. Otherwise, head East. Hug the right side of the hallway to avoid the traps, opening boxes as you walk. 5. Clear the following spawns, while watching out for damage traps:
|
Area 3
|
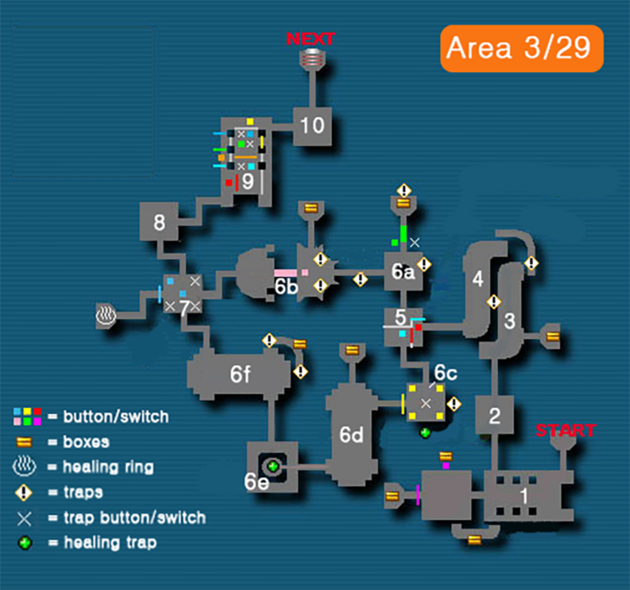
1. Clear, go north 2. Clear, go north 3. Clear, go northeast 4. Clear, go southwest 5. Press button to allow two players through south, then those players press button to allow first two players through north Team A (north): 6a. Clear, go west (ignore hallway Hilde) 6b. Press button to raise bridge (this triggers floor traps). Clear and go west Team B (south): 6c. Press four corner buttons and go west 6d. Clear, go west 6e. Clear, go north 6f. Clear, go northwest 7. Clear, go north 8. Clear, go east 9. (see map for color coded key) 9.1 Press first button to allow Player 1 through the gate. 9.2 Player 1 presses the east button to allow all three players through the gate on the west wall. 9.3 Players 2-4 press the next button on the west wall to allow the Player 1 through their gate. 9.4 Player 1 presses the first switch to the west to allow Players 2-4 through the next gate 9.5 Player 1 presses the last switch to the east to allow Players 2-4 through the next gate. 9.6 Players 2-4 press the switch on the north wall to allow Player 1 through their last gate (do not warp). All players go east 10. Clear, go north to exit |
Area 4
|
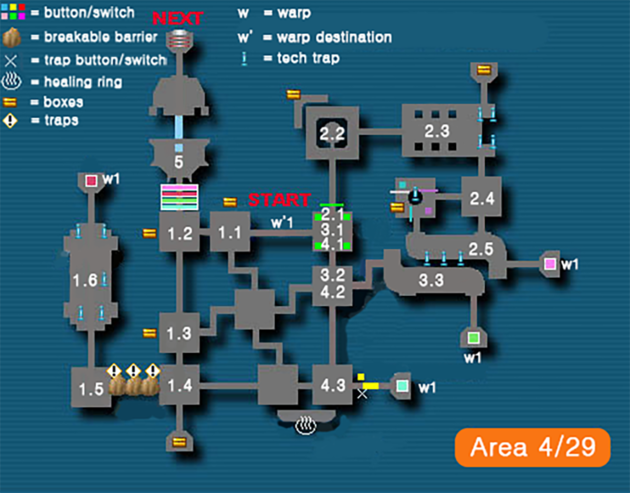
Choose one player each for the following routes: 1.1 Go west 1.2 Clear, go south 1.3 Go south 1.4 Clear, go west 1.5 Clear, go north 1.6 Clear, go north, press switch and warp 2.1 Press four corner buttons and go north 2.2 Clear, go east 2.3 Clear, go south 2.4 Clear, go south 2.5 Clear, go west, press switch and warp 3.1 Clear, go south 3.2 Clear, go east 3.3 Clear, go south, press switch and warp 4.1 Clear, go south 4.2 Clear, go south 4.3 Clear, go east, press north switch to unlock gate and continue. Press switch and warp After warping, all players go to room 5 5. Press switch to raise bridge, Clear, go north to exit |
Area 5
|
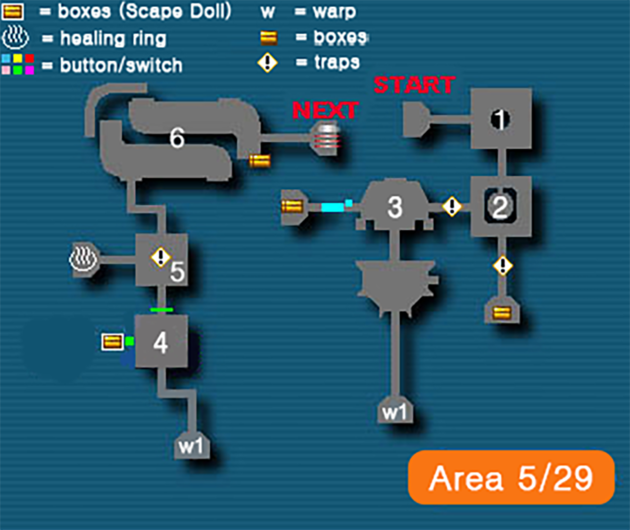
1. Clear, go south (only need to kill rappy to west?) 2. Clear, go west 3. Clear, go south and warp 4. Clear, go north 5. Clear, go north 6. Clear, go east to exit (ignore hallway Hilde) |
Area 6
|
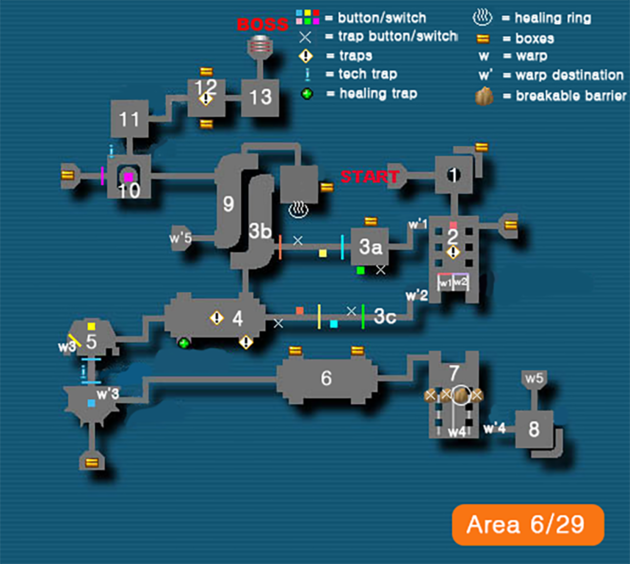
1. Clear, go south 2. Press button, have one team use the west warp which allows the other team to use the east warp Team A (west warp/w1): 3a. Press southwest switch, Clear. Go west when door opens and press south switch, then continue west when door opens 3b. Clear, go south Team B (east warp/w2): 3c. Go west when door opens, then press south switch. Continue west when next door opens and press north switch, then continue west to 4 4. Clear, go west 5. Press switch to allow one player to warp, then that player presses switch to allow others to cross bridge. Clear, go southeast 6. Clear, go east 7. Break the third barrier from the door to proceed to the south wall and warp 8. Clear, go north, warp 9. Clear, go west 10. Clear, go north 11. Clear, go east (ignore hallway Monest) 12. Clear, go east 13. Clear, go north to boss |
