Letter from Lionel: Difference between revisions
From Ephinea PSO Wiki
No edit summary |
m (→Enemy Counts) |
||
| (17 intermediate revisions by 5 users not shown) | |||
| Line 9: | Line 9: | ||
|author=Sonic Team | |author=Sonic Team | ||
|langs=English, Japanese | |langs=English, Japanese | ||
|prereqs={{Quest link|Claiming a Stake}}<br>{{Quest link|Magnitude of Metal}}<br>{{Quest link|Battle Training}} | |||
|nxpon=2243 | |nxpon=2243 | ||
|hxpon=12130 | |hxpon=12130 | ||
| Line 18: | Line 19: | ||
|uxpoff=70464 | |uxpoff=70464 | ||
}} | }} | ||
==Quest details== | |||
All parts must be found in the following order. If you do not find them in order, the parts will not show up. | |||
# '''Letter from Lionel''': The first item to be given to the player when the quest starts. | |||
# '''An android's head''': In Forest 2, find the room with a backward, pink "[E]". Talk to the RAmar standing in the room. To the left will be a warp pad that you'll take to the upper level. Another warp pad across the upper level will take you down to gold box. Turn around to find Lionel's head. | |||
# '''An android's right arm''': In Forest 2, a sky blue door with three dots [.ॱ.] that was previously locked will be unlocked after finding the android's head. Enter, walk about halfway across the room, and a Hildebear will spawn carrying Lionel's right arm. | |||
# '''An android's right leg''': Go back to Forest 1 and you'll find Lionel's right leg in a river in the largest room of the area. | |||
# '''An android's left leg''': Continue to Cave 2. Play through the level and you'll come across Lionel's left leg and the very end. | |||
# '''Lionel's body and left arm''': Use a Telepipe to get back to Pioneer 2. You'll find the same RAmar that you spoke to in Forest 2 standing in front and to the right of the Hunter's Guild. Speak to him to get the body and left arm. | |||
==Enemy Counts== | ==Enemy Counts== | ||
{|class="wikitable questTable" style="display:inline-table;vertical-align:top;" | {|class="wikitable questTable" style="display:inline-table;vertical-align:top;" | ||
| Line 24: | Line 35: | ||
!Enemy | !Enemy | ||
!Count | !Count | ||
|- | |- | ||
|[[Booma]] | |[[Booma]] | ||
| Line 43: | Line 44: | ||
|[[Gigobooma]] | |[[Gigobooma]] | ||
|1 | |1 | ||
|- | |||
|[[Savage Wolf]] | |||
|7 | |||
|- | |||
|[[Barbarous Wolf]] | |||
|2 | |||
|- | |- | ||
|[[Monest]] | |[[Monest]] | ||
|1 | |1 | ||
|- | |- | ||
|[[Rag Rappy]] | |||
|2 | |||
|} | |} | ||
{|class="wikitable questTable" style="display:inline-table;vertical-align:top;" | {|class="wikitable questTable" style="display:inline-table;vertical-align:top;" | ||
| Line 53: | Line 62: | ||
!Enemy | !Enemy | ||
!Count | !Count | ||
|- | |- | ||
|[[Booma]] | |[[Booma]] | ||
| Line 72: | Line 71: | ||
|[[Gigobooma]] | |[[Gigobooma]] | ||
|4 | |4 | ||
|- | |||
|[[Savage Wolf]] | |||
|12 | |||
|- | |||
|[[Barbarous Wolf]] | |||
|2 | |||
|- | |- | ||
|[[Monest]] | |[[Monest]] | ||
|1 | |1 | ||
|- | |||
|[[Rag Rappy]] | |||
|15 | |||
|- | |- | ||
|[[Hildebear]] | |[[Hildebear]] | ||
|5 | |5 | ||
|} | |} | ||
{|class="wikitable questTable" style="display:inline-table;vertical-align:top;" | {|class="wikitable questTable" style="display:inline-table;vertical-align:top;" | ||
!colspan=2|[[ | !colspan=2|[[Cave|Cave 1]] | ||
|- | |- | ||
!Enemy | !Enemy | ||
!Count | !Count | ||
|- | |- | ||
|[[Evil Shark]] | |[[Evil Shark]] | ||
| Line 98: | Line 104: | ||
|[[Poison Lily]] | |[[Poison Lily]] | ||
|11 | |11 | ||
|- | |||
|[[Grass Assassin]] | |||
|1 | |||
|- | |- | ||
|[[Nano Dragon]] | |[[Nano Dragon]] | ||
| Line 104: | Line 113: | ||
|[[Pan Arms]] | |[[Pan Arms]] | ||
|1 | |1 | ||
|} | |} | ||
{|class="wikitable questTable" style="display:inline-table;vertical-align:top;" | {|class="wikitable questTable" style="display:inline-table;vertical-align:top;" | ||
!colspan=2|[[ | !colspan=2|[[Cave|Cave 2]] | ||
|- | |- | ||
!Enemy | !Enemy | ||
!Count | !Count | ||
|- | |- | ||
|[[Evil Shark]] | |[[Evil Shark]] | ||
| | |4 | ||
|- | |- | ||
|[[Poison Lily]] | |[[Poison Lily]] | ||
|1 | |1 | ||
|- | |- | ||
|[[Grass Assassin]] | |[[Grass Assassin]] | ||
| | |1 | ||
|} | |} | ||
{|class="wikitable questTable" style="display:inline-table;vertical-align:top;" | {|class="wikitable questTable" style="display:inline-table;vertical-align:top;" | ||
| Line 146: | Line 137: | ||
!Count | !Count | ||
|- | |- | ||
|[[ | |[[Booma]] | ||
| | |34 | ||
|[[Evil Shark]] | |[[Evil Shark]] | ||
| | |29 | ||
|- | |||
|[[Gobooma]] | |||
|15 | |||
| [[Pal Shark]] | |||
| 4 | |||
|- | |||
|[[Gigobooma]] | |||
|5 | |||
| [[Guil Shark]] | |||
| 2 | |||
|- | |- | ||
|[[Savage Wolf]] | |[[Savage Wolf]] | ||
|19 | |19 | ||
|[[ | |[[Poison Lily]] | ||
| | |12 | ||
|- | |- | ||
|[[Barbarous Wolf]] | |[[Barbarous Wolf]] | ||
|4 | |4 | ||
|[[ | |[[Grass Assassin]] | ||
| | |2 | ||
|- | |- | ||
|[[ | |[[Monest]] | ||
| | |2 | ||
| [[Nano Dragon]] | | [[Nano Dragon]] | ||
| 1 | | 1 | ||
|- | |- | ||
|[[ | |[[Rag Rappy]] | ||
| | |17 | ||
| [[ | |[[Pan Arms]] | ||
| | |1 | ||
|- | |- | ||
|[[Hildebear]] | |[[Hildebear]] | ||
|5 | |5 | ||
| | ! colspan="2" | | ||
|} | |} | ||
{|class="wikitable" style="display:inline-table;vertical-align:top;" | {|class="wikitable" style="display:inline-table;vertical-align:top;" | ||
| Line 221: | Line 190: | ||
|41 | |41 | ||
|[[Box|Box]] | |[[Box|Box]] | ||
| | |44 | ||
|- | |- | ||
|[[Box|Box (Armor)]] | |[[Box|Box (Armor)]] | ||
|2 | |2 | ||
|[[Box|Box (Armor)]] | |[[Box|Box (Armor)]] | ||
| | |3 | ||
|- | |||
|[[Box|Box (Weapon)]] | |||
|3 | |||
|[[Box|Box (Weapon)]] | |||
|3 | |||
|- | |||
|[[Box|Box (Telepipe)]] | |||
|1 | |||
|[[Box|Box (Telepipe)]] | |||
|1 | |||
|- | |- | ||
|[[Box|Box (Rareless)]] | |[[Box|Box (Rareless)]] | ||
| Line 233: | Line 212: | ||
|1 | |1 | ||
|- | |- | ||
| | ! colspan="2" | | ||
|[[Box|Box (Star Atomizer)]] | |[[Box|Box (Star Atomizer)]] | ||
|1 | |1 | ||
|- | |- | ||
!colspan=2|[[Cave|Cave 1]] | |||
!colspan=2|[[Cave|Cave 2]] | |||
!colspan=2|[[ | |||
!colspan=2|[[ | |||
|- | |- | ||
|[[Box|Box]] | |[[Box|Box]] | ||
| Line 250: | Line 223: | ||
|[[Box|Box]] | |[[Box|Box]] | ||
|7 | |7 | ||
|- | |- | ||
|[[Box|Box (Armor)]] | |[[Box|Box (Armor)]] | ||
|3 | |3 | ||
! colspan="2" rowspan="4" | | |||
| | |||
|- | |- | ||
|[[Box|Box (Weapon)]] | |[[Box|Box (Weapon)]] | ||
|3 | |3 | ||
|- | |- | ||
|[[Box|Box (Antidote)]] | |||
|2 | |||
|- | |||
|[[Box|Box (Telepipe)]] | |||
|1 | |||
|} | |} | ||
[[Category:Quests]][[Category:Episode 1 Quests]] | |||
==Quest Maps== | |||
<gallery mode="nolines" heights="300" widths="300"> | |||
Letter from Lionel (Forest 1).png | Forest 1 | |||
Letter from Lionel (Forest 2).png | Forest 2 | |||
Letter from Lionel (Cave 1).png | Cave 1 | |||
Letter from Lionel (Cave 2).png | Cave 2 | |||
Letter from Lionel (Pioneer 2).png | Pioneer 2 | |||
</gallery> | |||
[[File:Map_Legend.png|350px|]] | |||
{{Episode1Quests}} | |||
[[Category:Quests]] | |||
[[Category:Episode 1 Quests]] | |||
[[Category:Side Story Quests]] | [[Category:Side Story Quests]] | ||
Latest revision as of 20:57, 3 June 2026
| Episode 1 | |||||||||||||||||
|---|---|---|---|---|---|---|---|---|---|---|---|---|---|---|---|---|---|
| Category: | |||||||||||||||||
| Client: | Lionel | ||||||||||||||||
| Info: | A mysterious letter was delivered to the Hunter's Guild. | ||||||||||||||||
| Description: | A letter signed by Lionel is asking to rescue "all of him?" | ||||||||||||||||
| Reward: | Normal: 3000 Hard: 6000 Very Hard: 9000 Ultimate: 12000 |
||||||||||||||||
| Author: | Sonic Team | ||||||||||||||||
| Languages: | English, Japanese | ||||||||||||||||
| Prerequisites: | |||||||||||||||||
| Total XP | |||||||||||||||||
|
|
|||||||||||||||||
Quest details
All parts must be found in the following order. If you do not find them in order, the parts will not show up.
- Letter from Lionel: The first item to be given to the player when the quest starts.
- An android's head: In Forest 2, find the room with a backward, pink "[E]". Talk to the RAmar standing in the room. To the left will be a warp pad that you'll take to the upper level. Another warp pad across the upper level will take you down to gold box. Turn around to find Lionel's head.
- An android's right arm: In Forest 2, a sky blue door with three dots [.ॱ.] that was previously locked will be unlocked after finding the android's head. Enter, walk about halfway across the room, and a Hildebear will spawn carrying Lionel's right arm.
- An android's right leg: Go back to Forest 1 and you'll find Lionel's right leg in a river in the largest room of the area.
- An android's left leg: Continue to Cave 2. Play through the level and you'll come across Lionel's left leg and the very end.
- Lionel's body and left arm: Use a Telepipe to get back to Pioneer 2. You'll find the same RAmar that you spoke to in Forest 2 standing in front and to the right of the Hunter's Guild. Speak to him to get the body and left arm.
Enemy Counts
| Forest 1 | |
|---|---|
| Enemy | Count |
| Booma | 19 |
| Gobooma | 6 |
| Gigobooma | 1 |
| Savage Wolf | 7 |
| Barbarous Wolf | 2 |
| Monest | 1 |
| Rag Rappy | 2 |
| Forest 2 | |
|---|---|
| Enemy | Count |
| Booma | 15 |
| Gobooma | 9 |
| Gigobooma | 4 |
| Savage Wolf | 12 |
| Barbarous Wolf | 2 |
| Monest | 1 |
| Rag Rappy | 15 |
| Hildebear | 5 |
| Cave 1 | |
|---|---|
| Enemy | Count |
| Evil Shark | 25 |
| Pal Shark | 4 |
| Guil Shark | 2 |
| Poison Lily | 11 |
| Grass Assassin | 1 |
| Nano Dragon | 1 |
| Pan Arms | 1 |
| Cave 2 | |
|---|---|
| Enemy | Count |
| Evil Shark | 4 |
| Poison Lily | 1 |
| Grass Assassin | 1 |
| Total | |||
|---|---|---|---|
| Enemy | Count | Enemy | Count |
| Booma | 34 | Evil Shark | 29 |
| Gobooma | 15 | Pal Shark | 4 |
| Gigobooma | 5 | Guil Shark | 2 |
| Savage Wolf | 19 | Poison Lily | 12 |
| Barbarous Wolf | 4 | Grass Assassin | 2 |
| Monest | 2 | Nano Dragon | 1 |
| Rag Rappy | 17 | Pan Arms | 1 |
| Hildebear | 5 | ||
| Boxes | |||
|---|---|---|---|
| Box Type | Count | Box Type | Count |
| Forest 1 | Forest 2 | ||
| Box | 41 | Box | 44 |
| Box (Armor) | 2 | Box (Armor) | 3 |
| Box (Weapon) | 3 | Box (Weapon) | 3 |
| Box (Telepipe) | 1 | Box (Telepipe) | 1 |
| Box (Rareless) | 2 | Box (Moon Atomizer) | 1 |
| Box (Star Atomizer) | 1 | ||
| Cave 1 | Cave 2 | ||
| Box | 42 | Box | 7 |
| Box (Armor) | 3 | ||
| Box (Weapon) | 3 | ||
| Box (Antidote) | 2 | ||
| Box (Telepipe) | 1 | ||
Quest Maps

Forest 1

Forest 2
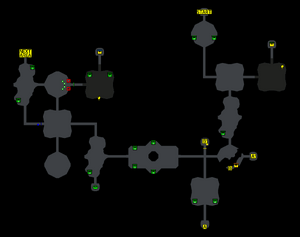
Cave 1
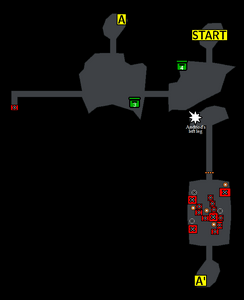
Cave 2
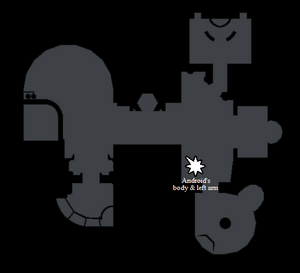
Pioneer 2
.png)
.png)
.png)
.png)
.png)
