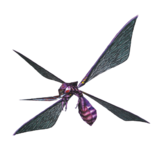
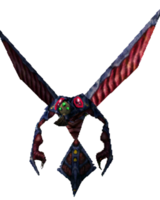
Mothmant: Difference between revisions
From Ephinea PSO Wiki
No edit summary |
|||
| (9 intermediate revisions by 5 users not shown) | |||
| Line 1: | Line 1: | ||
{{Enemy|name=Mothmant (E1)}} | {{Enemy|name=Mothmant (E1)}} | ||
{{Enemy|name=Mothmant (E2)}} | {{Enemy|name=Mothmant (E2)}} | ||
==Behavior/Mechanics== | |||
While in the air, Mothmants cannot be {{frozen}}. | |||
In Ultimate difficulty, Mothverts have a 5% chance to inflict {{poison}} if their attack will damage or push back a player. | |||
==Special activation== | |||
===Episode 1=== | |||
{{EnemySpecial|Mothmant (E1)}} | |||
===Episode 2=== | |||
{{EnemySpecial|Mothmant (E2)}} | |||
==Hunting== | ==Hunting== | ||
| Line 12: | Line 15: | ||
The following quests are recommended for hunting [[Monest]]s in Episode 1: | The following quests are recommended for hunting [[Monest]]s in Episode 1: | ||
* [VR] [[Tyrell's Ego]]: First Room (3) / First 2 Rooms (6) and side room (7) / Clear Forest (16) | * [VR] [[Tyrell's Ego]]: First Room (3) / First 2 Rooms (6) and side room (7) / Clear Forest (16) | ||
* [Government] [[1-3:Subterranean Den]]: Clear quest ( | * [Government] [[1-3:Subterranean Den]]: Clear quest (3) | ||
===Episode 2=== | ===Episode 2=== | ||
The following quests are recommended for hunting [[Monest]]s in Episode 2: | The following quests are recommended for hunting [[Monest]]s in Episode 2: | ||
* [Retrieval] [[Revisiting Darkness]]: Clear | * [Retrieval] [[Revisiting Darkness]]: Clear Temple Beta (4) | ||
==Rare Drops== | ==Rare Drops== | ||
===Episode 1=== | ===Episode 1=== | ||
{{ | {{EnemyDropTable|Mothmant (E1)|N=1|H=1|VH=1}} | ||
===Episode 2=== | ===Episode 2=== | ||
{{ | {{EnemyDropTable|Mothmant (E2)|N=1|H=1|VH=1}} | ||
{{Episode1Enemies}} | |||
{{Episode2Enemies}} | |||
[[Category:Enemies]] | |||
{{ | [[Category:Forest Enemies]] | ||
{{ | [[Category:VR Temple Enemies]] | ||
[[Category:Inflicts Poison]] | |||
Latest revision as of 20:29, 7 February 2025
Behavior/Mechanics
While in the air, Mothmants cannot be ![]() Frozen.
Frozen.
In Ultimate difficulty, Mothverts have a 5% chance to inflict ![]() Poison if their attack will damage or push back a player.
Poison if their attack will damage or push back a player.
Special activation
Episode 1
|
|
Episode 2
|
|
Hunting
Episode 1
The following quests are recommended for hunting Monests in Episode 1:
- [VR] Tyrell's Ego: First Room (3) / First 2 Rooms (6) and side room (7) / Clear Forest (16)
- [Government] 1-3:Subterranean Den: Clear quest (3)
Episode 2
The following quests are recommended for hunting Monests in Episode 2:
- [Retrieval] Revisiting Darkness: Clear Temple Beta (4)
Rare Drops
Episode 1
| Ultimate | |||||||||
|---|---|---|---|---|---|---|---|---|---|
| Gae Bolg | Mahu | Dragon Slayer | Gae Bolg | Cross Scar | Storm Wand: Indra | Mahu | Cross Scar | Dragon Slayer | Diska of Braveman |
| 1/1260 | 1/1260 | 1/1260 | 1/1260 | 1/1260 | 1/1260 | 1/1260 | 1/1260 | 1/1260 | 1/1260 |
Episode 2
| Ultimate | |||||||||
|---|---|---|---|---|---|---|---|---|---|
| Final Impact | Justy-23ST | Justy-23ST | Gae Bolg | L&K14 Combat | Storm Wand: Indra | Diska of Braveman | Cross Scar | Bravace | L&K14 Combat |
| 1/1575 | 1/1575 | 1/1575 | 1/1575 | 1/1575 | 1/1575 | 1/1575 | 1/1575 | 1/1575 | 1/1575 |
| CollapseEpisode 1 Monsters | |
|---|---|
| Forest | Rag Rappy (Rare: Al Rappy) • Savage Wolf • Barbarous Wolf • Booma • Gobooma • Gigobooma • Mothmant • Monest • Hildebear (Rare: Hildeblue) |
| Cave | Evil Shark • Pal Shark • Guil Shark • Poison Lily (Rare: Nar Lily) • Nano Dragon • Pan Arms • Hidoom • Migium • Grass Assassin • Pofuilly Slime (Rare: Pouilly Slime) |
| Mine | Gillchic • Dubchic • Dubwitch • Canadine • Canane • Sinow Beat • Sinow Gold • Garanz |
| Ruins | Dimenian • La Dimenian • So Dimenian • Claw • Bulclaw • Delsaber • Chaos Sorcerer • Dark Belra • Dark Gunner • Chaos Bringer |
| Bosses | Dragon • De Rol Le • Vol Opt • Dark Falz (Darvant) |
| CollapseEpisode 2 Monsters | |
|---|---|
| VR Temple | Rag Rappy (Rare: Love Rappy • St Rappy • Hallo Rappy • Egg Rappy) • Dimenian • La Dimenian • So Dimenian • Poison Lily (Rare: Nar Lily) • Mothmant • Monest • Grass Assassin • Hildebear (Rare: Hildeblue) • Dark Belra |
| VR Spaceship | Savage Wolf • Barbarous Wolf • Pan Arms • Hidoom • Migium • Gillchic • Dubchic • Dubwitch • Delsaber • Garanz • Chaos Sorcerer |
| Central Control Area | Merillia • Meriltas • Gee • Ul Gibbon • Zol Gibbon • Sinow Berill • Sinow Spigell • Gi Gue • Gibbles • Mericarol • Merikle • Mericus |
| Seabed | Dolmolm • Dolmdarl • Sinow Zoa • Sinow Zele • Morfos • Deldepth • Recobox • Recon • Delbiter |
| Control Tower | Del Lily • Ill Gill • Epsilon |
| Bosses | Barba Ray • Gol Dragon • Gal Gryphon • Olga Flow |


