Random Attack Xrd REV 2: Difference between revisions
m (→Enemy Counts) |
Lilyzavoqth (talk | contribs) |
||
| (7 intermediate revisions by one other user not shown) | |||
| Line 18: | Line 18: | ||
}} | }} | ||
==Routing== | ==Routing== | ||
In this quest, the player(s) will progress through | In this quest, the player(s) will progress through 4 out of 10 possible areas (chosen randomly) in order. The full order is the same as the intended area progression through Episode 2, which is as follows: | ||
* VR Temple Alpha | * VR Temple Alpha | ||
* VR Temple Beta | * VR Temple Beta | ||
| Line 37: | Line 37: | ||
Each boss on the selected route provides an additional {{Meseta|10,000}} to the base 20,000 reward on Ultimate. | Each boss on the selected route provides an additional {{Meseta|10,000}} to the base 20,000 reward on Ultimate. | ||
==Enemy Counts== | ==Enemy Counts== | ||
: ''Note: Each area that you encounter has two routes which only one route will be used per run. The enemy count is color coded with the quest maps below.'' | |||
{| class="wikitable questTable" style="display:inline-table;vertical-align:top;" | {| class="wikitable questTable" style="display:inline-table;vertical-align:top;" | ||
! colspan="2" |[[VR Temple Alpha]] | ! colspan="2" |[[VR Temple Alpha]] | ||
| Line 116: | Line 116: | ||
|[[Dubchic]] | |[[Dubchic]] | ||
|2 + (<span style="color:#00FF00">9</span>/<span style="color:#EE4B2B">11</span>) [22] | |2 + (<span style="color:#00FF00">9</span>/<span style="color:#EE4B2B">11</span>) [22] | ||
|- | |||
|[[Dubwitch]] | |||
|1 + (<span style="color:#00FF00">3</span>/<span style="color:#EE4B2B">4</span>) [8] | |||
|- | |- | ||
|[[Savage Wolf]] | |[[Savage Wolf]] | ||
| Line 143: | Line 146: | ||
|[[Dubchic]] | |[[Dubchic]] | ||
| 3 + (<span style="color:#00FF00">6</span>/<span style="color:#EE4B2B">12</span>) [21] | | 3 + (<span style="color:#00FF00">6</span>/<span style="color:#EE4B2B">12</span>) [21] | ||
|- | |||
|[[Dubwitch]] | |||
|1 + (<span style="color:#00FF00">2</span>/<span style="color:#EE4B2B">4</span>) [7] | |||
|- | |- | ||
|[[Savage Wolf]] | |[[Savage Wolf]] | ||
| Line 356: | Line 362: | ||
|[[Delbiter]] | |[[Delbiter]] | ||
|1 + (<span style="color:#00FF00">7</span>/<span style="color:#EE4B2B">8</span>) [16] | |1 + (<span style="color:#00FF00">7</span>/<span style="color:#EE4B2B">8</span>) [16] | ||
|} | |} | ||
{| class="wikitable questTable" style="display:inline-table;vertical-align:top;" | {| class="wikitable questTable" style="display:inline-table;vertical-align:top;" | ||
| Line 401: | Line 374: | ||
|[[Recon]] | |[[Recon]] | ||
|20 | |20 | ||
|- | |||
|[[Delbiter]] | |||
|9 | |||
|- | |||
|[[Del Lily]] | |||
|14 | |||
|- | |||
|[[Ill Gill]] | |||
|22 | |||
|- | |- | ||
|[[Mericarol]] | |[[Mericarol]] | ||
| Line 414: | Line 396: | ||
|7 | |7 | ||
|- | |- | ||
|[[Gi Gue | | [[Gi Gue]] | ||
|9 | |9 | ||
|- | |- | ||
|[[Epsilon]] | |[[Epsilon]] | ||
|6 | |6 | ||
|- | |- | ||
|[[Mericarol#Mericarol Subtypes and Random Mericarol|Random Mericarol]] | | [[Mericarol#Mericarol Subtypes and Random Mericarol|Random Mericarol]] | ||
|2 | |2 | ||
|} | |} | ||
{| class="wikitable questTable" style="display:inline-table;vertical-align:top;" | {| class="wikitable questTable" style="display:inline-table;vertical-align:top;" | ||
! colspan="2" |Bosses | ! colspan="2" |Bosses | ||
|- | |- | ||
!Enemy | !Enemy | ||
!Count | !Count | ||
|- | |||
! colspan="2" |[[VR Temple Final]] | |||
|- | |||
|[[Barba Ray]] | |||
|1 | |||
|- | |||
! colspan="2" |[[VR Spaceship Final]] | |||
|- | |||
|[[Gol Dragon]] | |||
|1 | |||
|- | |||
! colspan="2" |[[Cliffs of Gal Da Val]] | |||
|- | |||
|[[Gal Gryphon]] | |||
|1 | |||
|- | |||
! colspan="2" |[[Test Subject Disposal Area]] | |||
|- | |||
|[[Olga Flow]] | |||
|1 | |||
|} | |||
{| class="wikitable questTable" style="display:inline-table;vertical-align:top;" | |||
! colspan="10" |Total | |||
|- | |||
!Enemy | !Enemy | ||
!Count | !Count | ||
!Enemy | ! Enemy | ||
!Count | !Count | ||
!Enemy | !Enemy | ||
!Count | ! Count | ||
!Enemy | !Enemy | ||
!Count | !Count | ||
| Line 457: | Line 453: | ||
|[[Dolmolm]] | |[[Dolmolm]] | ||
|0-47 [72] | |0-47 [72] | ||
|[[ | | [[Delbiter]] | ||
|0- | |0-26 [38] | ||
|- | |- | ||
|[[La Dimenian]] | |[[La Dimenian]] | ||
| Line 467: | Line 461: | ||
|0-28 [43] | |0-28 [43] | ||
|[[Meriltas]] | |[[Meriltas]] | ||
|0-37 [47] | | 0-37 [47] | ||
|[[Dolmdarl]] | |[[Dolmdarl]] | ||
|0-38 [55] | |0-38 [55] | ||
|[[ | |[[Del Lily]] | ||
|0- | |0-14 [14] | ||
|- | |- | ||
|[[So Dimenian]] | |[[So Dimenian]] | ||
|0-22 [33] | |0-22 [33] | ||
|[[ | |[[Dubwitch]] | ||
|0- | |0-10 [15] | ||
|[[Ul Gibbon]] | |[[Ul Gibbon]] | ||
|0-46 [70] | |0-46 [70] | ||
|[[Recobox]] | |[[Recobox]] | ||
|0-35 [55] | |0-35 [55] | ||
|[[ | |[[Ill Gill]] | ||
|0- | |0-22 [22] | ||
|- | |- | ||
|[[Rag Rappy]] | |[[Rag Rappy]] | ||
|0-21 [28] | |0-21 [28] | ||
|[[ | |[[Savage Wolf]] | ||
|0- | |0-26 [32] | ||
|[[Zol Gibbon]] | |[[Zol Gibbon]] | ||
|0-32 [45] | |0-32 [45] | ||
|[[Recon]] | |[[Recon]] | ||
|0-??? [305] | |0-??? [305] | ||
|[[ | |[[Mericarol]] | ||
|0- | |0-10 [10] | ||
|- | |- | ||
|[[Poison Lily]] | |[[Poison Lily]] | ||
|0-33 [46] | |0-33 [46] | ||
|[[ | |[[Barbarous Wolf]] | ||
|0- | |0-17 [28] | ||
|[[Gee]] | |[[Gee]] | ||
|0-82 [104] | |0-82 [104] | ||
|[[Sinow Zoa]] | |[[Sinow Zoa]] | ||
|0-29 [44] | |0-29 [44] | ||
|[[ | |[[Merikle]] | ||
|0- | |0-10 [10] | ||
|- | |- | ||
|[[Hildebear]] | |[[Hildebear]] | ||
|0-23 [31] | |0-23 [31] | ||
|[[ | |[[Delsaber]] | ||
|0- | |0-24 [42] | ||
|[[Sinow Berill]] | |[[Sinow Berill]] | ||
|0-30 [42] | |0-30 [42] | ||
|[[Sinow Zele]] | |[[Sinow Zele]] | ||
|0-13 [18] | |0-13 [18] | ||
|[[ | |[[Mericus]] | ||
|0- | | 0-8 [8] | ||
|- | |- | ||
|[[Grass Assassin]] | |[[Grass Assassin]] | ||
|0-13 [20] | |0-13 [20] | ||
|[[ | |[[Pan Arms]] | ||
|0- | |0-13 [17] | ||
|[[Sinow Spigell]] | |[[Sinow Spigell]] | ||
|0-15 [21] | |0-15 [21] | ||
|[[Morfos]] | |[[Morfos]] | ||
|0-22 [31] | |0-22 [31] | ||
|[[ | |[[Gibbles]] | ||
|0- | |0-17 [24] | ||
|- | |- | ||
|[[Dark Belra]] | |[[Dark Belra]] | ||
|0-18 [30] | |0-18 [30] | ||
|[[ | |[[Garanz]] | ||
|0- | | 0-15 [20] | ||
! colspan="2" | | ! colspan="2" | | ||
|[[Deldepth]] | |[[Deldepth]] | ||
|0-17 [24] | |0-17 [24] | ||
|[[ | | [[Gi Gue]] | ||
|0- | |0-20 [27] | ||
|- | |- | ||
|[[Monest]] | |[[Monest]] | ||
|0-4 [6] | |0-4 [6] | ||
|[[Chaos Sorcerer]] | |||
|0-16 [21] | |||
! colspan="4" | | |||
! colspan=" | |||
|[[Epsilon]] | |[[Epsilon]] | ||
|0-6 [6] | |0-6 [6] | ||
|- | |- | ||
! colspan=" | ! colspan="8" | | ||
|[[Mericarol#Mericarol Subtypes and Random Mericarol|Random Mericarol]] | |[[Mericarol#Mericarol Subtypes and Random Mericarol|Random Mericarol]] | ||
|0-5 [8] | | 0-5 [8] | ||
|} | |} | ||
{| class="wikitable" style="display:inline-table;vertical-align:top;" | {| class="wikitable" style="display:inline-table;vertical-align:top;" | ||
! colspan=" | ! colspan="14" |Boxes | ||
|- | |- | ||
!Box Type | |||
!Count | |||
!Box Type | |||
! Count | |||
!Box Type | |||
!Count | |||
!Box Type | |||
! Count | |||
!Box Type | |||
!Count | |||
!Box Type | |||
!Count | |||
!Box Type | !Box Type | ||
!Count | !Count | ||
|- | |- | ||
! colspan="2" |[[Crater West|VR Temple Alpha]] | ! colspan="2" |[[Crater West|VR Temple Alpha]] | ||
! colspan="2" |[[Crater North|VR Spaceship Alpha]] | |||
! colspan="2" |[[Subterranean Desert 1|Jungle East]] | |||
! colspan="2" |[[Subterranean Desert 3|Seaside]] | |||
! colspan="2" |[[Subterranean Desert 3|Seabed Lower]] | |||
! colspan="2" |[[Subterranean Desert 3|VR Temple Final]] | |||
! colspan="2" |[[Subterranean Desert 3|Cliffs of Gal Da Val]] | |||
|- | |- | ||
|[[Box]] | |[[Box]] | ||
|3 + (<span style="color:#00FF00">7</span>/<span style="color:#EE4B2B">6</span>) | |3 + (<span style="color:#00FF00">7</span>/<span style="color:#EE4B2B">6</span>) [16] | ||
| | |[[Box]] | ||
|4 + (<span style="color:#00FF00">8</span>/<span style="color:#EE4B2B">8</span>) [20] | |||
|[[Box]] | |[[Box]] | ||
| | |22 | ||
|[[Box]] | |[[Box]] | ||
|4 + (<span style="color:#00FF00"> | | 4 + (<span style="color:#00FF00">9</span>/<span style="color:#EE4B2B">8</span>) [21] | ||
| colspan="1" |[[Box]] | |||
| 4 + (<span style="color:#00FF00">6</span>/<span style="color:#EE4B2B">6</span>) [16] | |||
| colspan="1" |[[Box|Box (Weapon)]] | |||
|7 | |||
| colspan="1" |[[Box|Box (Weapon)]] | |||
|8 | |||
|- | |- | ||
! colspan="2" |[[Crater South|VR Temple Beta]] | |||
! colspan="2" |[[Crater Interior|VR Spaceship Beta]] | ! colspan="2" |[[Crater Interior|VR Spaceship Beta]] | ||
! colspan="2" |[[Subterranean Desert 2|Mountain]] | |||
! colspan="2" |[[Subterranean Desert 3|Seabed Upper]] | |||
! colspan="2" |[[Subterranean Desert 3|Control Tower]] | |||
|[[Box|Box (Armor)]] | |||
|7 | |||
|[[Box|Box (Armor)]] | |||
|4 | |||
|- | |- | ||
|[[Box]] | |[[Box]] | ||
|4 + (<span style="color:#00FF00"> | |4 + (<span style="color:#00FF00">7</span>/<span style="color:#EE4B2B">7</span>) [18] | ||
|[[Box]] | |[[Box]] | ||
| | |4 + (<span style="color:#00FF00">8</span>/<span style="color:#EE4B2B">8</span>) [20] | ||
|[[Box]] | |[[Box]] | ||
|2 + (<span style="color:#00FF00">8</span>/<span style="color:#EE4B2B">13</span>) [23] | |2 + (<span style="color:#00FF00">8</span>/<span style="color:#EE4B2B">13</span>) [23] | ||
|[[Box]] | |[[Box]] | ||
|4 + (<span style="color:#00FF00">12</span>/<span style="color:#EE4B2B">5</span>) [21] | |4 + (<span style="color:#00FF00">12</span>/<span style="color:#EE4B2B">5</span>) [21] | ||
| colspan="1" |[[Box]] | | colspan="1" |[[Box]] | ||
|17 | |17 | ||
! colspan="2" |[[Subterranean Desert 3|VR Spaceship Final]] | ! colspan="2" |[[Subterranean Desert 3|VR Spaceship Final]] | ||
! colspan="2" |[[Subterranean Desert 3|Test Subject Disposal Area]] | |||
|- | |- | ||
! colspan="10" rowspan="2" | | |||
| colspan="1" |[[Box|Box (Weapon)]] | | colspan="1" |[[Box|Box (Weapon)]] | ||
|12 | |12 | ||
| colspan="1" |[[Box|Box (Weapon)]] | |||
|10 | |||
|- | |- | ||
|[[Box|Box (Armor)]] | |[[Box|Box (Armor)]] | ||
|12 | |12 | ||
|[[Box|Box (Armor)]] | |[[Box|Box (Armor)]] | ||
|10 | |10 | ||
|} | |} | ||
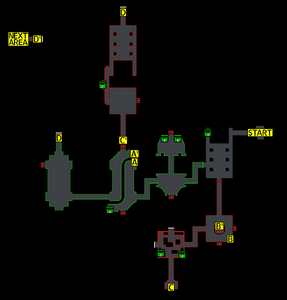
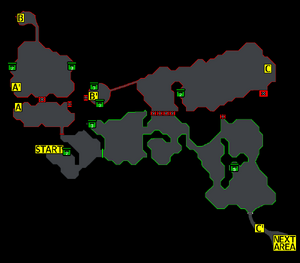
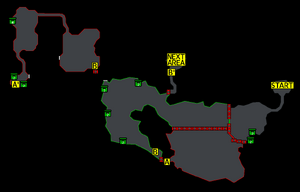
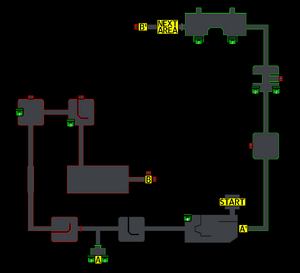
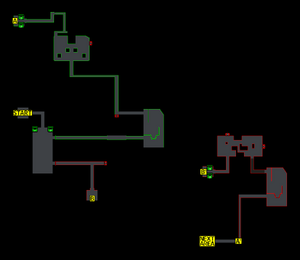
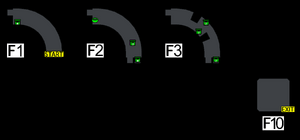
==Quest Maps== | ==Quest Maps== | ||
| Line 669: | Line 633: | ||
Random Attack Xrd REV 2 (Control Tower).png| Control Tower | Random Attack Xrd REV 2 (Control Tower).png| Control Tower | ||
</gallery> | </gallery> | ||
[[File:Map_Legend.png|350px|]] | |||
{{Episode2Quests}} | {{Episode2Quests}} | ||
[[Category:Quests]] | [[Category:Quests]] | ||
[[Category:Episode 4Quests]] | [[Category:Episode 4Quests]] | ||
[[Category:Maximum Attack Quests]] | [[Category:Maximum Attack Quests]] | ||
Latest revision as of 23:33, 15 June 2026
| Episode 2 | |||||||||||||||||
|---|---|---|---|---|---|---|---|---|---|---|---|---|---|---|---|---|---|
| Category: | |||||||||||||||||
| Info: | Fight off swarms of monsters in various areas. Can you make it to the end? | ||||||||||||||||
| Description: | Venture through a randomized series of maps. | ||||||||||||||||
| Reward: | ??? Meseta | ||||||||||||||||
| Author: | Ender | ||||||||||||||||
| Languages: | English | ||||||||||||||||
| Total XP | |||||||||||||||||
|
|
|||||||||||||||||
Routing
In this quest, the player(s) will progress through 4 out of 10 possible areas (chosen randomly) in order. The full order is the same as the intended area progression through Episode 2, which is as follows:
- VR Temple Alpha
- VR Temple Beta
- VR Spaceship Alpha
- VR Spaceship Beta
- Jungle Area East
- Mountain Area
- Seaside Area
- Seabed Upper Levels
- Seabed Lower Levels
- Control Tower
When selecting areas, it is not possible for a later area to come before an earlier one. For example, this means that if the first two areas the quest selects are VR Temple Alpha, then VR Spaceship Beta, neither of VR Temple Beta or VR Spaceship Alpha can be selected, as VR Spaceship Beta is later than both of those.
Each area contains a randomized split, so the player(s) will never fight the full number of enemies that spawn in a given area. The exception to this rule is the Control Tower, which has no randomized split, thus, the player(s) will fight all enemies listed below.
The last selection of each area that appears has a 1/3 chance of spawning the Boss Teleporter before proceeding to the next area. For example, if the quest selects VR Temple Alpha and VR Temple Beta, only VR Temple Beta will perform the random roll for the boss. If only VR Temple Alpha is selected, the random roll can be performed for VR Temple Alpha.
Each boss on the selected route provides an additional ![]() 10,000 Meseta to the base 20,000 reward on Ultimate.
10,000 Meseta to the base 20,000 reward on Ultimate.
Enemy Counts
- Note: Each area that you encounter has two routes which only one route will be used per run. The enemy count is color coded with the quest maps below.
| VR Temple Alpha | |
|---|---|
| Enemy | Count |
| Dimenian | 5 + (11/9) [25] |
| La Dimenian | 4 + (11/8) [23] |
| So Dimenian | 0 + (6/5) [11] |
| Rag Rappy | 2 + (6/4) [12] |
| Poison Lily | 2 + (8/17) [27] |
| Hildebear | 1 + (11/4) [16] |
| Grass Assassin | 0 + (4/6) [10] |
| Dark Belra | 2 + (3/5) [10] |
| Monest | 0 + (2/2) [4] |
| VR Temple Beta | |
|---|---|
| Enemy | Count |
| Dimenian | 3 + (5/10) [18] |
| La Dimenian | 1 + (11/8) [20] |
| So Dimenian | 4 + (12/6) [22] |
| Rag Rappy | 4 + (3/9) [16] |
| Poison Lily | 4 + (5/10) [19] |
| Hildebear | 3 + (8/4) [15] |
| Grass Assassin | 2 + (3/5) [10] |
| Dark Belra | 2 + (9/9) [20] |
| Monest | 0 + (0/2) [2] |
| VR Spaceship Alpha | |
|---|---|
| Enemy | Count |
| Gillchic | 3 + (15/25) [43] |
| Dubchic | 2 + (9/11) [22] |
| Dubwitch | 1 + (3/4) [8] |
| Savage Wolf | 2 + (6/2) [10] |
| Barbarous Wolf | 2 + (7/5) [14] |
| Delsaber | 1 + (10/9) [20] |
| Pan Arms | 0 + (5/1) [6] |
| Garanz | 1 + (14/5) [20] |
| VR Spaceship Beta | |
|---|---|
| Enemy | Count |
| Gillchic | 11 + (11/4) [28] |
| Dubchic | 3 + (6/12) [21] |
| Dubwitch | 1 + (2/4) [7] |
| Savage Wolf | 3 + (15/4) [22] |
| Barbarous Wolf | 2 + (6/6) [14] |
| Delsaber | 4 + (9/9) [22] |
| Pan Arms | 3 + (5/3) [11] |
| Chaos Sorcerer | 4 + (12/5) [21] |
| Jungle East | |
|---|---|
| Enemy | Count |
| Merillia | 13 + (0-8) [21] |
| Meriltas | 11 + (3-11) [25] |
| Ul Gibbon | 8 + (2-10) [20] |
| Zol Gibbon | 3 + (0-5) [8] |
| Gee | 12 + (3-6) [21] |
| Sinow Berill | 7 + (2-7) [16] |
| Sinow Spigell | 2 + (0-4) [6] |
| Mericarol | 2 + (0-2) [4] |
| Merikle | 3 + (0-2) [5] |
| Mericus | 3 + (0-0) [3] |
| Gibbles | 0 + (0-1) [1] |
| Gi Gue | 0 + (0-1) [1] |
| Random Mericarol | 3 + (0-0) [3] |
| Mountain | |
|---|---|
| Enemy | Count |
| Merillia | 0 + (8/9) [18] |
| Meriltas | 2 + (4/3) [11] |
| Ul Gibbon | 3 + (18/15) [36] |
| Zol Gibbon | 0 + (10/15) [25] |
| Gee | 6 + (10/27) [37] |
| Sinow Berill | 0 + (8/5) [13] |
| Sinow Spigell | 0 + (4/2) [6] |
| Mericarol | 0 + (1/0) [1] |
| Mericus | 0 + (1/0) [1] |
| Gibbles | 1 + (5/5) [11] |
| Gi Gue | 0 + (1/1) [2] |
| Random Mericarol | 0 + (0/1) [1] |
| Seaside | |
|---|---|
| Enemy | Count |
| Merillia | 0 + (3/7) [10] |
| Meriltas | 3 + (6/2) [11] |
| Ul Gibbon | 0 + (7/7) [14] |
| Zol Gibbon | 3 + (6/3) [12] |
| Gee | 2 + (15/29) [46] |
| Sinow Berill | 1 + (5/7) [13] |
| Sinow Spigell | 0 + (5/4) [9] |
| Mericarol | 0 + (1/0) [1] |
| Merikle | 0 + (0/1) [1] |
| Mericus | 0 + (1/0) [1] |
| Gibbles | 0 + (3/1) [4] |
| Gi Gue | 2 + (7/6) [15] |
| Random Mericarol | 0 + (1/1) [2] |
| Seabed Upper | |
|---|---|
| Enemy | Count |
| Dolmolm | 9 + (11/16) [36] |
| Dolmdarl | 0 + (16/10) [26] |
| Recobox | 4 + (12/13) [29] |
| Recon | 20 + (60/65) [145] |
| Sinow Zoa | 3 + (9/11) [23] |
| Sinow Zele | 0 + (3/6) [9] |
| Morfos | 2 + (3/10) [15] |
| Deldepth | 2 + (2/5) [9] |
| Delbiter | 1 + (7/4) [12] |
| Seabed Lower | |
|---|---|
| Enemy | Count |
| Dolmolm | 4 + (18/14) [36] |
| Dolmdarl | 4 + (7/18) [29] |
| Recobox | 0 + (18/4) [22] |
| Recon | 0 + (??/??) [140] |
| Sinow Zoa | 1 + (14/6) [21] |
| Sinow Zele | 0 + (7/2) [9] |
| Morfos | 2 + (6/8) [16] |
| Deldepth | 4 + (6/5) [15] |
| Delbiter | 1 + (7/8) [16] |
| Control Tower | |
|---|---|
| Enemy | Count |
| Recobox | 4 |
| Recon | 20 |
| Delbiter | 9 |
| Del Lily | 14 |
| Ill Gill | 22 |
| Mericarol | 4 |
| Merikle | 3 |
| Mericus | 3 |
| Gibbles | 7 |
| Gi Gue | 9 |
| Epsilon | 6 |
| Random Mericarol | 2 |
| Bosses | |
|---|---|
| Enemy | Count |
| VR Temple Final | |
| Barba Ray | 1 |
| VR Spaceship Final | |
| Gol Dragon | 1 |
| Cliffs of Gal Da Val | |
| Gal Gryphon | 1 |
| Test Subject Disposal Area | |
| Olga Flow | 1 |
| Total | |||||||||
|---|---|---|---|---|---|---|---|---|---|
| Enemy | Count | Enemy | Count | Enemy | Count | Enemy | Count | Enemy | Count |
| Dimenian | 0-29 [43] | Gillchic | 0-50 [71] | Merillia | 0-37 [49] | Dolmolm | 0-47 [72] | Delbiter | 0-26 [38] |
| La Dimenian | 0-27 [43] | Dubchic | 0-28 [43] | Meriltas | 0-37 [47] | Dolmdarl | 0-38 [55] | Del Lily | 0-14 [14] |
| So Dimenian | 0-22 [33] | Dubwitch | 0-10 [15] | Ul Gibbon | 0-46 [70] | Recobox | 0-35 [55] | Ill Gill | 0-22 [22] |
| Rag Rappy | 0-21 [28] | Savage Wolf | 0-26 [32] | Zol Gibbon | 0-32 [45] | Recon | 0-??? [305] | Mericarol | 0-10 [10] |
| Poison Lily | 0-33 [46] | Barbarous Wolf | 0-17 [28] | Gee | 0-82 [104] | Sinow Zoa | 0-29 [44] | Merikle | 0-10 [10] |
| Hildebear | 0-23 [31] | Delsaber | 0-24 [42] | Sinow Berill | 0-30 [42] | Sinow Zele | 0-13 [18] | Mericus | 0-8 [8] |
| Grass Assassin | 0-13 [20] | Pan Arms | 0-13 [17] | Sinow Spigell | 0-15 [21] | Morfos | 0-22 [31] | Gibbles | 0-17 [24] |
| Dark Belra | 0-18 [30] | Garanz | 0-15 [20] | Deldepth | 0-17 [24] | Gi Gue | 0-20 [27] | ||
| Monest | 0-4 [6] | Chaos Sorcerer | 0-16 [21] | Epsilon | 0-6 [6] | ||||
| Random Mericarol | 0-5 [8] | ||||||||
| Boxes | |||||||||||||
|---|---|---|---|---|---|---|---|---|---|---|---|---|---|
| Box Type | Count | Box Type | Count | Box Type | Count | Box Type | Count | Box Type | Count | Box Type | Count | Box Type | Count |
| VR Temple Alpha | VR Spaceship Alpha | Jungle East | Seaside | Seabed Lower | VR Temple Final | Cliffs of Gal Da Val | |||||||
| Box | 3 + (7/6) [16] | Box | 4 + (8/8) [20] | Box | 22 | Box | 4 + (9/8) [21] | Box | 4 + (6/6) [16] | Box (Weapon) | 7 | Box (Weapon) | 8 |
| VR Temple Beta | VR Spaceship Beta | Mountain | Seabed Upper | Control Tower | Box (Armor) | 7 | Box (Armor) | 4 | |||||
| Box | 4 + (7/7) [18] | Box | 4 + (8/8) [20] | Box | 2 + (8/13) [23] | Box | 4 + (12/5) [21] | Box | 17 | VR Spaceship Final | Test Subject Disposal Area | ||
| Box (Weapon) | 12 | Box (Weapon) | 10 | ||||||||||
| Box (Armor) | 12 | Box (Armor) | 10 | ||||||||||
Quest Maps
VR Temple Alpha

VR Temple Beta

VR Spaceship Alpha
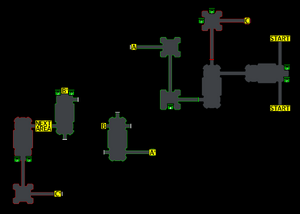
VR Spaceship Beta
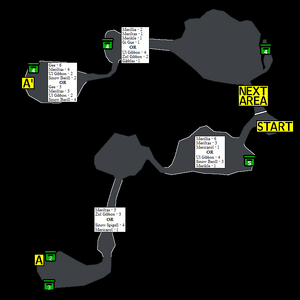
Jungle East
Mountain
Seaside
Seabed Upper
Seabed Lower
Control Tower
.png)
.png)
.png)
.png)
.png)
.png)
.png)
.png)
.png)
.png)
