Hildebear: Difference between revisions
m (→Set Damage) |
m (→Forces) |
||
| (22 intermediate revisions by 5 users not shown) | |||
| Line 1: | Line 1: | ||
{{Enemy|name=Hildebear (E1)}} | {{Enemy|name=Hildebear (E1)}} | ||
{{Enemy|name=Hildebear (E2)}} | {{Enemy|name=Hildebear (E2)}} | ||
==Behavior/Mechanics== | |||
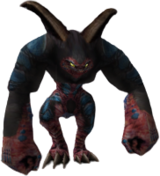
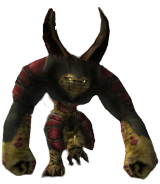
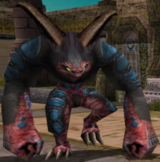
Hildebears are quite dangerous and can kill a weaker character in one hit. At range, they will either spit {{Foie}} ({{Gizonde}} in Ultimate difficulty) at their targets or leap to them, dealing damage where they land. | |||
== | ===Fixed Damage=== | ||
{| | |||
| | |||
{{#tag:tabber| | {{#tag:tabber| | ||
Normal= | Normal= | ||
<tabber> | <tabber> | ||
Normal= | Normal= | ||
{| class="wikitable | {| class="wikitable" style="text-align:center" | ||
! Area | |||
! Attack | ! Attack | ||
! | ! Damage | ||
|- | |- | ||
| | | Forest 2 || rowspan="2"|Drop || 5 | ||
|- | |- | ||
| | | Temple || 5 | ||
|- | |- | ||
| {{Foie}} || 22 | | Forest 2 || rowspan="2"|Jump Attack || 24 | ||
|- | |||
| Temple || 14 | |||
|- | |||
| Forest 2 || rowspan="2"|{{Foie}} || 22 | |||
|- | |||
| Temple || 22 | |||
|} | |} | ||
|-| | |-| | ||
One Person= | One Person= | ||
{| class="wikitable | {| class="wikitable" style="text-align:center" | ||
! Area | |||
! Attack | ! Attack | ||
! | ! Damage | ||
|- | |- | ||
| | | Forest 2 || rowspan="2"|Drop || 5 | ||
|- | |- | ||
| | | Temple || 5 | ||
|- | |- | ||
| {{Foie}} || 22 | | Forest 2 || rowspan="2"|Jump Attack || 14 | ||
|- | |||
| Temple || 14 | |||
|- | |||
| Forest 2 || rowspan="2"|{{Foie}} || 22 | |||
|- | |||
| Temple || 22 | |||
|} | |} | ||
</tabber> | </tabber> | ||
| Line 70: | Line 52: | ||
<tabber> | <tabber> | ||
Normal= | Normal= | ||
{| class="wikitable | {| class="wikitable" style="text-align:center" | ||
! Area | |||
! Attack | ! Attack | ||
! | ! Damage | ||
|- | |- | ||
| | | Forest 2 || rowspan="2"|Drop || 5 | ||
|- | |- | ||
| | | Temple || 5 | ||
|- | |- | ||
| {{Foie}} || 22 | | Forest 2 || rowspan="2"|Jump Attack || 120 | ||
|- | |||
| Temple || 60 | |||
|- | |||
| Forest 2 || rowspan="2"|{{Foie}} || 22 | |||
|- | |||
| Temple || 22 | |||
|} | |} | ||
|-| | |-| | ||
One Person= | One Person= | ||
{| class="wikitable | {| class="wikitable" style="text-align:center" | ||
! Area | |||
! Attack | ! Attack | ||
! | ! Damage | ||
|- | |||
| Forest 2 || rowspan="2"|Drop || 5 | |||
|- | |||
| Temple || 5 | |||
|- | |||
| Forest 2 || rowspan="2"|Jump Attack || 60 | |||
|- | |- | ||
| | | Temple || 60 | ||
|- | |- | ||
| | | Forest 2 || rowspan="2"|{{Foie}} || 22 | ||
|- | |- | ||
| | | Temple || 22 | ||
|} | |} | ||
</tabber> | </tabber> | ||
| Line 99: | Line 93: | ||
<tabber> | <tabber> | ||
Normal= | Normal= | ||
{| class="wikitable | {| class="wikitable" style="text-align:center" | ||
! Area | |||
! Attack | ! Attack | ||
! | ! Damage | ||
|- | |||
| Forest 2 || rowspan="2"|Drop || 5 | |||
|- | |||
| Temple || 5 | |||
|- | |- | ||
| | | Forest 2 || rowspan="2"|Jump Attack || 240 | ||
|- | |- | ||
| | | Temple || 140 | ||
|- | |- | ||
| {{Foie}} || 22 | | Forest 2 || rowspan="2"|{{Foie}} || 22 | ||
|- | |||
| Temple || 22 | |||
|} | |} | ||
|-| | |-| | ||
One Person= | One Person= | ||
{| class="wikitable | {| class="wikitable" style="text-align:center" | ||
! Area | |||
! Attack | ! Attack | ||
! | ! Damage | ||
|- | |- | ||
| | | Forest 2 || rowspan="2"|Drop || 5 | ||
|- | |- | ||
| | | Temple || 5 | ||
|- | |- | ||
| {{Foie}} || 22 | | Forest 2 || rowspan="2"|Jump Attack || 140 | ||
|- | |||
| Temple || 140 | |||
|- | |||
| Forest 2 || rowspan="2"|{{Foie}} || 22 | |||
|- | |||
| Temple || 22 | |||
|} | |} | ||
</tabber> | </tabber> | ||
| Line 128: | Line 134: | ||
<tabber> | <tabber> | ||
Normal= | Normal= | ||
{| class="wikitable | {| class="wikitable" style="text-align:center" | ||
! Area | |||
! Attack | ! Attack | ||
! | ! Damage | ||
|- | |- | ||
| | | Forest 2 || rowspan="2"|Drop || 5 | ||
|- | |- | ||
| | | Temple || 5 | ||
|- | |- | ||
| {{Gizonde}} || 136 | | Forest 2 || rowspan="2"|Jump Attack || 300 | ||
|- | |||
| Temple || 300 | |||
|- | |||
| Forest 2 || rowspan="2"|{{Gizonde}} || 136 | |||
|- | |||
| Temple || 136 | |||
|} | |} | ||
|-| | |-| | ||
One Person= | One Person= | ||
{| class="wikitable | {| class="wikitable" style="text-align:center" | ||
! Area | |||
! Attack | ! Attack | ||
! | ! Damage | ||
|- | |||
| Forest 2 || rowspan="2"|Drop || 5 | |||
|- | |||
| Temple || 5 | |||
|- | |- | ||
| | | Forest 2 || rowspan="2"|Jump Attack || 300 | ||
|- | |- | ||
| | | Temple || 220 | ||
|- | |- | ||
| {{Gizonde}} || 136 | | Forest 2 || rowspan="2"|{{Gizonde}} || 136 | ||
|- | |||
| Temple || 48 | |||
|} | |} | ||
</tabber> | </tabber> | ||
}} | }} | ||
|} | |||
==Strategy== | |||
===Hunters=== | |||
Hildebears have worse coverage on their right, so try to attack them from that side. Their punches seem to have better coverage on their left, so it's inadvisable to attack from that side. At range, they'll spit fireballs, but those are relatively easy to dodge and don't do as much damage. | |||
===Rangers=== | |||
Once the Hildebear has closed the gap, attacking from its right is a good idea. If range can be maintained, [[Mechguns]] are a good option for quick damage. | |||
===Forces=== | |||
Hildebears in Episode 1 are weak to Barta until Ultimate, where they are weak to Grants. In Episode 2, they are weak to Barta and Megid in all difficulties. | |||
==Rare Spawns== | ==Rare Spawns== | ||
A Hildebear has a {{RareEnemyRate}} chance of spawning as a [[Hildeblue]]. | A Hildebear has a {{RareEnemyRate}} chance of spawning as a [[Hildeblue]]. | ||
==Hunting== | |||
===Episode 1=== | |||
The following quests are recommended for hunting this enemy in Episode 1: | |||
{{HuntingTableHead}} | |||
{{HuntingTableRow|category=VR|catspan=3|quest=Tyrell's Ego|questspan=|details=Clear Forest|count=52}} | |||
{{HuntingTableRow|category=|catspan=|quest=Simulator 2.0|questspan=|details=Clear Forest|count=10}} | |||
{{HuntingTableRow|category=|catspan=|quest=Towards the Future|questspan=|details={{Note|First two rooms|Clear Forest}}|count=4}} | |||
{{HuntingTableRow|category=Retrieval|catspan=|quest=Rappy's Holiday|questspan=|details=Clear Forest 2|count=75}} | |||
{{HuntingTableRow|category=Maximum Attack|catspan=|quest=Maximum Attack E: Episode 1|questspan=|details=Clear Forest|count=17}} | |||
{{HuntingTableRow|category=Side Story|catspan=|quest=Forest of Sorrow|questspan=|details=Clear quest|count=16}} | |||
|} | |||
===Episode 2=== | |||
The following quests are recommended for hunting this enemy in Episode 2: | |||
{{HuntingTableHead}} | |||
{{HuntingTableRow2|category=Maximum Attack|catspan=|quest=MAXIMUM ATTACK 2 Ver2|questspan=|details="Beginning of a Legacy" route<br>(Clear first room, proceed forward two rooms,<br>proceed right one room, clear)|count=15}} | |||
{{HuntingTableRow2|category=Halloween|catspan=|quest=Hollow Reality: Temple|questspan=|details=Clear quest|count=21}} | |||
{{HuntingTableRow2|category=Maximum Attack|catspan=|quest=Maximum Attack E: VR|questspan=|details=Clear VR Temple|count=21}} | |||
{{HuntingTableRow2|category=Retrieval|catspan=2|quest=Lost SHOCK RIFLE|questspan=2|details=Clear VR Temple Alpha|count=20}} | |||
{{HuntingTableRow2|category=|catspan=|quest=|questspan=|details=Clear quest|count=41}} | |||
|} | |||
==Rare Drops== | ==Rare Drops== | ||
===Episode 1=== | ===Episode 1=== | ||
| Line 164: | Line 212: | ||
===Episode 2=== | ===Episode 2=== | ||
{{EnemyDropTable|Hildebear (E2)}} | {{EnemyDropTable|Hildebear (E2)}} | ||
{{Episode1Enemies}}{{Episode2Enemies}} | |||
{{Episode1Enemies}} | |||
{{Episode2Enemies}} | |||
[[Category:Enemies]] | |||
[[Category:Forest Enemies]] | |||
[[Category:VR Temple Enemies]] | |||
[[Category:Casts Foie]] | |||
[[Category:Casts Gizonde]] | |||
[[Category:Inflicts Shock]] | |||
Latest revision as of 03:57, 22 December 2025
|
||||||||||||||||||||||||||||||||||||||||||||||||||||||||||||||||||||||||||||||||||||||||||||||||||||||||||||||||||||||||||||||||||||||||||||||||||||||||||||||||||||||||||||||||||||||||||||||||||||||||||||||||||||||||||||||||||||||||||||||||||||||||||||||||||||||||||||||||||||||||||||||||||||||||||||||||||||||||||||||||||||||||||||||||
Behavior/Mechanics
Hildebears are quite dangerous and can kill a weaker character in one hit. At range, they will either spit ![]() Foie (
Foie (![]() Gizonde in Ultimate difficulty) at their targets or leap to them, dealing damage where they land.
Gizonde in Ultimate difficulty) at their targets or leap to them, dealing damage where they land.
Fixed Damage
|
|
Strategy
Hunters
Hildebears have worse coverage on their right, so try to attack them from that side. Their punches seem to have better coverage on their left, so it's inadvisable to attack from that side. At range, they'll spit fireballs, but those are relatively easy to dodge and don't do as much damage.
Rangers
Once the Hildebear has closed the gap, attacking from its right is a good idea. If range can be maintained, Mechguns are a good option for quick damage.
Forces
Hildebears in Episode 1 are weak to Barta until Ultimate, where they are weak to Grants. In Episode 2, they are weak to Barta and Megid in all difficulties.
Rare Spawns
A Hildebear has a 1/500 chance of spawning as a Hildeblue.
Hunting
Episode 1
The following quests are recommended for hunting this enemy in Episode 1:
| Category | Quest | Details | Count |
|---|---|---|---|
| Clear Forest | 52 | ||
| Clear Forest | 10 | ||
| Clear Forest | 4 | ||
| Clear Forest 2 | 75 | ||
| Clear Forest | 17 | ||
| Clear quest | 16 |
Episode 2
The following quests are recommended for hunting this enemy in Episode 2:
| Category | Quest | Details | Count |
|---|---|---|---|
| "Beginning of a Legacy" route (Clear first room, proceed forward two rooms, proceed right one room, clear) |
15 | ||
| Clear quest | 21 | ||
| Clear VR Temple | 21 | ||
| Clear VR Temple Alpha | 20 | ||
| Clear quest | 41 |
Rare Drops
Episode 1
| Normal | |||||||||
|---|---|---|---|---|---|---|---|---|---|
| Trimate | Trimate | Trimate | Trimate | Trimate | Trimate | Trimate | Trimate | Trimate | Trimate |
| 1/2.22 | 1/2.22 | 1/2.22 | 1/2.22 | 1/2.22 | 1/2.22 | 1/2.22 | 1/2.22 | 1/2.22 | 1/2.22 |
| Hard | |||||||||
| Crush Bullet | Visk-235W | Flowen's Sword | Brionac | M&A60 Vise | Fire Scepter: Agni | Slicer of Assassin | Flowen's Sword | Flowen's Sword | Slicer of Assassin |
| 1/45.7 | 1/45.7 | 1/45.7 | 1/45.7 | 1/45.7 | 1/45.7 | 1/45.7 | 1/45.7 | 1/45.7 | 1/45.7 |
| Very Hard | |||||||||
| Hildebear's Head | Hildebear's Head | Dragon Slayer | Hildebear's Head | Hildebear's Head | Hildebear's Head | Custom Frame ver.OO | Hildebear's Head | Hildebear's Head | Varista |
| 1/43 | 1/43 | 1/43 | 1/43 | 1/43 | 1/43 | 1/43 | 1/43 | 1/43 | 1/43 |
| Ultimate | |||||||||
| Star Amplifier | Star Amplifier | Flowen's Sword (3064) | Elysion | Elysion | Smartlink | Heavenly/Battle | Elysion | Luminous Field | Red Saber |
| 1/371 | 1/371 | 1/75.3 | 1/371 | 1/371 | 1/1205 | 1/371 | 1/371 | 1/1205 | 1/371 |
Episode 2
| Normal | |||||||||
|---|---|---|---|---|---|---|---|---|---|
| Trimate | Trimate | Trimate | Trimate | Trimate | Trimate | Trimate | Trimate | Trimate | Trimate |
| 1/2.22 | 1/2.22 | 1/2.22 | 1/2.22 | 1/2.22 | 1/2.22 | 1/2.22 | 1/2.22 | 1/2.22 | 1/2.22 |
| Hard | |||||||||
| Meteor Smash | Wals-MK2 | Last Survivor | Vjaya | H&S25 Justice | Ice Staff: Dagon | Diska of Liberator | Bloody Art | Ice Staff: Dagon | Diska of Liberator |
| 1/45.7 | 1/45.7 | 1/45.7 | 1/45.7 | 1/45.7 | 1/45.7 | 1/45.7 | 1/45.7 | 1/45.7 | 1/45.7 |
| Very Hard | |||||||||
| Crush Bullet | Magic Rock "Moola" | Dragon Slayer | Vjaya | H&S25 Justice | Ice Staff: Dagon | Diska of Liberator | Cross Scar | Last Survivor | Diska of Liberator |
| 1/45.7 | 1/45.7 | 1/45.7 | 1/45.7 | 1/45.7 | 1/45.7 | 1/45.7 | 1/45.7 | 1/45.7 | 1/45.7 |
| Ultimate | |||||||||
| Asuka | Flowen's Sword (3060) | Ancient Saber | Flowen's Sword (3067) | Ancient Saber | Technical Crozier | Flowen's Sword (3082) | Ancient Saber | Agito (1977) | Victor Axe |
| 1/394 | 1/80 | 1/394 | 1/80 | 1/394 | 1/394 | 1/80 | 1/394 | 1/394 | 1/80 |
| Episode 1 Monsters | |
|---|---|
| Forest | Booma • Gobooma • Gigobooma • Rag Rappy (Rare: Al Rappy) • Savage Wolf • Barbarous Wolf • Monest • Mothmant • Hildebear (Rare: Hildeblue) |
| Cave | Evil Shark • Pal Shark • Guil Shark • Poison Lily (Rare: Nar Lily) • Nano Dragon • Pan Arms (Hidoom • Migium) • Grass Assassin • Pofuilly Slime (Rare: Pouilly Slime) |
| Mine | Gillchic • Dubchic • Dubwitch • Canadine • Canane • Sinow Beat • Sinow Gold • Garanz |
| Ruins | Dimenian • La Dimenian • So Dimenian • Claw • Bulclaw • Delsaber • Chaos Sorcerer • Dark Belra • Dark Gunner • Chaos Bringer |
| Bosses | Dragon • De Rol Le • Vol Opt • Dark Falz (Darvant) |
| Episode 2 Monsters | |
|---|---|
| VR Temple | Dimenian • La Dimenian • So Dimenian • Rag Rappy (Rare: Love Rappy • St Rappy • Hallo Rappy • Egg Rappy) • Poison Lily (Rare: Nar Lily) • Monest • Mothmant • Hildebear (Rare: Hildeblue) • Grass Assassin • Dark Belra |
| VR Spaceship | Gillchic • Dubchic • Dubwitch • Savage Wolf • Barbarous Wolf • Pan Arms (Hidoom • Migium) • Delsaber • Garanz • Chaos Sorcerer |
| Central Control Area | Merillia • Meriltas • Gee • Ul Gibbon • Zol Gibbon • Sinow Berill • Sinow Spigell • Mericarol • Merikle • Mericus • Gi Gue • Gibbles |
| Seabed | Dolmolm • Dolmdarl • Recobox • Recon • Sinow Zoa • Sinow Zele • Morfos • Deldepth • Delbiter |
| Control Tower | Del Lily • Ill Gill • Epsilon |
| Bosses | Barba Ray • Gol Dragon • Gal Gryphon • Olga Flow |


