Hildeblue: Difference between revisions
No edit summary |
m (→Megid level) |
||
| (25 intermediate revisions by 6 users not shown) | |||
| Line 1: | Line 1: | ||
{{Enemy|name=Hildeblue (E1)}} | {{Enemy|name=Hildeblue (E1)}} | ||
{{Enemy|name=Hildeblue (E2)}} | {{Enemy|name=Hildeblue (E2)}} | ||
[[ | A [[Hildebear]] has a 1/500 chance of spawning as a Hildeblue. | ||
==Behavior/Mechanics== | |||
Hildeblue are quite dangerous and can kill a weaker character in one hit. At range, they will either spit {{Gibarta}} ({{Megid}} in Ultimate mode) at their targets or leap to them, dealing damage where they land. | |||
===Megid level=== | |||
{| | |||
| | |||
<tabber> | |||
Normal= | |||
{| class="wikitable" style="text-align:center" | |||
! Area | |||
! {{Megid}}<br>level | |||
! EDK for<br>immunity | |||
|- | |||
| Forest || 30 || 100 | |||
|- | |||
| VR Temple || 30 || 100 | |||
|} | |||
|-| | |||
One Person= | |||
{| class="wikitable" style="text-align:center" | |||
! Area | |||
! {{Megid}}<br>level | |||
! EDK for<br>immunity | |||
|- | |||
| Forest || 30 || 100 | |||
|- | |||
| VR Temple || 1 || 27 | |||
|} | |||
</tabber> | |||
|} | |||
==Strategy== | ==Strategy== | ||
===Hunters=== | ===Hunters=== | ||
Hildeblue have worse coverage on their right, so try to attack them from that side. Their punches seem to have better coverage on their left, so it's inadvisable to attack from that side. | |||
===Rangers=== | ===Rangers=== | ||
Once the Hildeblue has closed the gap | Once the Hildeblue has closed the gap, attacking from its right is a good idea. If range can be maintained, [[Mechguns]] are a good option for quick damage. | ||
===Forces=== | ===Forces=== | ||
Hildeblue in Ep. 1 are weak to Foie until Ultimate, where they are weak to Grants. In Ep.2, they are weak to Foie and Megid in all difficulties. | Hildeblue in Ep. 1 are weak to Foie until Ultimate, where they are weak to Grants. In Ep.2, they are weak to Foie and Megid in all difficulties. | ||
== | ==Hunting== | ||
===Episode 1=== | |||
The following quests are recommended for hunting [[Hildebear|Hildebears]] in Episode 1: | |||
* [Event] [[Maximum Attack E: Forest]]: Clear quest (32) | |||
* [VR] [[Tyrell's Ego]]: Clear Forest (52) | |||
* [Retrieval] [[Rappy's Holiday]]: Clear Forest 2 (75) | |||
* [Maximum Attack] [[Maximum Attack E: Episode 1]]: Clear Forest (17) | |||
* [VR] [[Simulator 2.0]]: Clear Forest (10) | |||
* [Story] [[Forest of Sorrow]]: Clear quest (16) | |||
===Episode 2=== | |||
The following quests are recommended for hunting [[Hildebear|Hildebears]] in Episode 2: | |||
* [Maximum Attack] [[MAXIMUM ATTACK 2 Ver2]]: "Beginning of a legacy" route (15) | |||
* [Extermination] [[CAL's Clock Challenge]]: Clear Temple (8) | |||
* [Halloween] [[Hollow Reality: Temple]]: Clear Quest (21) | |||
* [Event] [[Maximum Attack E: Temple]]: Clear Temple (22) | |||
* [Maximum Attack] [[Maximum Attack E: VR]]: Clear Temple (21) | |||
* [Retrieval] [[Lost SHOCK RIFLE]]: Clear Alpha (15) / Clear Quest (41) | |||
==Rare Drops== | ==Rare Drops== | ||
===Episode 1=== | ===Episode 1=== | ||
{{ | {{EnemyDropTable|Hildeblue (E1)}} | ||
===Episode 2=== | ===Episode 2=== | ||
{{ | {{EnemyDropTable|Hildeblue (E2)}} | ||
{{Episode1Enemies}} | |||
{{ | {{Episode2Enemies}} | ||
{{ | [[Category:Enemies]] | ||
[[Category:Forest Enemies]] | |||
[[Category:VR Temple Enemies]] | |||
[[Category:Rare Enemies]] | |||
[[Category:Casts Gibarta]] | |||
[[Category:Casts Megid]] | |||
[[Category:Inflicts Freeze]] | |||
Latest revision as of 19:00, 16 May 2025
|
||||||||||||||||||||||||||||||||||||||||||||||||
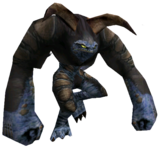
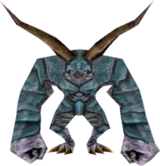
A Hildebear has a 1/500 chance of spawning as a Hildeblue.
Behavior/Mechanics
Hildeblue are quite dangerous and can kill a weaker character in one hit. At range, they will either spit ![]() Gibarta (
Gibarta (![]() Megid in Ultimate mode) at their targets or leap to them, dealing damage where they land.
Megid in Ultimate mode) at their targets or leap to them, dealing damage where they land.
Megid level
|
|
Strategy
Hunters
Hildeblue have worse coverage on their right, so try to attack them from that side. Their punches seem to have better coverage on their left, so it's inadvisable to attack from that side.
Rangers
Once the Hildeblue has closed the gap, attacking from its right is a good idea. If range can be maintained, Mechguns are a good option for quick damage.
Forces
Hildeblue in Ep. 1 are weak to Foie until Ultimate, where they are weak to Grants. In Ep.2, they are weak to Foie and Megid in all difficulties.
Hunting
Episode 1
The following quests are recommended for hunting Hildebears in Episode 1:
- [Event] Maximum Attack E: Forest: Clear quest (32)
- [VR] Tyrell's Ego: Clear Forest (52)
- [Retrieval] Rappy's Holiday: Clear Forest 2 (75)
- [Maximum Attack] Maximum Attack E: Episode 1: Clear Forest (17)
- [VR] Simulator 2.0: Clear Forest (10)
- [Story] Forest of Sorrow: Clear quest (16)
Episode 2
The following quests are recommended for hunting Hildebears in Episode 2:
- [Maximum Attack] MAXIMUM ATTACK 2 Ver2: "Beginning of a legacy" route (15)
- [Extermination] CAL's Clock Challenge: Clear Temple (8)
- [Halloween] Hollow Reality: Temple: Clear Quest (21)
- [Event] Maximum Attack E: Temple: Clear Temple (22)
- [Maximum Attack] Maximum Attack E: VR: Clear Temple (21)
- [Retrieval] Lost SHOCK RIFLE: Clear Alpha (15) / Clear Quest (41)
Rare Drops
Episode 1
| Normal | |||||||||
|---|---|---|---|---|---|---|---|---|---|
| Resist/Fire | Power Material | Resist/Fire | General/Mind | General/Legs | Resist/Flame | Resist/Light | General/Mind | Resist/Fire | General/Legs |
| 7/8 | 7/8 | 7/8 | 7/8 | 7/8 | 7/8 | 7/8 | 7/8 | 7/8 | 7/8 |
| Hard | |||||||||
| Meteor Smash | Wals-MK2 | Photon Claw | Vjaya | H&S25 Justice | Ice Staff: Dagon | Diska of Liberator | Last Survivor | Kaladbolg | Inferno Bazooka |
| 7/8 | 7/8 | 7/8 | 7/8 | 7/8 | 7/8 | 7/8 | 7/8 | 7/8 | 7/8 |
| Very Hard | |||||||||
| Final Impact | Elysion | God/Arm | Hildeblue's Head | Hildeblue's Head | Hildeblue's Head | Cure/Shock | Hildeblue's Head | Hildeblue's Head | Diska of Braveman |
| 7/8 | 7/8 | 7/8 | 7/8 | 7/8 | 7/8 | 7/8 | 7/8 | 7/8 | 7/8 |
| Ultimate | |||||||||
| Red Saber | Frozen Shooter | Red Saber | Heaven Punisher | Frozen Shooter | Star Amplifier | Magic Stone "Iritista" | Syncesta | Frozen Shooter | Frozen Shooter |
| 1/2 | 1/2 | 1/2 | 1/205 | 1/2 | 1/2 | 1/21.3 | 1/21.3 | 1/2 | 1/2 |
Episode 2
| Normal | |||||||||
|---|---|---|---|---|---|---|---|---|---|
| Resist/Flame | Resist/Freeze | General/Power | Trigrinder | Resist/Light | Resist/Freeze | AddSlot | Dragon/HP | Scape Doll | General/Power |
| 7/8 | 7/8 | 7/8 | 7/8 | 7/8 | 7/8 | 7/8 | 7/8 | 7/8 | 7/8 |
| Hard | |||||||||
| Meteor Smash | Wals-MK2 | Last Survivor | Vjaya | H&S25 Justice | Ice Staff: Dagon | Diska of Liberator | Bloody Art | Brave Hammer | Diska of Liberator |
| 7/8 | 7/8 | 7/8 | 7/8 | 7/8 | 7/8 | 7/8 | 7/8 | 7/8 | 7/8 |
| Very Hard | |||||||||
| Final Impact | Justy-23ST | Mahu | Victor Axe | L&K14 Combat | Storm Wand: Indra | Victor Axe | Victor Axe | Bloody Art | Diska of Braveman |
| 7/8 | 7/8 | 7/8 | 7/8 | 7/8 | 7/8 | 7/8 | 7/8 | 7/8 | 7/8 |
| Ultimate | |||||||||
| Frozen Shooter | Kamui | Heavenly/Power | Windmill | Kamui | Berdysh | Magic Stone "Iritista" | Syncesta | Flight Cutter | Rage de Glace |
| 1/2 | 1/2 | 1/2 | 1/2 | 1/2 | 1/2 | 1/21.3 | 1/21.3 | 1/2 | 1/2 |
| Episode 1 Monsters | |
|---|---|
| Forest | Rag Rappy (Rare: Al Rappy) • Savage Wolf • Barbarous Wolf • Booma • Gobooma • Gigobooma • Mothmant • Monest • Hildebear (Rare: Hildeblue) |
| Cave | Evil Shark • Pal Shark • Guil Shark • Poison Lily (Rare: Nar Lily) • Nano Dragon • Pan Arms • Hidoom • Migium • Grass Assassin • Pofuilly Slime (Rare: Pouilly Slime) |
| Mine | Gillchic • Dubchic • Dubwitch • Canadine • Canane • Sinow Beat • Sinow Gold • Garanz |
| Ruins | Dimenian • La Dimenian • So Dimenian • Claw • Bulclaw • Delsaber • Chaos Sorcerer • Dark Belra • Dark Gunner • Chaos Bringer |
| Bosses | Dragon • De Rol Le • Vol Opt • Dark Falz (Darvant) |
| Episode 2 Monsters | |
|---|---|
| VR Temple | Rag Rappy (Rare: Love Rappy • St Rappy • Hallo Rappy • Egg Rappy) • Dimenian • La Dimenian • So Dimenian • Poison Lily (Rare: Nar Lily) • Mothmant • Monest • Grass Assassin • Hildebear (Rare: Hildeblue) • Dark Belra |
| VR Spaceship | Savage Wolf • Barbarous Wolf • Pan Arms • Hidoom • Migium • Gillchic • Dubchic • Dubwitch • Delsaber • Garanz • Chaos Sorcerer |
| Central Control Area | Merillia • Meriltas • Gee • Ul Gibbon • Zol Gibbon • Sinow Berill • Sinow Spigell • Gi Gue • Gibbles • Mericarol • Merikle • Mericus |
| Seabed | Dolmolm • Dolmdarl • Sinow Zoa • Sinow Zele • Morfos • Deldepth • Recobox • Recon • Delbiter |
| Control Tower | Del Lily • Ill Gill • Epsilon |
| Bosses | Barba Ray • Gol Dragon • Gal Gryphon • Olga Flow |

