Endless: Episode 1: Difference between revisions
No edit summary |
mNo edit summary |
||
| (22 intermediate revisions by 4 users not shown) | |||
| Line 17: | Line 17: | ||
|uxpoff=??? | |uxpoff=??? | ||
}} | }} | ||
Rare enemies are rolled again when starting a new lap in this quest. | |||
==Room Objectives== | ==Room Objectives== | ||
| Line 23: | Line 25: | ||
* Avoid healing. | * Avoid healing. | ||
* Avoid death. | * Avoid death. | ||
* Avoid losing | * Avoid losing {{Meseta}}. | ||
Time and points added per area is based on the number of penalties the party receives for the current objective. | Time and points added per area is based on the number of penalties the party receives for the current objective. | ||
| Line 29: | Line 31: | ||
Boss rooms each have their own static objective, which are the following: | Boss rooms each have their own static objective, which are the following: | ||
* Dragon: Avoid taking damage. | * [[Dragon]]: Avoid taking damage. | ||
* De Rol Le: Avoid healing. | * [[De Rol Le]]: Avoid healing. | ||
* Vol Opt: Avoid losing meseta. | * [[Vol Opt]]: Avoid losing meseta. | ||
* Dark Falz: Avoid death. | * [[Dark Falz]]: Avoid death. | ||
A lap ends after 20 total areas | A lap ends after 20 total areas (or 21 if Dark Falz is reached; see [[Endless: Episode 1#Additional Area|Additional Area]] below). | ||
==Lap Completion== | ==Lap Completion== | ||
| Line 49: | Line 51: | ||
* Check the current lap number. | * Check the current lap number. | ||
==Invincibility Blessing== | ==Invincibility Blessing== | ||
Each non-boss room has a 15% base chance (reduced by 3% per rank of the [ | Each non-boss room has a 15% base chance (reduced by 3% per rank of the [[Endless: Episode 1#Lap Completion|lap penalty]]) of granting invincibility to the party for a variable amount of time. The duration of this is based on how fast the previous room was cleared. | ||
==Additional Area== | ==Additional Area== | ||
If the party manages to reach the end of a lap with a low amount of overall penalties (the exact limit is | If the party manages to reach the end of a lap with a low amount of overall penalties (the exact limit is five times the number of party members, or three when solo), Dark Falz is given as an additional area. This area does not subtract from the timer, and gives a higher than usual amount of points for completion. | ||
==Coffee Side Quest== | ==Coffee Side Quest== | ||
A side quest that awards additional points and meseta can be completed once per lap. A video with the necessary steps can be found [https://www.youtube.com/watch?v= | A side quest that awards additional points and meseta can be completed once per lap. A video with the necessary steps can be found [https://www.youtube.com/watch?v=DZ4uEnsfsko here]. | ||
==Enemy Counts== | ==Enemy Counts== | ||
{|class="wikitable" style="display:inline-table;vertical-align:top;" | {|class="wikitable questTable" style="display:inline-table;vertical-align:top;" | ||
!colspan= | ! colspan="5" |[[Forest 1]] | ||
|- | |- | ||
!Enemy | !Enemy | ||
! | !<span style="color:#EE4B2B">R</span> | ||
!<span style="color:#00FF00">G</span> | |||
!<span style="color:#FFFF00">Y</span> | |||
!Total | |||
|- | |- | ||
|[[Booma]] | |||
|13 | |||
|7 | |||
|10 | |||
|30 | |||
|- | |- | ||
|[[ | |[[Gobooma]] | ||
|2 | |||
|3 | |||
|2 | |2 | ||
|7 | |||
|- | |- | ||
|[[ | |[[Gigobooma]] | ||
| | |4 | ||
|0 | |||
|4 | |||
|8 | |||
|- | |- | ||
|[[Savage Wolf]] | |[[Savage Wolf]] | ||
| | |3 | ||
|6 | |6 | ||
|5 | |||
|14 | |||
|- | |- | ||
|[[ | |[[Barbarous Wolf]] | ||
| | |1 | ||
| | |0 | ||
| | |1 | ||
| | |2 | ||
|- | |- | ||
|[[Rag Rappy]] | |||
|0 | |||
|2 | |||
|0 | |||
|2 | |||
|} | |} | ||
{|class="wikitable" style="display:inline-table;vertical-align:top;" | |||
!colspan= | {|class="wikitable questTable" style="display:inline-table;vertical-align:top;" | ||
! colspan="5" |[[Forest 2]] | |||
|- | |- | ||
!Enemy | !Enemy | ||
! | !<span style="color:#EE4B2B">R</span> | ||
!<span style="color:#00FF00">G</span> | |||
!<span style="color:#FFFF00">Y</span> | |||
!Total | |||
|- | |||
|[[Booma]] | |||
|3 | |||
|2 | |||
|1 | |||
|6 | |||
|- | |- | ||
|[[Gobooma]] | |||
|8 | |||
|4 | |||
|6 | |||
|18 | |||
|- | |- | ||
|[[ | |[[Gigobooma]] | ||
|1 | |||
|7 | |7 | ||
|5 | |5 | ||
|13 | |||
|- | |- | ||
|[[Savage Wolf]] | |[[Savage Wolf]] | ||
| | |4 | ||
| | |2 | ||
|6 | |6 | ||
|12 | |||
|- | |- | ||
|[[ | |[[Barbarous Wolf]] | ||
| | |1 | ||
|1 | |||
|0 | |||
|2 | |||
|- | |- | ||
|[[ | |[[Rag Rappy]] | ||
| | |5 | ||
|8 | |||
|4 | |||
|17 | |||
|- | |- | ||
|[[Hildebear]] | |||
|1 | |||
|1 | |||
|5 | |||
|7 | |||
|} | |} | ||
{|class="wikitable" style="display:inline-table;vertical-align:top;" | |||
!colspan= | {|class="wikitable questTable" style="display:inline-table;vertical-align:top;" | ||
! colspan="5" |[[Cave 1]] | |||
|- | |- | ||
!Enemy | !Enemy | ||
! | !<span style="color:#EE4B2B">R</span> | ||
!<span style="color:#00FF00">G</span> | |||
!<span style="color:#FFFF00">Y</span> | |||
!Total | |||
|- | |- | ||
|[[Evil Shark]] | |||
|10 | |||
|10 | |||
|13 | |||
|33 | |||
|- | |- | ||
|[[ | |[[Pal Shark]] | ||
| | |3 | ||
|1 | |||
|4 | |||
|8 | |||
|- | |- | ||
|[[Guil Shark]] | |[[Guil Shark]] | ||
|3 | |||
|1 | |||
|4 | |||
|8 | |8 | ||
|- | |- | ||
|[[Poison Lily]] | |[[Poison Lily]] | ||
|4 | |||
|5 | |||
|2 | |||
|11 | |11 | ||
|- | |- | ||
|[[Grass Assassin]] | |[[Grass Assassin]] | ||
|2 | |||
|1 | |||
|0 | |||
|3 | |3 | ||
|- | |- | ||
|[[Nano Dragon]] | |||
|2 | |||
|1 | |||
|2 | |||
|5 | |||
|} | |} | ||
{|class="wikitable" style="display:inline-table;vertical-align:top;" | |||
!colspan= | {|class="wikitable questTable" style="display:inline-table;vertical-align:top;" | ||
! colspan="5" |[[Cave 2]] | |||
|- | |- | ||
!Enemy | !Enemy | ||
! | !<span style="color:#EE4B2B">R</span> | ||
!<span style="color:#00FF00">G</span> | |||
!<span style="color:#FFFF00">Y</span> | |||
!Total | |||
|- | |- | ||
|[[Evil Shark]] | |||
|6 | |||
|5 | |||
|8 | |||
|19 | |||
|- | |- | ||
|[[ | |[[Pal Shark]] | ||
| | |12 | ||
|10 | |||
|9 | |||
|31 | |||
|- | |- | ||
|[[ | |[[Guil Shark]] | ||
|1 | |||
|5 | |||
|4 | |||
|10 | |10 | ||
|- | |- | ||
|[[ | |[[Poison Lily]] | ||
|6 | |||
|3 | |||
|1 | |||
|10 | |10 | ||
|- | |- | ||
|[[ | |[[Pofuilly Slime]] | ||
| | |1 | ||
|1 | |||
|0 | |||
|2 | |||
|- | |- | ||
|[[ | |[[Grass Assassin]] | ||
| | |3 | ||
|3 | |||
|1 | |||
|7 | |||
|- | |- | ||
|[[Nano Dragon]] | |[[Nano Dragon]] | ||
|1 | |||
|3 | |||
|0 | |||
|4 | |4 | ||
|} | |} | ||
{|class="wikitable" style="display:inline-table;vertical-align:top;" | {|class="wikitable" style="display:inline-table;vertical-align:top;" | ||
!colspan= | ! colspan="5" |[[Cave 3]] | ||
|- | |- | ||
!Enemy | !Enemy | ||
! | !<span style="color:#EE4B2B">R</span> | ||
!<span style="color:#00FF00">G</span> | |||
!<span style="color:#FFFF00">Y</span> | |||
!Total | |||
|- | |- | ||
|[[Evil Shark]] | |||
|6 | |||
|8 | |||
|9 | |||
|23 | |||
|- | |- | ||
|[[ | |[[Pal Shark]] | ||
|8 | |8 | ||
|5 | |||
|9 | |||
|22 | |||
|- | |- | ||
|[[Guil Shark]] | |[[Guil Shark]] | ||
|3 | |||
|5 | |||
|4 | |||
|12 | |12 | ||
|- | |- | ||
|[[ | |[[Poison Lily]] | ||
| | |4 | ||
| | |3 | ||
| | |1 | ||
| | |8 | ||
|- | |- | ||
|[[Pofuilly Slime]] | |[[Pofuilly Slime]] | ||
|0 | |||
|0 | |||
|2 | |||
|2 | |2 | ||
|- | |- | ||
|[[Nano Dragon]] | |[[Nano Dragon]] | ||
|0 | |||
|3 | |||
|0 | |||
|3 | |3 | ||
|} | |} | ||
{|class="wikitable" style="display:inline-table;vertical-align:top;" | <br> | ||
!colspan= | {|class="wikitable questTable" style="display:inline-table;vertical-align:top;" | ||
! colspan="5" |[[Mine 1]] | |||
|- | |- | ||
!Enemy | !Enemy | ||
! | !<span style="color:#EE4B2B">R</span> | ||
!<span style="color:#00FF00">G</span> | |||
!<span style="color:#FFFF00">Y</span> | |||
!Total | |||
|- | |- | ||
|[[Gillchic]] | |[[Gillchic]] | ||
| | |13 | ||
| | |14 | ||
| | |14 | ||
| | |41 | ||
|- | |- | ||
|[[Canadine]] | |[[Canadine]] | ||
| | |12 | ||
|3 | |3 | ||
|13 | |||
|28 | |||
|- | |- | ||
|[[Canane]] | |[[Canane]] | ||
|0 | |||
|0 | |||
|1 | |||
|1 | |1 | ||
|- | |- | ||
|[[Sinow Beat]] | |||
|0 | |||
|4 | |||
|2 | |||
|6 | |||
|- | |||
|[[Sinow Gold]] | |||
|2 | |||
|0 | |||
|1 | |||
|3 | |||
|} | |} | ||
{|class="wikitable" style="display:inline-table;vertical-align:top;" | {|class="wikitable questTable" style="display:inline-table;vertical-align:top;" | ||
!colspan= | ! colspan="5" |[[Mine 2]] | ||
|- | |- | ||
!Enemy | !Enemy | ||
! | !<span style="color:#EE4B2B">R</span> | ||
!<span style="color:#00FF00">G</span> | |||
!<span style="color:#FFFF00">Y</span> | |||
!Total | |||
|- | |- | ||
|[[Gillchic]] | |[[Gillchic]] | ||
| | |7 | ||
|7 | |||
|14 | |||
|28 | |||
|- | |- | ||
|[[Dubchic]] | |[[Dubchic]] | ||
| | |4 | ||
|2 | |||
|6 | |||
|12 | |||
|- | |||
|[[Canadine]] | |||
|14 | |||
|4 | |||
|1 | |||
|19 | |||
|- | |- | ||
|[[ | |[[Canane]] | ||
| | |1 | ||
|0 | |||
|0 | |||
|1 | |||
|- | |- | ||
|[[Sinow Beat]] | |[[Sinow Beat]] | ||
|4 | |||
|2 | |||
|4 | |||
|10 | |10 | ||
|- | |- | ||
|[[ | |[[Garanz]] | ||
| | |1 | ||
|1 | |||
|1 | |||
|3 | |||
|- | |- | ||
|[[Dubwitch]] | |[[Dubwitch]] | ||
|1 | |||
|1 | |||
|1 | |||
|3 | |3 | ||
|} | |} | ||
{|class="wikitable" style="display:inline-table;vertical-align:top;" | |||
!colspan= | {|class="wikitable questTable" style="display:inline-table;vertical-align:top;" | ||
! colspan="5" |[[Ruins 1]] | |||
|- | |- | ||
!Enemy | !Enemy | ||
! | !<span style="color:#EE4B2B">R</span> | ||
!<span style="color:#00FF00">G</span> | |||
!<span style="color:#FFFF00">Y</span> | |||
!Total | |||
|- | |- | ||
|[[Dimenian]] | |||
|[[ | |7 | ||
|7 | |||
|9 | |9 | ||
|23 | |||
|- | |- | ||
|[[ | |[[La Dimenian]] | ||
|7 | |7 | ||
| | |3 | ||
| | |0 | ||
| | |10 | ||
|- | |- | ||
|[[So Dimenian]] | |[[So Dimenian]] | ||
|1 | |||
|0 | |||
|1 | |||
|2 | |2 | ||
|- | |- | ||
|[[ | |[[Claw]] | ||
|13 | |13 | ||
|5 | |||
|7 | |||
|25 | |||
|- | |- | ||
|[[ | |[[Bulclaw]] | ||
| | |0 | ||
|1 | |||
|0 | |||
|1 | |||
|- | |||
|[[Delsaber]] | |||
|2 | |||
|3 | |||
|2 | |||
|7 | |||
|- | |- | ||
|[[Dark Belra]] | |[[Dark Belra]] | ||
| | |0 | ||
|1 | |||
|3 | |||
|4 | |||
|- | |- | ||
|[[ | |[[Chaos Sorcerer]] | ||
|2 | |2 | ||
| | |1 | ||
|3 | |||
|6 | |||
|} | |} | ||
{|class="wikitable" style="display:inline-table;vertical-align:top;" | {|class="wikitable questTable" style="display:inline-table;vertical-align:top;" | ||
!colspan= | ! colspan="5" |[[Ruins 2]] | ||
|- | |- | ||
!Enemy | !Enemy | ||
! | !<span style="color:#EE4B2B">R</span> | ||
!<span style="color:#00FF00">G</span> | |||
!<span style="color:#FFFF00">Y</span> | |||
!Total | |||
|- | |- | ||
|[[Dimenian]] | |||
|4 | |||
|4 | |||
|2 | |||
|10 | |||
|- | |- | ||
|[[La Dimenian]] | |[[La Dimenian]] | ||
| | |3 | ||
|10 | |||
|8 | |||
|21 | |||
|- | |- | ||
|[[So Dimenian]] | |[[So Dimenian]] | ||
|1 | |||
|0 | |||
|0 | |||
|1 | |1 | ||
|- | |- | ||
|[[ | |[[Claw]] | ||
| | |6 | ||
|6 | |||
|9 | |||
|21 | |||
|- | |||
|[[Bulclaw]] | |||
|0 | |||
|1 | |||
|0 | |||
|1 | |||
|- | |- | ||
|[[Delsaber]] | |[[Delsaber]] | ||
| | |2 | ||
|3 | |||
|3 | |||
|8 | |||
|- | |- | ||
|[[Dark Gunner]] | |[[Dark Gunner]] | ||
| | |3 | ||
| | |3 | ||
| | |0 | ||
| | |6 | ||
|- | |- | ||
|[[Chaos Bringer]] | |[[Chaos Bringer]] | ||
|0 | |||
|1 | |1 | ||
| | |0 | ||
|1 | |1 | ||
|} | |} | ||
{|class="wikitable" style="display:inline-table;vertical-align:top;" | |||
!colspan= | {|class="wikitable questTable" style="display:inline-table;vertical-align:top;" | ||
! colspan="5" |[[Ruins 3]] | |||
|- | |- | ||
!Enemy | !Enemy | ||
! | !<span style="color:#EE4B2B">R</span> | ||
!<span style="color:#00FF00">G</span> | |||
!<span style="color:#FFFF00">Y</span> | |||
!Total | |||
|- | |- | ||
|[[Dimenian]] | |||
|3 | |||
|5 | |||
|18 | |||
|26 | |||
|- | |- | ||
|[[ | |[[La Dimenian]] | ||
|5 | |||
|0 | |||
|0 | |||
|5 | |5 | ||
|- | |- | ||
|[[Dimenian]] | |[[So Dimenian]] | ||
| | |3 | ||
|0 | |||
|0 | |||
|3 | |||
|- | |||
|[[Claw]] | |||
|7 | |||
|9 | |||
|2 | |||
|18 | |||
|- | |- | ||
|[[Bulclaw]] | |[[Bulclaw]] | ||
|0 | |||
|1 | |||
|0 | |||
|1 | |1 | ||
|- | |- | ||
|[[ | |[[Dark Belra]] | ||
| | |2 | ||
|1 | |||
|2 | |||
|5 | |||
|- | |- | ||
|[[Dark Gunner]] | |[[Dark Gunner]] | ||
| | |0 | ||
|5 | |||
|4 | |||
|9 | |||
|- | |- | ||
|[[ | |[[Chaos Sorcerer]] | ||
| | |2 | ||
|2 | |||
|1 | |||
|5 | |||
|- | |- | ||
|[[Chaos Bringer]] | |[[Chaos Bringer]] | ||
|1 | |1 | ||
| | |0 | ||
| | |0 | ||
| | |1 | ||
|} | |} | ||
{|class="wikitable" style="display:inline-table;vertical-align:top;" | {|class="wikitable questTable" style="display:inline-table;vertical-align:top;" | ||
!colspan=2| | !colspan=2|Bosses | ||
|- | |- | ||
!Enemy | !Enemy | ||
!Count | !Count | ||
|- | |- | ||
! colspan="2" |[[Under the Dome]] | |||
|- | |- | ||
|[[Dragon]] | |[[Dragon]] | ||
| Line 350: | Line 582: | ||
|- | |- | ||
!colspan=2|[[Underground Channel]] | !colspan=2|[[Underground Channel]] | ||
|- | |- | ||
|[[De Rol Le]] | |[[De Rol Le]] | ||
| Line 359: | Line 587: | ||
|- | |- | ||
!colspan=2|[[Monitor Room]] | !colspan=2|[[Monitor Room]] | ||
|- | |- | ||
|[[Vol Opt]] | |[[Vol Opt]] | ||
|1 | |1 | ||
|- | |- | ||
!colspan=2|[[???]] | !colspan=2|[[???? (Dark Falz)|????]] | ||
|- | |- | ||
|[[Dark Falz]] | |[[Dark Falz]] | ||
|1 | |1 | ||
|} | |} | ||
{|class="wikitable" style="display:inline-table;vertical-align:top;" | {| class="wikitable questTable" style="display:inline-table;vertical-align:top;" | ||
!colspan= | ! colspan="8" |Total | ||
|- | |- | ||
!Enemy | !Enemy | ||
!Count | !Count | ||
!Enemy | !Enemy | ||
!Count | |||
!Enemy | |||
!Count | !Count | ||
!Enemy | !Enemy | ||
!Count | !Count | ||
|- | |- | ||
|[[Booma]] | |[[Booma]] | ||
|36 | |36 | ||
| [[Evil Shark]] | |||
|75 | |||
|[[Gillchic]] | |||
|69 | |||
|[[Dimenian]] | |||
|59 | |||
|- | |||
|[[Gobooma]] | |[[Gobooma]] | ||
|25 | |25 | ||
|[[Pal Shark]] | |||
|61 | |||
|[[Dubchic]] | |||
|12 | |||
|[[La Dimenian]] | |||
|36 | |||
|- | |- | ||
|[[Gigobooma]] | |[[Gigobooma]] | ||
|21 | |21 | ||
|[[Guil Shark]] | |[[Guil Shark]] | ||
|30 | |30 | ||
|[[ | |[[Canadine]] | ||
| | |47 | ||
|[[So Dimenian]] | |||
|6 | |||
|- | |- | ||
|[[Savage Wolf]] | |||
|26 | |||
|[[Poison Lily]] | |[[Poison Lily]] | ||
|29 | |29 | ||
|[[ | |[[Canane]] | ||
| | |2 | ||
|[[Claw]] | |||
|64 | |||
|- | |- | ||
|[[Pofuilly Slime]] | |[[Barbarous Wolf]] | ||
|4 | |||
| [[Pofuilly Slime]] | |||
|4 | |4 | ||
|[[Sinow Beat]] | |[[Sinow Beat]] | ||
|16 | |16 | ||
|[[Bulclaw]] | |||
|3 | |||
|- | |- | ||
|[[Rag Rappy]] | |||
|19 | |||
| [[Grass Assassin]] | |||
|10 | |||
|[[Sinow Gold]] | |[[Sinow Gold]] | ||
|3 | |3 | ||
|[[Delsaber]] | |||
|15 | |||
|- | |||
|[[Hildebear]] | |||
|7 | |||
|[[Nano Dragon]] | |||
|12 | |||
|[[Garanz]] | |[[Garanz]] | ||
|3 | |3 | ||
|[[Dark Gunner]] | |||
|15 | |||
|- | |- | ||
!colspan=4| | ! colspan="4" rowspan="3" | | ||
|[[Dubwitch]] | |||
|[[ | |||
|3 | |3 | ||
|[[Dark Belra]] | |||
|9 | |||
|- | |- | ||
! colspan="2" rowspan="2" | | |||
|[[Chaos Sorcerer]] | |[[Chaos Sorcerer]] | ||
|11 | |11 | ||
|- | |- | ||
|[[Chaos Bringer]] | |[[Chaos Bringer]] | ||
|2 | |2 | ||
|} | |} | ||
{|class="wikitable" style="display:inline-table;vertical-align:top;" | {|class="wikitable" style="display:inline-table;vertical-align:top;" | ||
!colspan= | ! colspan="10" |Boxes | ||
|- | |- | ||
!Box Type | !Box Type | ||
| Line 523: | Line 707: | ||
|20 | |20 | ||
|[[Box|Box]] | |[[Box|Box]] | ||
| | |14 | ||
|[[Box|Box]] | |[[Box|Box]] | ||
| | |18 | ||
|[[Box|Box]] | |[[Box|Box]] | ||
|4 | |4 | ||
| Line 549: | Line 733: | ||
|- | |- | ||
|[[Box|Box]] | |[[Box|Box]] | ||
| | |5 | ||
|[[Box|Box]] | |[[Box|Box]] | ||
| | |4 | ||
|[[Box|Box]] | |[[Box|Box]] | ||
| | |4 | ||
|[[Box|Box]] | |[[Box|Box]] | ||
| | |14 | ||
|[[Box|Box]] | |[[Box|Box]] | ||
|6 | |6 | ||
|- | |- | ||
! | |||
! | |||
! | |||
! | |||
|[[Box|Box (Weapon)]] | |||
|1 | |||
! | |||
! | |||
! | |||
! | |||
|} | |} | ||
<br><br><br><br> | |||
{|class="wikitable" style="display:inline-table;vertical-align:top;" | {|class="wikitable" style="display:inline-table;vertical-align:top;" | ||
!colspan= | ! colspan="8" |Boss Boxes | ||
|- | |- | ||
!Box Type | !Box Type | ||
| Line 575: | Line 770: | ||
!colspan=2|[[Underground Channel]] | !colspan=2|[[Underground Channel]] | ||
!colspan=2|[[Monitor Room]] | !colspan=2|[[Monitor Room]] | ||
!colspan=2|[[???]] | !colspan=2|[[???? (Dark Falz)|????]] | ||
|- | |||
|[[Box |Box (Armor)]] | |||
|2 | |||
|[[Box |Box (Armor)]] | |||
|2 | |||
|[[Box |Box (Armor)]] | |||
|3 | |||
|[[Box |Box (Armor)]] | |||
|9 | |||
|- | |- | ||
|[[Box |Box (Weapon)]] | |[[Box |Box (Weapon)]] | ||
| Line 585: | Line 789: | ||
|[[Box |Box (Weapon)]] | |[[Box |Box (Weapon)]] | ||
|12 | |12 | ||
|- | |- | ||
|[[Box |Box (Meseta)]] | |[[Box |Box (Meseta)]] | ||
| Line 606: | Line 801: | ||
|[[Box |Box (Tool)]] | |[[Box |Box (Tool)]] | ||
|5 | |5 | ||
! | |||
! | |||
|[[Box |Box (Tool)]] | |[[Box |Box (Tool)]] | ||
|7 | |7 | ||
! | |||
! | |||
|} | |} | ||
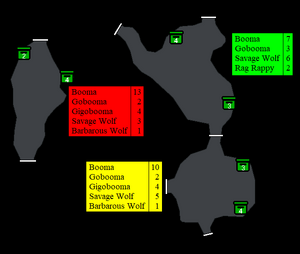
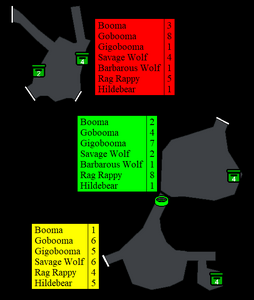
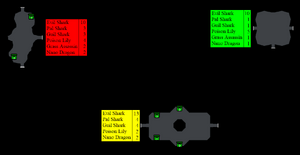
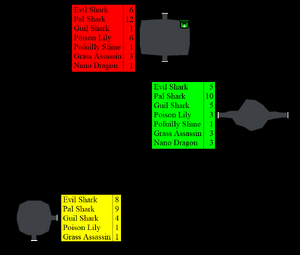
==Quest Maps== | |||
<gallery mode="nolines" heights="300" widths="300"> | |||
Endless Episode 1 (Forest 1).png | Forest 1 | |||
Endless Episode 1 (Forest 2).png | Forest 2 | |||
</gallery> | |||
<gallery mode="nolines" heights="300" widths="300"> | |||
Endless Episode 1 (Cave 1).png | Cave 1 | |||
Endless Episode 1 (Cave 2).png | Cave 2 | |||
Endless Episode 1 (Cave 3).png | Cave 3 | |||
</gallery> | |||
<gallery mode="nolines" heights="300" widths="300"> | |||
Endless Episode 1 (Mine 1).png | Mine 1 | |||
Endless Episode 1 (Mine 2).png | Mine 2 | |||
</gallery> | |||
<gallery mode="nolines" heights="300" widths="300"> | |||
Endless Episode 1 (Ruins 1).png | Ruins 1 | |||
Endless Episode 1 (Ruins 2).png | Ruins 2 | |||
Endless Episode 1 (Ruins 3).png | Ruins 3 | |||
</gallery> | |||
[[File:Map_Legend.png|350px|]] | |||
{{Episode1Quests}} | {{Episode1Quests}} | ||
Latest revision as of 21:52, 7 June 2026
| Episode 1 | |||||||||||||||||
|---|---|---|---|---|---|---|---|---|---|---|---|---|---|---|---|---|---|
| Category: | |||||||||||||||||
| Info: | A VR simulation designed to test a team's limits! | ||||||||||||||||
| Description: | Test the simulator to see how high you can get your score! | ||||||||||||||||
| Reward: | ??? Meseta | ||||||||||||||||
| Author: | Alisaryn | ||||||||||||||||
| Languages: | English | ||||||||||||||||
| Total XP | |||||||||||||||||
|
|
|||||||||||||||||
Rare enemies are rolled again when starting a new lap in this quest.
Room Objectives
Each room of the quest has one of four objectives, chosen randomly for non-boss areas:
- Avoid taking damage.
- Avoid healing.
- Avoid death.
- Avoid losing
 Meseta.
Time and points added per area is based on the number of penalties the party receives for the current objective.
Additionally, areas 5 and 15 each have a bonus objective on top of their typical objective, which is a task that awards additional points if completed successfully.
Boss rooms each have their own static objective, which are the following:
- Dragon: Avoid taking damage.
- De Rol Le: Avoid healing.
- Vol Opt: Avoid losing meseta.
- Dark Falz: Avoid death.
A lap ends after 20 total areas (or 21 if Dark Falz is reached; see Additional Area below).
Lap Completion
After completion of a lap, one rank of a quest-wide penalty is applied for the rest of the run. These are applied in the following order:
- Reduced invincibility (blessing) chance. (Max: 5 ranks)
- Room clear time decrease. (Max: 5 ranks)
- Stricter penalties (Penalties reduce the room clear time award by additional amounts.) (Max: 4 ranks)
- Extra time deduction per penalty (x additional seconds are deducted from the timer per penalty, x being the current lap number.) (Max: Infinite ranks)
Quest Board
The Quest Board (Item Pack -> Quest Board) has some optional uses in this quest, allowing the player to:
- Check their current points.
- Check the current room's objective.
- Check the number of objective penalties for the current room.
- Check the current lap number.
Invincibility Blessing
Each non-boss room has a 15% base chance (reduced by 3% per rank of the lap penalty) of granting invincibility to the party for a variable amount of time. The duration of this is based on how fast the previous room was cleared.
Additional Area
If the party manages to reach the end of a lap with a low amount of overall penalties (the exact limit is five times the number of party members, or three when solo), Dark Falz is given as an additional area. This area does not subtract from the timer, and gives a higher than usual amount of points for completion.
Coffee Side Quest
A side quest that awards additional points and meseta can be completed once per lap. A video with the necessary steps can be found here.
Enemy Counts
| Forest 1 | ||||
|---|---|---|---|---|
| Enemy | R | G | Y | Total |
| Booma | 13 | 7 | 10 | 30 |
| Gobooma | 2 | 3 | 2 | 7 |
| Gigobooma | 4 | 0 | 4 | 8 |
| Savage Wolf | 3 | 6 | 5 | 14 |
| Barbarous Wolf | 1 | 0 | 1 | 2 |
| Rag Rappy | 0 | 2 | 0 | 2 |
| Forest 2 | ||||
|---|---|---|---|---|
| Enemy | R | G | Y | Total |
| Booma | 3 | 2 | 1 | 6 |
| Gobooma | 8 | 4 | 6 | 18 |
| Gigobooma | 1 | 7 | 5 | 13 |
| Savage Wolf | 4 | 2 | 6 | 12 |
| Barbarous Wolf | 1 | 1 | 0 | 2 |
| Rag Rappy | 5 | 8 | 4 | 17 |
| Hildebear | 1 | 1 | 5 | 7 |
| Cave 1 | ||||
|---|---|---|---|---|
| Enemy | R | G | Y | Total |
| Evil Shark | 10 | 10 | 13 | 33 |
| Pal Shark | 3 | 1 | 4 | 8 |
| Guil Shark | 3 | 1 | 4 | 8 |
| Poison Lily | 4 | 5 | 2 | 11 |
| Grass Assassin | 2 | 1 | 0 | 3 |
| Nano Dragon | 2 | 1 | 2 | 5 |
| Cave 2 | ||||
|---|---|---|---|---|
| Enemy | R | G | Y | Total |
| Evil Shark | 6 | 5 | 8 | 19 |
| Pal Shark | 12 | 10 | 9 | 31 |
| Guil Shark | 1 | 5 | 4 | 10 |
| Poison Lily | 6 | 3 | 1 | 10 |
| Pofuilly Slime | 1 | 1 | 0 | 2 |
| Grass Assassin | 3 | 3 | 1 | 7 |
| Nano Dragon | 1 | 3 | 0 | 4 |
| Cave 3 | ||||
|---|---|---|---|---|
| Enemy | R | G | Y | Total |
| Evil Shark | 6 | 8 | 9 | 23 |
| Pal Shark | 8 | 5 | 9 | 22 |
| Guil Shark | 3 | 5 | 4 | 12 |
| Poison Lily | 4 | 3 | 1 | 8 |
| Pofuilly Slime | 0 | 0 | 2 | 2 |
| Nano Dragon | 0 | 3 | 0 | 3 |
| Mine 1 | ||||
|---|---|---|---|---|
| Enemy | R | G | Y | Total |
| Gillchic | 13 | 14 | 14 | 41 |
| Canadine | 12 | 3 | 13 | 28 |
| Canane | 0 | 0 | 1 | 1 |
| Sinow Beat | 0 | 4 | 2 | 6 |
| Sinow Gold | 2 | 0 | 1 | 3 |
| Mine 2 | ||||
|---|---|---|---|---|
| Enemy | R | G | Y | Total |
| Gillchic | 7 | 7 | 14 | 28 |
| Dubchic | 4 | 2 | 6 | 12 |
| Canadine | 14 | 4 | 1 | 19 |
| Canane | 1 | 0 | 0 | 1 |
| Sinow Beat | 4 | 2 | 4 | 10 |
| Garanz | 1 | 1 | 1 | 3 |
| Dubwitch | 1 | 1 | 1 | 3 |
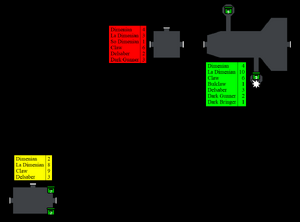
| Ruins 1 | ||||
|---|---|---|---|---|
| Enemy | R | G | Y | Total |
| Dimenian | 7 | 7 | 9 | 23 |
| La Dimenian | 7 | 3 | 0 | 10 |
| So Dimenian | 1 | 0 | 1 | 2 |
| Claw | 13 | 5 | 7 | 25 |
| Bulclaw | 0 | 1 | 0 | 1 |
| Delsaber | 2 | 3 | 2 | 7 |
| Dark Belra | 0 | 1 | 3 | 4 |
| Chaos Sorcerer | 2 | 1 | 3 | 6 |
| Ruins 2 | ||||
|---|---|---|---|---|
| Enemy | R | G | Y | Total |
| Dimenian | 4 | 4 | 2 | 10 |
| La Dimenian | 3 | 10 | 8 | 21 |
| So Dimenian | 1 | 0 | 0 | 1 |
| Claw | 6 | 6 | 9 | 21 |
| Bulclaw | 0 | 1 | 0 | 1 |
| Delsaber | 2 | 3 | 3 | 8 |
| Dark Gunner | 3 | 3 | 0 | 6 |
| Chaos Bringer | 0 | 1 | 0 | 1 |
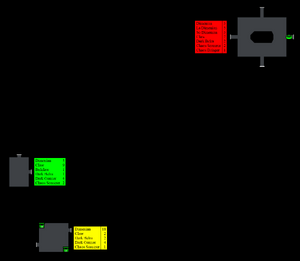
| Ruins 3 | ||||
|---|---|---|---|---|
| Enemy | R | G | Y | Total |
| Dimenian | 3 | 5 | 18 | 26 |
| La Dimenian | 5 | 0 | 0 | 5 |
| So Dimenian | 3 | 0 | 0 | 3 |
| Claw | 7 | 9 | 2 | 18 |
| Bulclaw | 0 | 1 | 0 | 1 |
| Dark Belra | 2 | 1 | 2 | 5 |
| Dark Gunner | 0 | 5 | 4 | 9 |
| Chaos Sorcerer | 2 | 2 | 1 | 5 |
| Chaos Bringer | 1 | 0 | 0 | 1 |
| Bosses | |
|---|---|
| Enemy | Count |
| Under the Dome | |
| Dragon | 1 |
| Underground Channel | |
| De Rol Le | 1 |
| Monitor Room | |
| Vol Opt | 1 |
| ???? | |
| Dark Falz | 1 |
| Total | |||||||
|---|---|---|---|---|---|---|---|
| Enemy | Count | Enemy | Count | Enemy | Count | Enemy | Count |
| Booma | 36 | Evil Shark | 75 | Gillchic | 69 | Dimenian | 59 |
| Gobooma | 25 | Pal Shark | 61 | Dubchic | 12 | La Dimenian | 36 |
| Gigobooma | 21 | Guil Shark | 30 | Canadine | 47 | So Dimenian | 6 |
| Savage Wolf | 26 | Poison Lily | 29 | Canane | 2 | Claw | 64 |
| Barbarous Wolf | 4 | Pofuilly Slime | 4 | Sinow Beat | 16 | Bulclaw | 3 |
| Rag Rappy | 19 | Grass Assassin | 10 | Sinow Gold | 3 | Delsaber | 15 |
| Hildebear | 7 | Nano Dragon | 12 | Garanz | 3 | Dark Gunner | 15 |
| Dubwitch | 3 | Dark Belra | 9 | ||||
| Chaos Sorcerer | 11 | ||||||
| Chaos Bringer | 2 | ||||||
| Boxes | |||||||||
|---|---|---|---|---|---|---|---|---|---|
| Box Type | Count | Box Type | Count | Box Type | Count | Box Type | Count | Box Type | Count |
| Forest 1 | Forest 2 | Cave 1 | Cave 2 | Cave 3 | |||||
| Box | 20 | Box | 14 | Box | 18 | Box | 4 | Box | 4 |
| Box Type | Count | Box Type | Count | Box Type | Count | Box Type | Count | Box Type | Count |
| Mine 1 | Mine 2 | Ruins 1 | Ruins 2 | Ruins 3 | |||||
| Box | 5 | Box | 4 | Box | 4 | Box | 14 | Box | 6 |
| Box (Weapon) | 1 | ||||||||
| Boss Boxes | |||||||
|---|---|---|---|---|---|---|---|
| Box Type | Count | Box Type | Count | Box Type | Count | Box Type | Count |
| Under the Dome | Underground Channel | Monitor Room | ???? | ||||
| Box (Armor) | 2 | Box (Armor) | 2 | Box (Armor) | 3 | Box (Armor) | 9 |
| Box (Weapon) | 2 | Box (Weapon) | 2 | Box (Weapon) | 3 | Box (Weapon) | 12 |
| Box (Meseta) | 5 | Box (Meseta) | 5 | Box (Meseta) | 3 | Box (Meseta) | 3 |
| Box (Tool) | 5 | Box (Tool) | 7 | ||||
Quest Maps
Forest 1
Forest 2
.png)
.png)
Cave 1
Cave 2
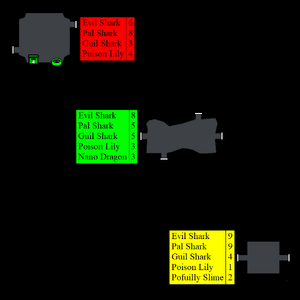
Cave 3
.png)
.png)
.png)
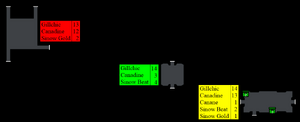
Mine 1
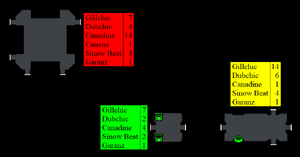
Mine 2
.png)
.png)
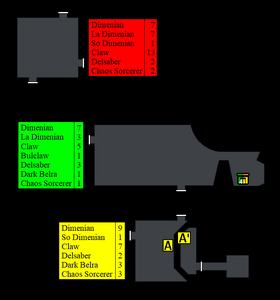
Ruins 1
Ruins 2
Ruins 3
.png)
.png)
.png)
