Nar Lily: Difference between revisions
Sgprometheus (talk | contribs) m (→Mechanics) |
m (→Episode 2) |
||
| (27 intermediate revisions by 7 users not shown) | |||
| Line 1: | Line 1: | ||
{{Enemy|name=Nar Lily (E1)}} | {{Enemy|name=Nar Lily (E1)}} | ||
{{Enemy|name=Nar Lily (E2)}} | {{Enemy|name=Nar Lily (E2)}} | ||
A Nar Lily/Mil Lily has a {{RareEnemyRate}} chance of spawning from a [[Poison Lily]]/[[Ob Lily]]. | |||
==Behavior/Mechanics== | |||
Nar Lilies are stationary enemies that spit projectiles at their target. In Normal, Hard, and Very Hard difficulties, they spit a toxic ball that inflicts {{Poison}} if it connects. In Ultimate, they spit {{Megid}}. | |||
When a Nar Lily finishes its damage received animation, there is a 30% chance of a paralyzing scream attack that causes {{Paralysis}}. At close range they will rapidly snap at targets. | |||
===Megid level=== | |||
The level of {{Megid}} cast by this monster depends on whether the monster is rare and which map. | |||
{| | |||
| | |||
<tabber> | |||
Normal= | |||
{| class="wikitable" style="text-align:center" | |||
|- | |||
! Area | |||
! Enemy | |||
! {{Megid|n}}<br>level | |||
! EDK for<br>immunity | |||
|- | |||
| rowspan="2"| Cave || Ob Lily || 14 || 66 | |||
|- | |||
| Mil Lily || 28 || 96 | |||
|- | |||
| rowspan="2"| VR Temple || Ob Lily || 15 || 69 | |||
|- | |||
| Mil Lily || 28 || 96 | |||
|} | |||
|-| | |||
One Person= | |||
{| class="wikitable" style="text-align:center" | |||
|- | |||
! Area | |||
! Enemy | |||
! {{Megid|n}}<br>level | |||
! EDK for<br>immunity | |||
|- | |||
| rowspan="2"| Cave || Ob Lily || 11 || 57 | |||
|- | |||
| Mil Lily || 25 || 90 | |||
|- | |||
| rowspan="2"| VR Temple || Ob Lily || 11 || 57 | |||
|- | |||
| Mil Lily || 25 || 90 | |||
|} | |||
</tabber> | |||
|} | |||
====Bugs==== | |||
On Ultimate difficulty, if a Mil Lily has spawned, nearby Ob Lilies will sometimes cast the Mil Lily's level of Megid. This is due to a bug in the client where the level of Megid is shared by all lilies and is set to the value used for the last Lily to spawn. For example, if there is a spawn of only Ob Lily alive and then a delayed spawn with a single rare lily occurs, then all lilies alive at the time will start using the rare lily's Megid level. | |||
==Hunting== | |||
===Episode 1=== | |||
The following quests are recommended for hunting [[Poison Lily|Poison Lilies]] in Episode 1: | |||
{{HuntingTableHead}} | |||
{{HuntingTableRow1|category=Halloween|catspan=|quest=Hollow Battlefield: Caves|questspan=|details=Clear quest|count=70}} | |||
{{HuntingTableRow1|category=Maximum Attack|catspan=2|quest=Maximum Attack 4th Stage -1B-|questspan=2|details=First three rooms|count=33}} | |||
{{HuntingTableRow1|category=|catspan=|quest=|questspan=|details=Clear Cave<br>([[Maximum Attack 4th Stage -1C-|MA1C]] also works)|count=62}} | |||
{{HuntingTableRow1|category=Extermination|catspan=3|quest=Today's Rate|questspan=3|details=East one room|count=9}} | |||
{{HuntingTableRow1|category=|catspan=|quest=|questspan=|details=After above, west room|count=+2}} | |||
{{HuntingTableRow1|category=|catspan=|quest=|questspan=|details=Clear Cave|count=52}} | |||
{{HuntingTableRow1|category=Event|catspan=2|quest=Christmas Fiasco (E1){{!}}Christmas Fiasco|questspan=2|details=Clear 7 waves|count=16}} | |||
{{HuntingTableRow1|category=|catspan=|quest=|questspan=|details=Clear Cave|count=56}} | |||
{{HuntingTableRow1|category=Maximum Attack|catspan=|quest=Maximum Attack 4th Stage -1A-|questspan=|details=Clear Cave|count=63}} | |||
{{HuntingTableRow1|category=Solo Only|catspan=|quest=Knight of Coral|questspan=|details=Clear Cave|count=29}} | |||
{{HuntingTableRow1|category=VR|catspan=|quest=Towards the Future|questspan=|details=First Cave room, second spawn,<br>second Cave room, second spawn|count=12}} | |||
{{HuntingTableRow1|category=Government|catspan=2|quest=2-2:Deep Within|questspan=2|details=Clear Cave 1|count=20}} | |||
{{HuntingTableRow1|category=|catspan=|quest=|questspan=|details=Clear quest|count=59}} | |||
|} | |||
===Episode 2=== | |||
The following quests are recommended for hunting [[Poison Lily|Poison Lilies]] in Episode 2: | |||
{{HuntingTableHead}} | |||
{{HuntingTableRow2|category=Halloween|catspan=|quest=Hollow Reality: Temple|questspan=|details=Clear quest|count=38}} | |||
{{HuntingTableRow2|category=Maximum Attack|catspan=2|quest=MAXIMUM ATTACK 2 Ver2|questspan=|details="Only the Chosen One" route<br>([https://wiki.pioneer2.net/images/thumb/3/33/Ma2v2_lily_route.png/737px-Ma2v2_lily_route.png Lily route map])|count=35}} | |||
{{HuntingTableRow2|category=|catspan=|quest=Maximum Attack E: VR|questspan=|details=Clear VR Temple|count=31}} | |||
{{HuntingTableRow2|category=Extermination|catspan=|quest=Sweep-up Operation 5{{!}}Sweep-up Operation #5|questspan=|details=Clear quest|count=29}} | |||
{{HuntingTableRow2|category=Retrieval|catspan=3|quest=Lost SHOCK RIFLE|questspan=2|details=Clear VR Temple Alpha|count=29}} | |||
{{HuntingTableRow2|category=|catspan=|quest=|questspan=|details=Clear quest|count=63}} | |||
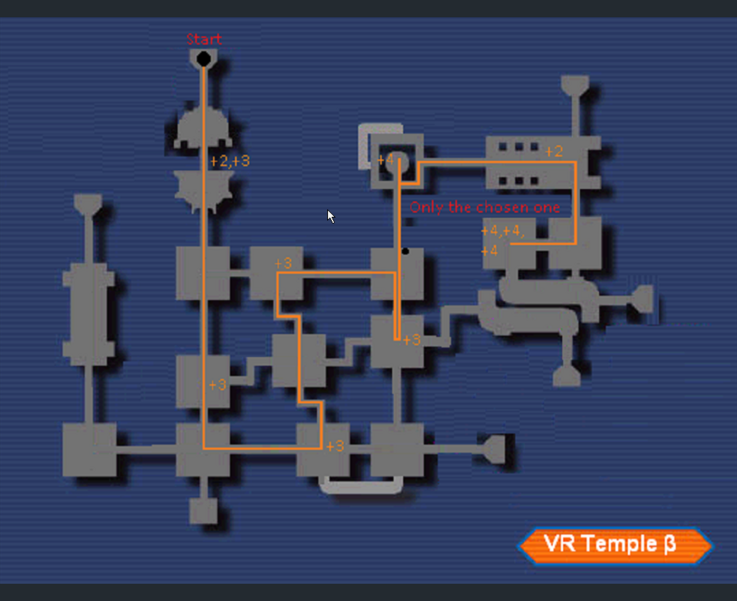
{{HuntingTableRow2|category=|catspan=|quest=Revisiting Darkness|questspan=|details=Clear VR Temple Beta|count=63}} | |||
|} | |||
==Rare Drops== | |||
===Episode 1=== | |||
{{EnemyDropTable|Nar Lily (E1)}} | |||
===Episode 2=== | |||
{{EnemyDropTable|Nar Lily (E2)}} | |||
{{Episode1Enemies}} | |||
{{Episode2Enemies}} | |||
[[Category:Enemies]] | [[Category:Enemies]] | ||
[[Category:Cave Enemies]] | [[Category:Cave Enemies]] | ||
| Line 8: | Line 98: | ||
[[Category:Inflicts Paralysis]] | [[Category:Inflicts Paralysis]] | ||
[[Category:Casts Megid]] | [[Category:Casts Megid]] | ||
Latest revision as of 16:38, 22 October 2025
|
||||||||||||||||||||||||||||||||||||||||||||||||||||||||||||||||||||||||||||||||||||||||||||||||||||||||||||||||||||||||||||||||||||||||||||||||||||||||||||||||||||||||||||||||||||||||||||||||||||||||||||||||||||||||||||||||||||||||||||||||||||||||||||||||||||||||||||||||||||||||||||||||||||||||||||||||||||||||||||||||||||||||||||||||
.png)
.png)
A Nar Lily/Mil Lily has a 1/500 chance of spawning from a Poison Lily/Ob Lily.
Behavior/Mechanics
Nar Lilies are stationary enemies that spit projectiles at their target. In Normal, Hard, and Very Hard difficulties, they spit a toxic ball that inflicts ![]() Poison if it connects. In Ultimate, they spit
Poison if it connects. In Ultimate, they spit ![]() Megid.
Megid.
When a Nar Lily finishes its damage received animation, there is a 30% chance of a paralyzing scream attack that causes ![]() Paralysis. At close range they will rapidly snap at targets.
Paralysis. At close range they will rapidly snap at targets.
Megid level
The level of ![]() Megid cast by this monster depends on whether the monster is rare and which map.
Megid cast by this monster depends on whether the monster is rare and which map.
|
|
Bugs
On Ultimate difficulty, if a Mil Lily has spawned, nearby Ob Lilies will sometimes cast the Mil Lily's level of Megid. This is due to a bug in the client where the level of Megid is shared by all lilies and is set to the value used for the last Lily to spawn. For example, if there is a spawn of only Ob Lily alive and then a delayed spawn with a single rare lily occurs, then all lilies alive at the time will start using the rare lily's Megid level.
Hunting
Episode 1
The following quests are recommended for hunting Poison Lilies in Episode 1:
| Category | Quest | Details | Count |
|---|---|---|---|
| Clear quest | 70 | ||
| First three rooms | 33 | ||
| Clear Cave (MA1C also works) |
62 | ||
| East one room | 9 | ||
| After above, west room | +2 | ||
| Clear Cave | 52 | ||
| Clear 7 waves | 16 | ||
| Clear Cave | 56 | ||
| Clear Cave | 63 | ||
| Clear Cave | 29 | ||
| First Cave room, second spawn, second Cave room, second spawn |
12 | ||
| Clear Cave 1 | 20 | ||
| Clear quest | 59 |
Episode 2
The following quests are recommended for hunting Poison Lilies in Episode 2:
| Category | Quest | Details | Count |
|---|---|---|---|
| Clear quest | 38 | ||
| "Only the Chosen One" route (Lily route map) |
35 | ||
| Clear VR Temple | 31 | ||
| Clear quest | 29 | ||
| Clear VR Temple Alpha | 29 | ||
| Clear quest | 63 | ||
| Clear VR Temple Beta | 63 |
Rare Drops
Episode 1
| Normal | |||||||||
|---|---|---|---|---|---|---|---|---|---|
| General/Mind | General/Mind | General/Mind | Dragon/HP | General/Legs | Angel/Mind | Angel/Mind | Dragon/HP | Dragon/HP | Angel/Mind |
| 7/8 | 7/8 | 7/8 | 7/8 | 7/8 | 7/8 | 7/8 | 7/8 | 7/8 | 7/8 |
| Hard | |||||||||
| Vjaya | Wals-MK2 | Last Survivor | Vjaya | H&S25 Justice | Ice Staff: Dagon | Diska of Liberator | Photon Claw | Custom Ray ver.OO | Photon Claw |
| 7/8 | 7/8 | 7/8 | 7/8 | 7/8 | 7/8 | 7/8 | 7/8 | 7/8 | 7/8 |
| Very Hard | |||||||||
| Devil/Battle | Hero/Ability | God/HP | Cure/Confuse | God/Mind | God/Mind | God/Body | HP/Revival | Cure/Confuse | Perfect/Resist |
| 7/8 | 7/8 | 7/8 | 7/8 | 7/8 | 7/8 | 7/8 | 7/8 | 7/8 | 7/8 |
| Ultimate | |||||||||
| Heavenly/Power | DB's Saber (3062) | Sange | Demolition Comet | Psycho Wand | Heavenly/Arms | Demolition Comet | Sense Plate | Sange | Agito (1975) |
| 1/2 | 7/8 | 1/2 | 1/2 | 1/205 | 1/3.20 | 1/2 | 1/2 | 1/2 | 1/21.3 |
Episode 2
| Normal | |||||||||
|---|---|---|---|---|---|---|---|---|---|
| General/Arm | General/Arm | - | HP/Restorate | Dragon/HP | General/Mind | AddSlot | General/Power | Resist/Flame | Resist/Flame |
| 7/8 | 7/8 | 7/8 | 7/8 | 7/8 | 7/8 | 7/8 | 7/8 | 7/8 | |
| Hard | |||||||||
| Meteor Smash | Wals-MK2 | Last Survivor | Vjaya | H&S25 Justice | Ice Staff: Dagon | Diska of Liberator | Bloody Art | Mace of Adaman | Diska of Liberator |
| 7/8 | 7/8 | 7/8 | 7/8 | 7/8 | 7/8 | 7/8 | 7/8 | 7/8 | 7/8 |
| Very Hard | |||||||||
| Final Impact | Justy-23ST | Regenerate Gear | Gae Bolg | Flowen's Frame | Storm Wand: Indra | Custom Barrier ver.OO | Flowen's Shield | Justy-23ST | Diska of Braveman |
| 7/8 | 7/8 | 7/8 | 7/8 | 7/8 | 7/8 | 7/8 | 7/8 | 7/8 | 7/8 |
| Ultimate | |||||||||
| Standstill Shield | Rage de Glace | Regenerate Gear B.P. | Smoking Plate | God/Mind | Rambling May | Crimson Coat | Aura Field | Secure Feet | Thirteen |
| 1/2 | 1/2 | 1/2 | 1/2 | 1/2 | 1/2 | 1/2 | 1/2 | 1/2 | 1/2 |
| Episode 1 Monsters | |
|---|---|
| Forest | Booma • Gobooma • Gigobooma • Rag Rappy (Rare: Al Rappy) • Savage Wolf • Barbarous Wolf • Monest • Mothmant • Hildebear (Rare: Hildeblue) |
| Cave | Evil Shark • Pal Shark • Guil Shark • Poison Lily (Rare: Nar Lily) • Nano Dragon • Pan Arms (Hidoom • Migium) • Grass Assassin • Pofuilly Slime (Rare: Pouilly Slime) |
| Mine | Gillchic • Dubchic • Dubwitch • Canadine • Canane • Sinow Beat • Sinow Gold • Garanz |
| Ruins | Dimenian • La Dimenian • So Dimenian • Claw • Bulclaw • Delsaber • Chaos Sorcerer • Dark Belra • Dark Gunner • Chaos Bringer |
| Bosses | Dragon • De Rol Le • Vol Opt • Dark Falz (Darvant) |
| Episode 2 Monsters | |
|---|---|
| VR Temple | Dimenian • La Dimenian • So Dimenian • Rag Rappy (Rare: Love Rappy • St Rappy • Hallo Rappy • Egg Rappy) • Poison Lily (Rare: Nar Lily) • Monest • Mothmant • Hildebear (Rare: Hildeblue) • Grass Assassin • Dark Belra |
| VR Spaceship | Gillchic • Dubchic • Dubwitch • Savage Wolf • Barbarous Wolf • Pan Arms (Hidoom • Migium) • Delsaber • Garanz • Chaos Sorcerer |
| Central Control Area | Merillia • Meriltas • Gee • Ul Gibbon • Zol Gibbon • Sinow Berill • Sinow Spigell • Mericarol • Merikle • Mericus • Gi Gue • Gibbles |
| Seabed | Dolmolm • Dolmdarl • Recobox • Recon • Sinow Zoa • Sinow Zele • Morfos • Deldepth • Delbiter |
| Control Tower | Del Lily • Ill Gill • Epsilon |
| Bosses | Barba Ray • Gol Dragon • Gal Gryphon • Olga Flow |