Episode 2: Stage 3/Guide: Difference between revisions
Richardian (talk | contribs) mNo edit summary |
mNo edit summary |
||
| (2 intermediate revisions by 2 users not shown) | |||
| Line 21: | Line 21: | ||
|style="vertical-align: top;"|[[File:2ca17.png|left|frameless|630x630px]] | |style="vertical-align: top;"|[[File:2ca17.png|left|frameless|630x630px]] | ||
|style="vertical-align: top;"| | |style="vertical-align: top;"| | ||
Gi-Gue spawns near northern set item box. Clear it to spawn the portal to the next area. | |||
The two set boxes each have a 4-slot frame in them. It is recommended to pick these up for some set unit drops later. | |||
It is also recommended to farm Gee’s at either player spawn in attempts to get a Buster and/or Autogun with decent stats. This helps immensely with the boss fight. | |||
|} | |} | ||
| Line 72: | Line 32: | ||
|style="vertical-align: top;"|[[File:2ca18.png|left|frameless|630x630px]] | |style="vertical-align: top;"|[[File:2ca18.png|left|frameless|630x630px]] | ||
|style="vertical-align: top;"| | |style="vertical-align: top;"| | ||
Both teams go directly to the room with the portal to the next area. Clear the Gibbles and continue to next area. | |||
|} | |} | ||
| Line 117: | Line 39: | ||
|style="vertical-align: top;"|[[File:2ca19.png|left|frameless|630x630px]] | |style="vertical-align: top;"|[[File:2ca19.png|left|frameless|630x630px]] | ||
|style="vertical-align: top;"| | |style="vertical-align: top;"| | ||
Rooms 5 and 6 each have set item boxes that contain an Autogun, a General/Power, and a General/Body, and they’re both very easy to get. Simply get to the room using the corresponding warp (you can open your quick menu to avoid the auto-warps on the way to room 6), then head straight for the boxes, dodging the traps and the enemies. | |||
Notably, for room 5 you can shortcut to the boxes by using the auto-warp directly to the left after warping (then open menu and run back to warp after picking up items). | |||
Between farming Gees in Mountain and/or the set Autogun spawns here, you will be equipped to beat Gal Gryphon, even if the fight takes a while. | |||
|} | |} | ||
__NOTOC__ | __NOTOC__ | ||
{{Guides}} | |||
[[Category:Guides]] | |||
Latest revision as of 00:01, 10 January 2024
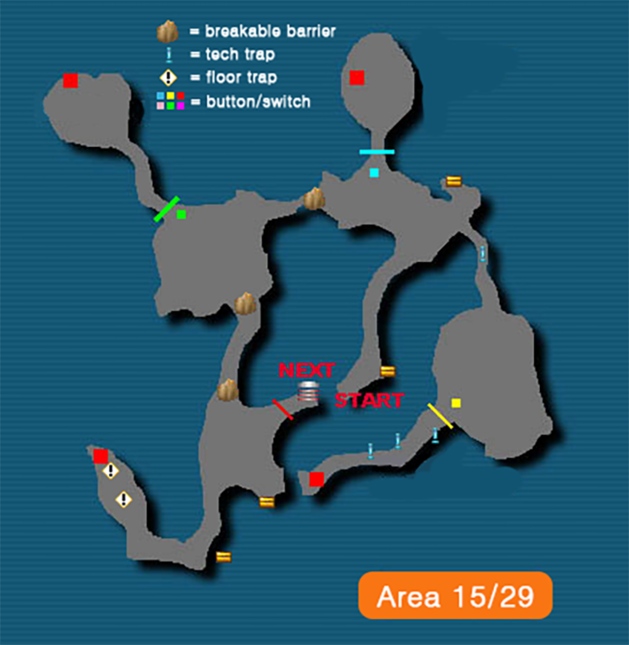
Area 15[edit | edit source]
|
The 4 Red buttons are all that’s necessary to proceed to the next area. No requirement to clear any mobs. The first three are blocked by a gate and a corresponding pressure switch right in front of it, while the last one is only obstructed by some floor traps. Navigate the stage and press all the red switches while avoiding all enemies then proceed to the next area. |
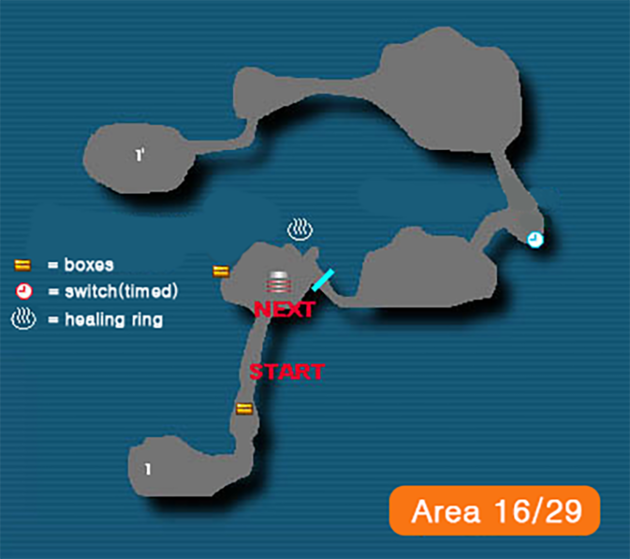
Area 16[edit | edit source]
|
Have FO walk forward into the open area and Clear the Mericarol, then everyone continue to the next area. |
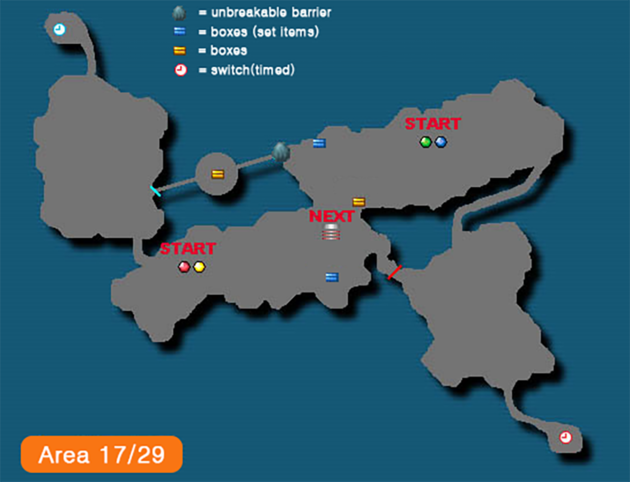
Area 17[edit | edit source]
|
Gi-Gue spawns near northern set item box. Clear it to spawn the portal to the next area. The two set boxes each have a 4-slot frame in them. It is recommended to pick these up for some set unit drops later. It is also recommended to farm Gee’s at either player spawn in attempts to get a Buster and/or Autogun with decent stats. This helps immensely with the boss fight. |
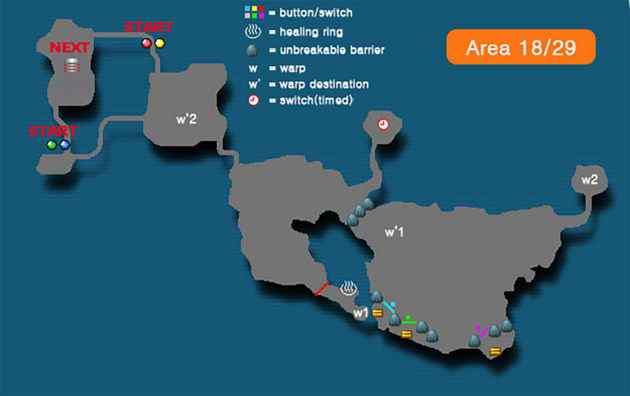
Area 18[edit | edit source]
|
Both teams go directly to the room with the portal to the next area. Clear the Gibbles and continue to next area. |
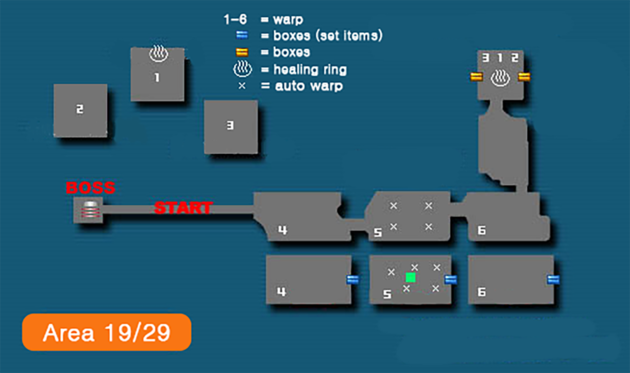
Area 19[edit | edit source]
|
Rooms 5 and 6 each have set item boxes that contain an Autogun, a General/Power, and a General/Body, and they’re both very easy to get. Simply get to the room using the corresponding warp (you can open your quick menu to avoid the auto-warps on the way to room 6), then head straight for the boxes, dodging the traps and the enemies. Notably, for room 5 you can shortcut to the boxes by using the auto-warp directly to the left after warping (then open menu and run back to warp after picking up items). Between farming Gees in Mountain and/or the set Autogun spawns here, you will be equipped to beat Gal Gryphon, even if the fight takes a while. |
| Guides | |
|---|---|
| Basics | Classes • Mags (Basic Mag feeding guide) • Quests • Section IDs • Stats • Status effects • Teams • Techniques • Tekking • Weapons |
| Classes | Class comparison • Hunter • HUmar • HUnewearl • HUcast • HUcaseal • RAmar • RAmarl • RAcast • RAcaseal • FOmar • FOmarl • FOnewm • FOnewearl |
| Items | Adding Hit to enemy weapons • Adding ES/S-Rank weapon specials • Common weapon ATA equivalencies • Increasing weapon attributes • Sealed items (Unsealing) • Set effects |
| Hunting | Common weapons • Drop charts (Level 30 techniques) • Item boxes • Ragol Boost Road • Weapon attribute drop tables |
| Mechanics | Accuracy glitch • Beat time • Combo-locked weapons • Fixed-damage attacks • Game mechanics (Frame data) • Reduced-special weapons |
| Challenge | Challenge • Episode 2: Stage 1 • Episode 2: Stage 2 • Episode 2: Stage 3 • Episode 2: Stage 4 • Episode 2: Stage 5 |
| Other | Chat commands • Coren • Custom files • Music replacement • Price guide • Terminology |
