Episode 2: Stage 2/Guide: Difference between revisions
Richardian (talk | contribs) (Created page with "==== Area 1 ==== {| |style="vertical-align: top;"|left|frameless|644x644px |style="vertical-align: top;"| 1. Clear, go south 2. Clear, go south 3. Press sw...") |
mNo edit summary |
||
| (8 intermediate revisions by 3 users not shown) | |||
| Line 1: | Line 1: | ||
==== Area | |||
== HUcast Autogun usage == | |||
Although [[HUcaseal]] can equip any [[Autogun]] that drops in this stage with starting stats, [[HUcast]] needs the following boosts to his ATA level from adding DEX to his [[Mag]], swapping Mags with a Ranger, or equipping any [[Marksman/Arm]] or [[General/Arm]] units that drop in the stage. | |||
{| class="wikitable" | |||
|+Additional stats required to equip Autogun on HUcast (no Mag swap) | |||
! | |||
!Level 13 | |||
!Level 14 | |||
!Level 15 | |||
!Level 16 | |||
!Level 17 | |||
!Level 18 | |||
!Level 19 | |||
|- | |||
|Additional DEX levels on Mag | |||
|0 | |||
|0-1 | |||
|1+ | |||
|1-2 | |||
|2 | |||
|1 | |||
|0 | |||
|- | |||
|ATA-boosting units equipped | |||
| colspan="2" |2 [[Marksman/Arm]] | |||
| colspan="2" |[[General/Arm]] | |||
| colspan="3" |[[Marksman/Arm]] | |||
|} | |||
{| class="wikitable" | |||
|+Additional stats required to equip Autogun on HUcast (Mag swapped with Ranger) | |||
! | |||
!Level 13 | |||
!Level 14 | |||
!Level 15 | |||
!Level 16 | |||
!Level 17 | |||
!Level 18 | |||
!Level 19 | |||
|- | |||
|Additional Dex levels on Mag | |||
| colspan="3" |0 | |||
|1 | |||
| colspan="3" |0 | |||
|- | |||
|ATA-boosting units equipped | |||
| colspan="3" |[[Marksman/Arm]] | |||
| colspan="4" |None | |||
|} | |||
== Fonewearl Breakpoints == | |||
[[Mind Material|Mind Materials]], [[Priest/Mind]], and [[General/Mind]] can all be found in this stage, which increase the player's MST by 10, 5, and 10 respectively when used. Depending on the number of Mind Materials consumed, and the number of MST-boosting units equipped, [[FOnewearl|FOnewearls]] can defeat the following enemies with fewer casts of a given technique than at the start of the stage. | |||
{| class="wikitable" | |||
|+Additional MST required | |||
!Enemy name | |||
!Technique casted | |||
!Number of casts | |||
!Total MST required | |||
!Level 12 | |||
!Level 13 | |||
!Level 14 | |||
!Level 15 | |||
!Level 16 | |||
!Level 17 | |||
!Level 18 | |||
|- | |||
|[[Barbarous Wolf]] | |||
|[[Foie]] | |||
|3 | |||
|179 | |||
| +45 | |||
| +35 | |||
| +30 | |||
| +25 | |||
| +20 | |||
| +15 | |||
| +10 | |||
|- | |||
|[[Delsaber]] | |||
|[[Barta]] | |||
|6 | |||
|190 | |||
| +55 | |||
| +50 | |||
| +45 | |||
| +35 | |||
| +30 | |||
| +25 | |||
| +20 | |||
|- | |||
|[[Dubchic]] | |||
|[[Barta]] | |||
|1 | |||
|212 | |||
| +75 | |||
| +70 | |||
| +65 | |||
| +60 | |||
| +50 | |||
| +45 | |||
| +40 | |||
|- | |||
|[[Savage Wolf]] | |||
|[[Zonde]] | |||
|2 | |||
|224 | |||
| +90 | |||
| +80 | |||
| +75 | |||
| +70 | |||
| +65 | |||
| +60 | |||
| +55 | |||
|- | |||
|[[Delsaber]] | |||
|[[Barta]] | |||
|5 | |||
|277 | |||
| +140 | |||
| +135 | |||
| +130 | |||
| +125 | |||
| +115 | |||
| +110 | |||
| +105 | |||
|} | |||
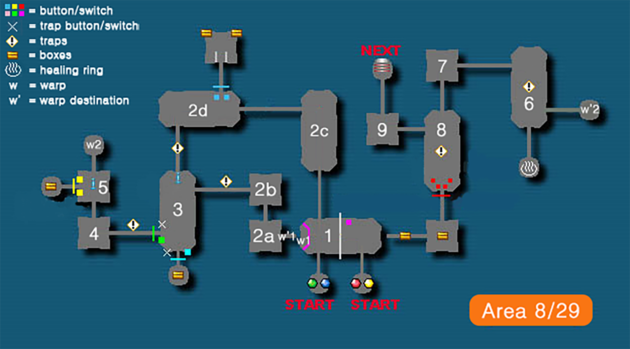
==== Area 8 ==== | |||
{| | {| | ||
|style="vertical-align: top;"|[[File: | |style="vertical-align: top;"|[[File:2ca8.png|left|frameless|630x630px]] | ||
|style="vertical-align: top;"| | |style="vertical-align: top;"| | ||
1. Clear, go | 1. Clear, then press button to allow one team to warp and other team go north | ||
Warp route: | |||
2a. Clear, go north | |||
2b. Clear, go west | |||
Door route: | |||
2c. Clear, go west | |||
2d. Clear, go south | |||
3. Clear, attack left switch on west door to open and go west | |||
4. Clear, go north | |||
5. Clear, go north and warp | |||
6. Clear, go west | |||
7. Clear, go south | |||
8. Clear, go west | |||
9. Clear, go north to exit | |||
|} | |} | ||
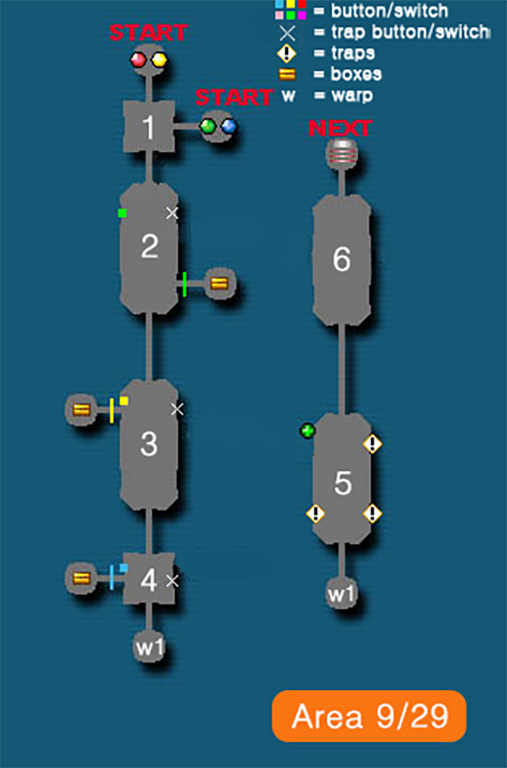
==== Area | ==== Area 9 ==== | ||
{| | {| | ||
|style="vertical-align: top;"|[[File: | |style="vertical-align: top;"|[[File:2ca9.png|left|frameless|768x768px]] | ||
|style="vertical-align: top;"| | |style="vertical-align: top;"| | ||
1. Clear, go | 1. Clear only Gilchic, go south | ||
2. Clear, go | 2. Press west switch, Clear only Wolf, go south | ||
3. Clear, go | 3. Press west switch, Clear only Wolf, go south | ||
4. Clear, go | 4. Press west switch, Clear only Pan Arms, go south and warp | ||
5. | 5. Clear only Delsaber, go north | ||
6. Clear only Garanz, go north to exit | |||
|} | |||
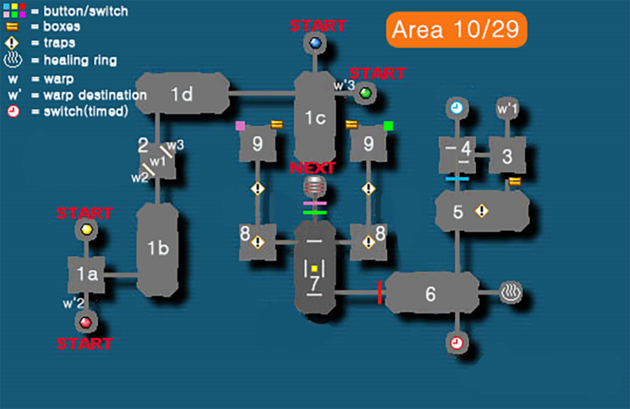
==== Area 10 ==== | |||
{| | |||
|style="vertical-align: top;"|[[File:2ca10.png|left|frameless|630x630px]] | |||
|style="vertical-align: top;"| | |||
Team A (southwest): | |||
1a. Clear, go east | |||
1b. Clear, go north | |||
Team B (north): | |||
1c. Go to south of room to trigger spawn, Clear, go west | |||
1d. Clear, go south | |||
2. Take warp in center of room | |||
3. Clear 2 Wolves and 1 Pan Arms, go west | |||
4. Go north to press timed switch, then go south | |||
5. Clear, go south (ignore hallway enemies) | |||
6. Clear, go south to press timed switch, then go west | |||
7. Light switch is in middle of room surrounded by walls and must be held. Clear, one team go east and one team go west | |||
8. One person kill boxes while the other goes north | |||
9. | 9. Press switch and return to room 8, avoiding hallway Garanz | ||
Everyone return to room 7 and go north to exit | |||
|} | |} | ||
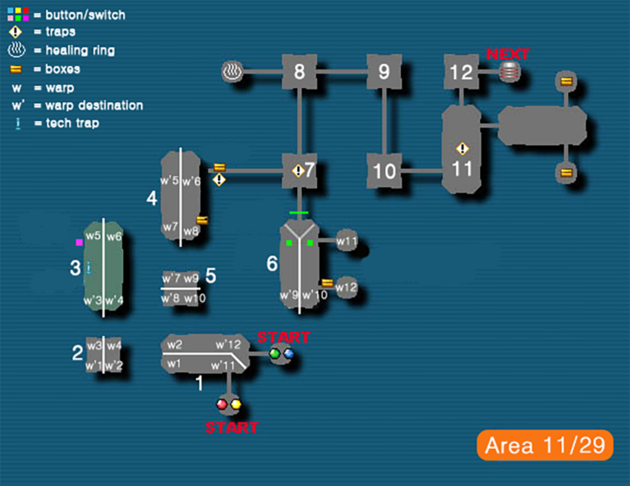
==== Area | ==== Area 11 ==== | ||
{| | {| | ||
|style="vertical-align: top;"|[[File: | |style="vertical-align: top;"|[[File:2ca11.png|left|frameless|630x630px]] | ||
|style="vertical-align: top;"| | |style="vertical-align: top;"| | ||
1. Clear, warp | |||
2. Clear, warp | |||
3. Poison switch in northwest. Clear, warp | |||
4. Clear, warp | |||
5. Clear, warp | |||
6. Clear, press switches, go north | |||
7. Clear, go north (ignore hallway enemies) | |||
8. Go east | |||
9. Clear, go south | |||
10. Clear, go east | |||
11. Clear, go north | |||
12. Clear, go east to exit | |||
|} | |||
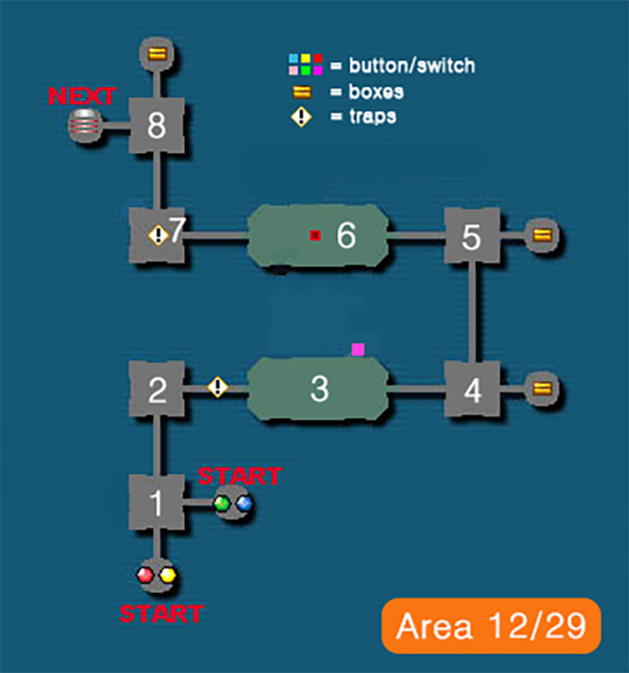
==== Area 12 ==== | |||
{| | |||
|style="vertical-align: top;"|[[File:2ca12.png|left|frameless|673x673px]] | |||
|style="vertical-align: top;"| | |||
1. Clear, go north | |||
2. Clear, go east | |||
3. | 3. Poison switch in northeast corner. Clear only Wolves, go east | ||
4. | 4. Clear only Wolves and go north | ||
5. Clear only Pan Arms, go west | |||
6. Poison pressure switch in middle of room. Press it to spawn | |||
Delsabers. Clear only Delsabers and go west | |||
7. Clear only Chaos Sorceror, go north | |||
8. WAIT UNTIL ALL 6 DUBCHICS SPAWN, then kill Dubwitch. Go west to exit | |||
|} | |} | ||
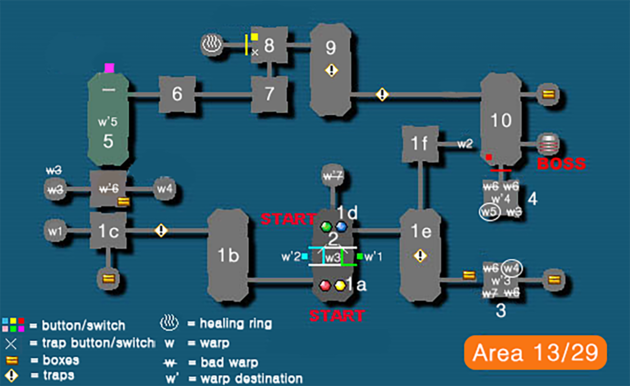
==== Area | ==== Area 13 ==== | ||
{| | {| | ||
|style="vertical-align: top;"|[[File: | |style="vertical-align: top;"|[[File:2ca13.png|left|frameless|630x630px]] | ||
|style="vertical-align: top;"| | |style="vertical-align: top;"| | ||
Team A (south): | |||
1a. Go west | |||
1b. Clear, go west (avoid hallway enemies) | |||
1c. Clear, go west, warp | |||
Team B (north): | |||
1d. Go east | |||
1e. Clear, go north (avoid hallway enemies) | |||
1f. Clear, go east, warp | |||
2. Ignore enemies if possible. Press switch and take center warp. | |||
3. Take northeast warp | |||
4. | 4. Take southwest warp | ||
5. | 5. Poison switch behind north barrier. Clear, go east | ||
6. Clear, go east | 6. Clear, go east | ||
7. | 7. Clear, go north | ||
8. | 8. Go east | ||
9. Clear, go | 9. Clear, go east (avoid hallway enemies) | ||
10. Clear, go | 10. Clear, go southeast to boss | ||
|} | |} | ||
__NOTOC__ | __NOTOC__ | ||
{{Guides}} | |||
[[Category:Guides]] | |||
Latest revision as of 00:00, 10 January 2024
HUcast Autogun usage[edit | edit source]
Although HUcaseal can equip any Autogun that drops in this stage with starting stats, HUcast needs the following boosts to his ATA level from adding DEX to his Mag, swapping Mags with a Ranger, or equipping any Marksman/Arm or General/Arm units that drop in the stage.
| Level 13 | Level 14 | Level 15 | Level 16 | Level 17 | Level 18 | Level 19 | |
|---|---|---|---|---|---|---|---|
| Additional DEX levels on Mag | 0 | 0-1 | 1+ | 1-2 | 2 | 1 | 0 |
| ATA-boosting units equipped | 2 Marksman/Arm | General/Arm | Marksman/Arm | ||||
| Level 13 | Level 14 | Level 15 | Level 16 | Level 17 | Level 18 | Level 19 | |
|---|---|---|---|---|---|---|---|
| Additional Dex levels on Mag | 0 | 1 | 0 | ||||
| ATA-boosting units equipped | Marksman/Arm | None | |||||
Fonewearl Breakpoints[edit | edit source]
Mind Materials, Priest/Mind, and General/Mind can all be found in this stage, which increase the player's MST by 10, 5, and 10 respectively when used. Depending on the number of Mind Materials consumed, and the number of MST-boosting units equipped, FOnewearls can defeat the following enemies with fewer casts of a given technique than at the start of the stage.
| Enemy name | Technique casted | Number of casts | Total MST required | Level 12 | Level 13 | Level 14 | Level 15 | Level 16 | Level 17 | Level 18 |
|---|---|---|---|---|---|---|---|---|---|---|
| Barbarous Wolf | Foie | 3 | 179 | +45 | +35 | +30 | +25 | +20 | +15 | +10 |
| Delsaber | Barta | 6 | 190 | +55 | +50 | +45 | +35 | +30 | +25 | +20 |
| Dubchic | Barta | 1 | 212 | +75 | +70 | +65 | +60 | +50 | +45 | +40 |
| Savage Wolf | Zonde | 2 | 224 | +90 | +80 | +75 | +70 | +65 | +60 | +55 |
| Delsaber | Barta | 5 | 277 | +140 | +135 | +130 | +125 | +115 | +110 | +105 |
Area 8[edit | edit source]
|
1. Clear, then press button to allow one team to warp and other team go north Warp route: 2a. Clear, go north 2b. Clear, go west Door route: 2c. Clear, go west 2d. Clear, go south 3. Clear, attack left switch on west door to open and go west 4. Clear, go north 5. Clear, go north and warp 6. Clear, go west 7. Clear, go south 8. Clear, go west 9. Clear, go north to exit |
Area 9[edit | edit source]
|
1. Clear only Gilchic, go south 2. Press west switch, Clear only Wolf, go south 3. Press west switch, Clear only Wolf, go south 4. Press west switch, Clear only Pan Arms, go south and warp 5. Clear only Delsaber, go north 6. Clear only Garanz, go north to exit |
Area 10[edit | edit source]
|
Team A (southwest): 1a. Clear, go east 1b. Clear, go north Team B (north): 1c. Go to south of room to trigger spawn, Clear, go west 1d. Clear, go south 2. Take warp in center of room 3. Clear 2 Wolves and 1 Pan Arms, go west 4. Go north to press timed switch, then go south 5. Clear, go south (ignore hallway enemies) 6. Clear, go south to press timed switch, then go west 7. Light switch is in middle of room surrounded by walls and must be held. Clear, one team go east and one team go west 8. One person kill boxes while the other goes north 9. Press switch and return to room 8, avoiding hallway Garanz Everyone return to room 7 and go north to exit |
Area 11[edit | edit source]
|
1. Clear, warp 2. Clear, warp 3. Poison switch in northwest. Clear, warp 4. Clear, warp 5. Clear, warp 6. Clear, press switches, go north 7. Clear, go north (ignore hallway enemies) 8. Go east 9. Clear, go south 10. Clear, go east 11. Clear, go north 12. Clear, go east to exit |
Area 12[edit | edit source]
|
1. Clear, go north 2. Clear, go east 3. Poison switch in northeast corner. Clear only Wolves, go east 4. Clear only Wolves and go north 5. Clear only Pan Arms, go west 6. Poison pressure switch in middle of room. Press it to spawn Delsabers. Clear only Delsabers and go west 7. Clear only Chaos Sorceror, go north 8. WAIT UNTIL ALL 6 DUBCHICS SPAWN, then kill Dubwitch. Go west to exit |
Area 13[edit | edit source]
|
Team A (south): 1a. Go west 1b. Clear, go west (avoid hallway enemies) 1c. Clear, go west, warp Team B (north): 1d. Go east 1e. Clear, go north (avoid hallway enemies) 1f. Clear, go east, warp 2. Ignore enemies if possible. Press switch and take center warp. 3. Take northeast warp 4. Take southwest warp 5. Poison switch behind north barrier. Clear, go east 6. Clear, go east 7. Clear, go north 8. Go east 9. Clear, go east (avoid hallway enemies) 10. Clear, go southeast to boss |
| Guides | |
|---|---|
| Basics | Classes • Mags (Basic Mag feeding guide) • Quests • Section IDs • Stats • Status effects • Teams • Techniques • Tekking • Weapons |
| Classes | Class comparison • Hunter • HUmar • HUnewearl • HUcast • HUcaseal • RAmar • RAmarl • RAcast • RAcaseal • FOmar • FOmarl • FOnewm • FOnewearl |
| Items | Adding Hit to enemy weapons • Adding ES/S-Rank weapon specials • Common weapon ATA equivalencies • Increasing weapon attributes • Sealed items (Unsealing) • Set effects |
| Hunting | Common weapons • Drop charts (Level 30 techniques) • Item boxes • Ragol Boost Road • Weapon attribute drop tables |
| Mechanics | Accuracy glitch • Beat time • Combo-locked weapons • Fixed-damage attacks • Game mechanics (Frame data) • Reduced-special weapons |
| Challenge | Challenge • Episode 2: Stage 1 • Episode 2: Stage 2 • Episode 2: Stage 3 • Episode 2: Stage 4 • Episode 2: Stage 5 |
| Other | Chat commands • Coren • Custom files • Music replacement • Price guide • Terminology |
