Episode 2: Stage 4/Guide: Difference between revisions
Richardian (talk | contribs) (Created page with "==== Area 15 ==== {| |style="vertical-align: top;"|left|frameless|645x645px |style="vertical-align: top;"| The 4 Red buttons are all that’s necessary to p...") |
(→FOnewm breakpoints: gizonde on squid, removed rafoie 5 cuz it doesn't drop) |
||
| (9 intermediate revisions by 4 users not shown) | |||
| Line 1: | Line 1: | ||
==== Area | == Lockgun/Railgun usage on HUcaseal and HUcast == | ||
[[HUcaseal]] can equip [[Lockgun]] at the start of the stage, but [[HUcast]] can not. Neither class can equip [[Railgun]] at the start of the stage. It is possible for a HUcaseal to equip a Railgun before the fight with [[Olga Flow]] if she gains enough levels and feeds her [[Mag]] enough [[Antiparalysis]] and [[Antidote|Antidotes]]. HUcasts will not be able to equip Lockgun before the fight with Olga Flow by Mag feeding alone. [[Marksman/Arm]], [[General/Arm]], or [[Elf/Arm]] units can drop in this stage to help players equip these weapons. If a [[RAnger|Ranger]] is present in the party, they can swap Mags with a HUcaseal to give her earlier access to Railgun, or with a HUcast to help with equipping a Lockgun or Railgun. | |||
{| class="wikitable" | |||
|+Additional stats required to equip Railgun on HUcaseal (no Mag swap) | |||
! | |||
!Level 23 | |||
!Level 24 | |||
!Level 25 | |||
!Level 26 | |||
!Level 27 | |||
!Level 28 | |||
!Level 29 | |||
!Level 30 | |||
!Level 31 | |||
!Level 32 | |||
!Level 33 | |||
|- | |||
|Total DEX level on Mag | |||
| colspan="2" |3 (+0) | |||
| colspan="2" |4 (+1) | |||
|3 (+0) | |||
|5 (+2) | |||
|4 (+1) | |||
|3 (+0) | |||
|6 (+3) | |||
|5 (+2) | |||
|3 (+0) | |||
|- | |||
|ATA-boosting units equipped | |||
| colspan="2" |[[General/Arm]] + [[Marksman/Arm]] | |||
|[[Marksman/Arm]]<nowiki/>x2 | |||
| colspan="2" |[[General/Arm]] | |||
| colspan="3" |[[Marksman/Arm]] | |||
| colspan="3" |None | |||
|} | |||
* Note that by Level 31 HUcaseal is able to equip Railgun without the assistance of Arm units as long she has fed enough Antidotes and Antiparalysis for her Mag to reach a total of 6 DEX. In a 4 player party, this would require feeding all 4 players' starting Antidotes and Antiparalysis and finding an additional 3 Antidotes or Antiparalysis. This would take a total of 9 Mag feeding cycles, and could be achieved no earlier than when the stage timer is at 31:30. | |||
{| class="wikitable" | |||
|+Additional stats required to equip Lockgun on HUcast (no Mag swap) | |||
! | |||
!Level 23 | |||
!Level 24 | |||
!Level 25 | |||
!Level 26 | |||
!Level 27 | |||
!Level 28 | |||
!Level 29 | |||
!Level 30 | |||
!Level 31 | |||
!Level 32 | |||
!Level 33 | |||
|- | |||
|Total DEX level on Mag | |||
| colspan="4" |3 (+0) | |||
|4 (+1) | |||
|5 (+2) | |||
|4 (+1) | |||
|3 (+0) | |||
|6 (+3) | |||
|5 (+2) | |||
|3 (+0) | |||
|- | |||
|ATA-boosting units equipped | |||
| colspan="2" |[[Marksman/Arm]] x3 | |||
|[[General/Arm]] + [[Marksman/Arm]] | |||
|[[Elf/Arm]] | |||
|[[Marksman/Arm]]<nowiki/>x2 | |||
| colspan="3" |[[General/Arm]] | |||
| colspan="3" |[[Marksman/Arm]] | |||
|} | |||
== FOnewm breakpoints == | |||
Due to [[FOnewm]]'s naturally high MST and boosted damage when using Gi and Ra [[Techniques]], both of which can drop in this stage, he is widely considered to be the strongest [[Force]] in this stage. The following table provides information on the number of casts required to defeat various enemies with certain techniques if the player has high enough MST. In this stage, MST can be boosted by using [[Mind Material|Mind Materials]], or equipping any [[Priest/Mind]], [[General/Mind]], or [[Angel/Mind]] units which drop. Equipping a [[Staff]] will also increase FOnewm's MST by 10, but will also cause FOnewm to cast Techniques at a slightly slower speed than if he were casting bare-handed. | |||
{| class="wikitable" | |||
|+Additional MST required | |||
!Enemy Name | |||
!Technique casted | |||
!Technique level | |||
!Number of casts | |||
!Total MST required | |||
!Level 20 | |||
!Level 21 | |||
!Level 22 | |||
!Level 23 | |||
!Level 24 | |||
!Level 25 | |||
!Level 26 | |||
!Level 27 | |||
!Level 28 | |||
!Level 29 | |||
!Level 30 | |||
|- | |||
| rowspan="7" |[[Dolmolm]] | |||
| rowspan="5" |[[Gizonde]] | |||
|1 | |||
| rowspan="5" |3 | |||
|339 | |||
| +138 | |||
| +132 | |||
| +126 | |||
| +119 | |||
| +113 | |||
| +107 | |||
| +100 | |||
| +94 | |||
| +88 | |||
| +81 | |||
| +75 | |||
|- | |||
|2 | |||
|317 | |||
| +116 | |||
| +110 | |||
| +104 | |||
| +97 | |||
| +91 | |||
| +85 | |||
| +78 | |||
| +72 | |||
| +66 | |||
| +59 | |||
| +53 | |||
|- | |||
|3 | |||
|295 | |||
| +94 | |||
| +88 | |||
| +82 | |||
| +75 | |||
| +69 | |||
| +63 | |||
| +56 | |||
| +50 | |||
| +44 | |||
| +37 | |||
| +31 | |||
|- | |||
|4 | |||
|273 | |||
| +72 | |||
| +66 | |||
| +60 | |||
| +53 | |||
| +47 | |||
| +41 | |||
| +34 | |||
| +28 | |||
| +22 | |||
| +15 | |||
| +9 | |||
|- | |||
|5 | |||
|251 | |||
| +50 | |||
| +44 | |||
| +38 | |||
| +31 | |||
| +25 | |||
| +19 | |||
| +12 | |||
| +6 | |||
| colspan="3" |0 | |||
|- | |||
| rowspan="11" |[[Rafoie]] | |||
|1 | |||
| rowspan="2" |4 | |||
|221 | |||
| +20 | |||
| +15 | |||
| +10 | |||
| +5 | |||
| colspan="7" |0 | |||
|- | |||
|2-4 | |||
|199 | |||
| colspan="11" |0 | |||
|- | |||
| rowspan="3" |[[Dolmdarl]] | |||
|1 | |||
| rowspan="3" |3 | |||
|239 | |||
| +40 | |||
| +35 | |||
| +30 | |||
| +20 | |||
| +15 | |||
| +10 | |||
| colspan="5" |0 | |||
|- | |||
|2 | |||
|217 | |||
| +20 | |||
| +10 | |||
| +5 | |||
| colspan="8" |0 | |||
|- | |||
|3-4 | |||
|195 | |||
| colspan="11" |0 | |||
|- | |||
| rowspan="6" |[[Recobox]] | |||
|1 | |||
| rowspan="2" |6 | |||
|223 | |||
| +25 | |||
| +20 | |||
| +10 | |||
| +5 | |||
| colspan="7" |0 | |||
|- | |||
|2-4 | |||
|201 | |||
| colspan="11" |0 | |||
|- | |||
|1 | |||
| rowspan="4" |5 | |||
|334 | |||
| +135 | |||
| +130 | |||
| +125 | |||
| +115 | |||
| +110 | |||
| +105 | |||
| +95 | |||
| +90 | |||
| +85 | |||
| +80 | |||
| +70 | |||
|- | |||
|2 | |||
|312 | |||
| +115 | |||
| +105 | |||
| +100 | |||
| +95 | |||
| +90 | |||
| +100 | |||
| +75 | |||
| +70 | |||
| +65 | |||
| +55 | |||
| +50 | |||
|- | |||
|3 | |||
|290 | |||
| +90 | |||
| +85 | |||
| +80 | |||
| +70 | |||
| +65 | |||
| +60 | |||
| +55 | |||
| +45 | |||
| +40 | |||
| +35 | |||
| +30 | |||
|- | |||
|4 | |||
|268 | |||
| +70 | |||
| +65 | |||
| +55 | |||
| +50 | |||
| +45 | |||
| +40 | |||
| +30 | |||
| +25 | |||
| +20 | |||
| +10 | |||
| +5 | |||
|} | |||
<nowiki>*</nowiki>Active/Inactive Recobox refers respectively to whether or not the Recobox is spawning Recons | |||
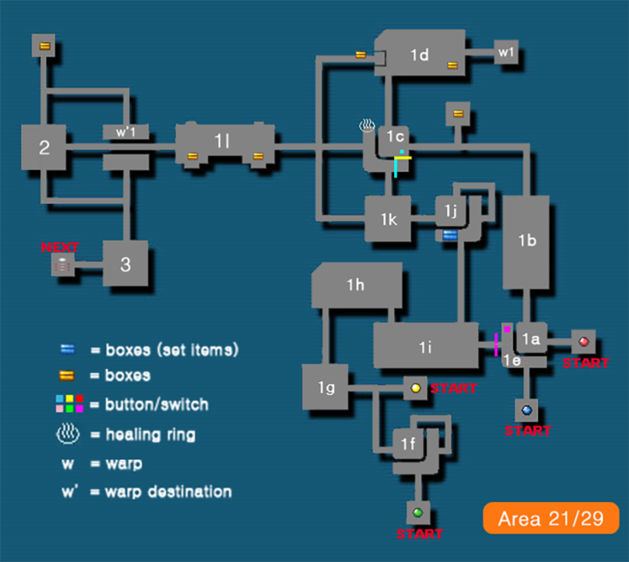
==== Area 21 ==== | |||
{| | {| | ||
|style="vertical-align: top;"|[[File: | |style="vertical-align: top;"|[[File:2ca21.png|left|frameless|629x629px]] | ||
|style="vertical-align: top;"| | |style="vertical-align: top;"| | ||
P1: | |||
1a. Clear 2 squids, go north | |||
1b. Clear, go north | |||
1c. Clear, go north | |||
1d. Clear, go east and warp | |||
P2: | |||
1f. Clear, go west | |||
P2+P3: | |||
1g. Clear, go north | |||
1f. Ignore enemies, go southeast | |||
P4: | |||
1e. Wait for door to open, then go west | |||
P2+P3+P4: | |||
1i. Clear, go northeast (Clear one Recobox in hall to continue) | |||
1j. Clear, go west | |||
1k. Clear active Recoboxes, then go north | |||
1l. Clear, go west | |||
2. Clear, go south | |||
3. Clear Deldepths, go west to exit | |||
|} | |} | ||
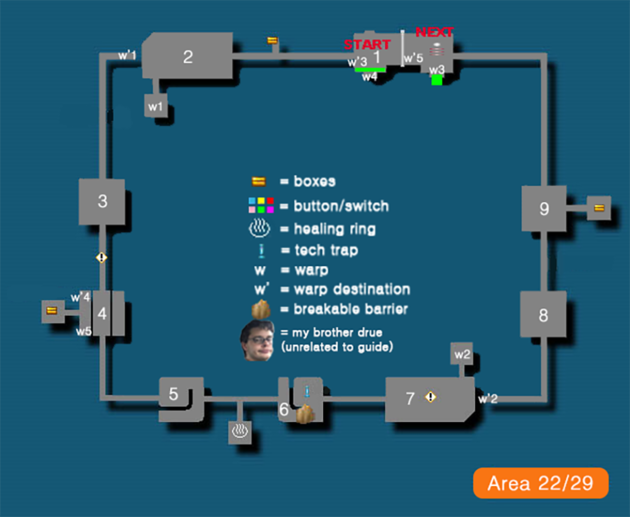
==== Area | ==== Area 22 ==== | ||
{| | {| | ||
|style="vertical-align: top;"|[[File: | |style="vertical-align: top;"|[[File:2ca22(drue).png|left|frameless|630x630px]] | ||
|style="vertical-align: top;"| | |style="vertical-align: top;"| | ||
1. Go west | |||
2. Clear Squids, go south (skip Sinow in hall), warp | |||
3. Clear everything but Recoboxes, then go south | |||
4. Clear second Recobox on bridge to continue south (Clear hallway enemies) | |||
5. Clear Sinows, go east | |||
6. Break barrier, Clear Recoboxes that spawn Recons, then go east | |||
7. Clear Squids and Sinows, then go north and warp | |||
8. Clear Deldepths, then go north (skip Sinow in hall) | |||
9. Clear active Recoboxes, then go north to exit | |||
|} | |} | ||
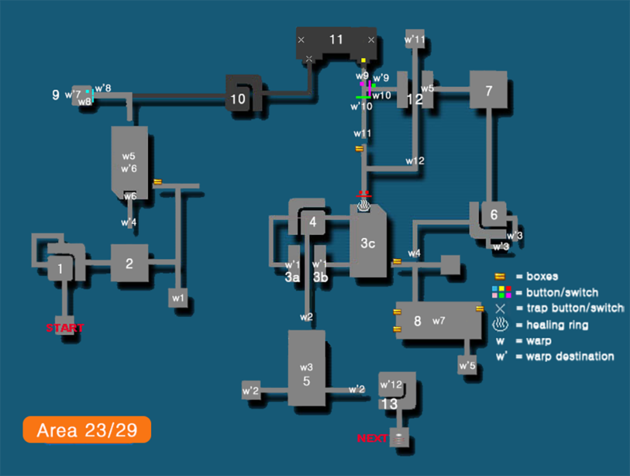
==== Area | ==== Area 23 ==== | ||
{| | {| | ||
|style="vertical-align: top;"|[[File: | |style="vertical-align: top;"|[[File:2ca23.png|left|frameless|630x630px]] | ||
|style="vertical-align: top;"| | |style="vertical-align: top;"| | ||
1. Clear, go east | |||
2. Clear, go east, go south in hall and warp | |||
West team: | |||
3a. Go west and kill hall enemies | |||
East team: | |||
3b. Go east (ignore Recoboxes) | |||
3c. Clear Squids, go northwest | |||
4. Clear, go south, clear the hallway Sinow and warp | |||
5. ALL PLAYERS HUG MIDDLE OF WEST WALL. Clear Squids and Deldepths to auto-warp. | |||
6. Clear, go north (Clear the last hallway Recobox to continue) | |||
7. Clear all except Recoboxes, go west and warp | |||
8. Clear and take the warp that appears | |||
9. Attack the terminal and go east through hall | |||
10. Clear active Recoboxes and go east | |||
11. Clear, go southeast. In the hall, let one player through the east gate so they can let the other players through the south one to warp | |||
12. Clear, go south, warp (warp should appear for solo player too) | |||
13. Clear, go south to exit | |||
|} | |} | ||
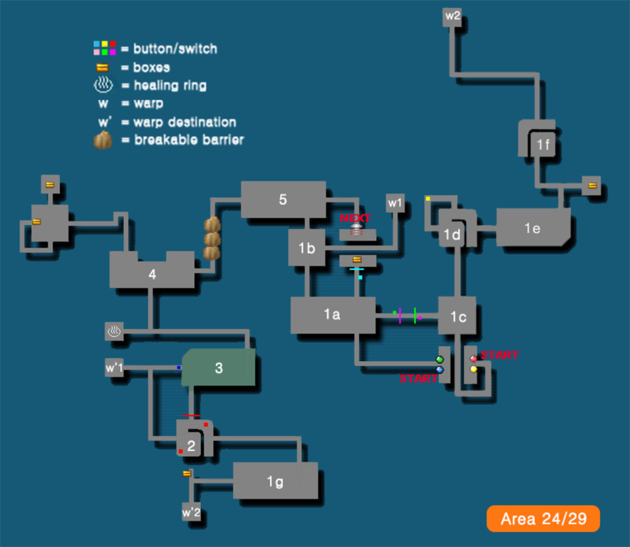
==== Area | ==== Area 24 ==== | ||
{| | {| | ||
|style="vertical-align: top;"|[[File: | |style="vertical-align: top;"|[[File:2ca24.png|left|frameless|630x630px]] | ||
|style="vertical-align: top;"| | |style="vertical-align: top;"| | ||
West team: | |||
1a. Clear, go northwest | |||
1b. Clear Recoboxes, go east and warp. Go east in hall to press poison switch, then go south in hall | |||
East team: | |||
1c. Go north | |||
1d. Clear, go east | |||
1e. Clear Delbiter, go north | |||
1f. Clear all except inactive Recoboxes, go north (skip Sinow in hall) | |||
1g. Clear Squids and Sinows, go north | |||
2. Clear, press switches, go north | |||
3. Clear squids, go north | |||
4. Clear Sinow, go east (break hall barriers) | |||
5. Clear, go east to exit | |||
|} | |} | ||
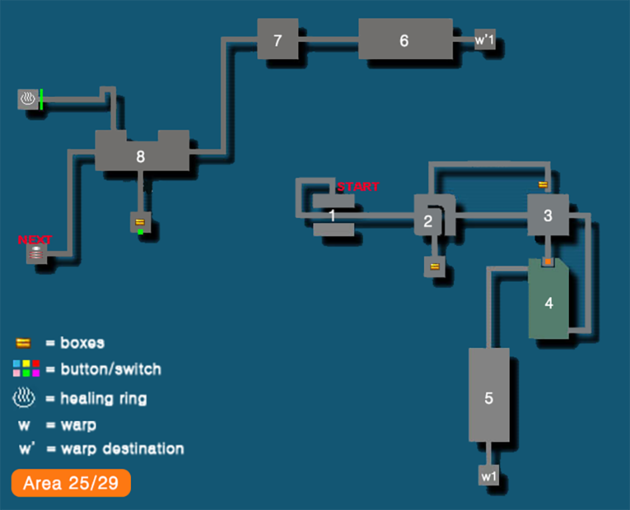
==== Area | ==== Area 25 ==== | ||
{| | {| | ||
|style="vertical-align: top;"|[[File: | |style="vertical-align: top;"|[[File:2ca25.png|left|frameless|630x630px]] | ||
|style="vertical-align: top;"| | |style="vertical-align: top;"| | ||
1. Clear, go east | |||
2. Clear, go east (ignore hallway enemies) | |||
3. Clear, go south to press poison switch, then go east and clear Sinow in hall | |||
4. Clear all but inactive Recoboxes, go west | |||
5. Clear Delbiter, go south and warp | |||
6. Clear Sinows, go west | |||
7. Clear active Recoboxes, go west | |||
8. Clear 2 Sinows, go west to exit (clear Sinow in hall) | |||
|} | |||
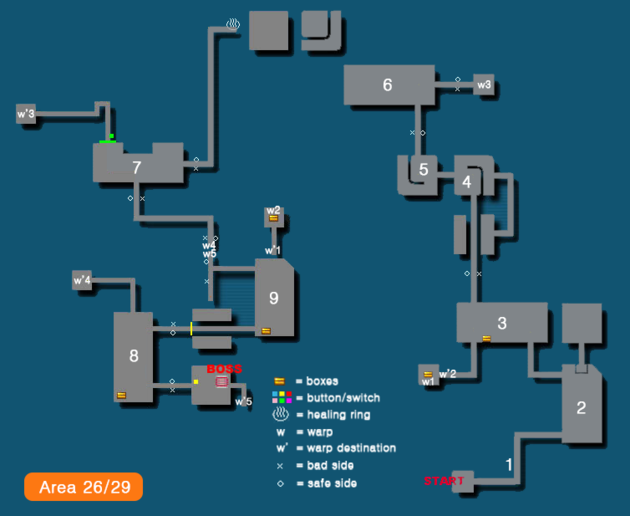
==== Area 26 ==== | |||
{| | |||
| style="vertical-align: top;" |[[File:2ca26.png|left|frameless|630x630px]] | |||
| style="vertical-align: top;" | | |||
<nowiki>*</nowiki>Open menu when going through x/o hallways. It prevents you from being auto-warped even if on the bad side | |||
1. Go through hall, clearing Recoboxes | |||
2. Clear, go northwest | |||
3. Clear, go northwest | |||
4. Clear, go west | |||
5. Clear, go north | |||
6. Clear Deldepths, go east, warp | |||
7. Clear Sinows, go south, warp | |||
8. Clear, go southeast, press switch, then return and go northeast | |||
9. Clear, go northwest, use the north hallway to auto-warp (w5) to boss | |||
|} | |} | ||
__NOTOC__ | __NOTOC__ | ||
{{Guides}} | |||
[[Category:Guides]] | |||
Latest revision as of 03:17, 3 February 2024
Lockgun/Railgun usage on HUcaseal and HUcast[edit | edit source]
HUcaseal can equip Lockgun at the start of the stage, but HUcast can not. Neither class can equip Railgun at the start of the stage. It is possible for a HUcaseal to equip a Railgun before the fight with Olga Flow if she gains enough levels and feeds her Mag enough Antiparalysis and Antidotes. HUcasts will not be able to equip Lockgun before the fight with Olga Flow by Mag feeding alone. Marksman/Arm, General/Arm, or Elf/Arm units can drop in this stage to help players equip these weapons. If a Ranger is present in the party, they can swap Mags with a HUcaseal to give her earlier access to Railgun, or with a HUcast to help with equipping a Lockgun or Railgun.
| Level 23 | Level 24 | Level 25 | Level 26 | Level 27 | Level 28 | Level 29 | Level 30 | Level 31 | Level 32 | Level 33 | |
|---|---|---|---|---|---|---|---|---|---|---|---|
| Total DEX level on Mag | 3 (+0) | 4 (+1) | 3 (+0) | 5 (+2) | 4 (+1) | 3 (+0) | 6 (+3) | 5 (+2) | 3 (+0) | ||
| ATA-boosting units equipped | General/Arm + Marksman/Arm | Marksman/Armx2 | General/Arm | Marksman/Arm | None | ||||||
- Note that by Level 31 HUcaseal is able to equip Railgun without the assistance of Arm units as long she has fed enough Antidotes and Antiparalysis for her Mag to reach a total of 6 DEX. In a 4 player party, this would require feeding all 4 players' starting Antidotes and Antiparalysis and finding an additional 3 Antidotes or Antiparalysis. This would take a total of 9 Mag feeding cycles, and could be achieved no earlier than when the stage timer is at 31:30.
| Level 23 | Level 24 | Level 25 | Level 26 | Level 27 | Level 28 | Level 29 | Level 30 | Level 31 | Level 32 | Level 33 | |
|---|---|---|---|---|---|---|---|---|---|---|---|
| Total DEX level on Mag | 3 (+0) | 4 (+1) | 5 (+2) | 4 (+1) | 3 (+0) | 6 (+3) | 5 (+2) | 3 (+0) | |||
| ATA-boosting units equipped | Marksman/Arm x3 | General/Arm + Marksman/Arm | Elf/Arm | Marksman/Armx2 | General/Arm | Marksman/Arm | |||||
FOnewm breakpoints[edit | edit source]
Due to FOnewm's naturally high MST and boosted damage when using Gi and Ra Techniques, both of which can drop in this stage, he is widely considered to be the strongest Force in this stage. The following table provides information on the number of casts required to defeat various enemies with certain techniques if the player has high enough MST. In this stage, MST can be boosted by using Mind Materials, or equipping any Priest/Mind, General/Mind, or Angel/Mind units which drop. Equipping a Staff will also increase FOnewm's MST by 10, but will also cause FOnewm to cast Techniques at a slightly slower speed than if he were casting bare-handed.
| Enemy Name | Technique casted | Technique level | Number of casts | Total MST required | Level 20 | Level 21 | Level 22 | Level 23 | Level 24 | Level 25 | Level 26 | Level 27 | Level 28 | Level 29 | Level 30 |
|---|---|---|---|---|---|---|---|---|---|---|---|---|---|---|---|
| Dolmolm | Gizonde | 1 | 3 | 339 | +138 | +132 | +126 | +119 | +113 | +107 | +100 | +94 | +88 | +81 | +75 |
| 2 | 317 | +116 | +110 | +104 | +97 | +91 | +85 | +78 | +72 | +66 | +59 | +53 | |||
| 3 | 295 | +94 | +88 | +82 | +75 | +69 | +63 | +56 | +50 | +44 | +37 | +31 | |||
| 4 | 273 | +72 | +66 | +60 | +53 | +47 | +41 | +34 | +28 | +22 | +15 | +9 | |||
| 5 | 251 | +50 | +44 | +38 | +31 | +25 | +19 | +12 | +6 | 0 | |||||
| Rafoie | 1 | 4 | 221 | +20 | +15 | +10 | +5 | 0 | |||||||
| 2-4 | 199 | 0 | |||||||||||||
| Dolmdarl | 1 | 3 | 239 | +40 | +35 | +30 | +20 | +15 | +10 | 0 | |||||
| 2 | 217 | +20 | +10 | +5 | 0 | ||||||||||
| 3-4 | 195 | 0 | |||||||||||||
| Recobox | 1 | 6 | 223 | +25 | +20 | +10 | +5 | 0 | |||||||
| 2-4 | 201 | 0 | |||||||||||||
| 1 | 5 | 334 | +135 | +130 | +125 | +115 | +110 | +105 | +95 | +90 | +85 | +80 | +70 | ||
| 2 | 312 | +115 | +105 | +100 | +95 | +90 | +100 | +75 | +70 | +65 | +55 | +50 | |||
| 3 | 290 | +90 | +85 | +80 | +70 | +65 | +60 | +55 | +45 | +40 | +35 | +30 | |||
| 4 | 268 | +70 | +65 | +55 | +50 | +45 | +40 | +30 | +25 | +20 | +10 | +5 | |||
*Active/Inactive Recobox refers respectively to whether or not the Recobox is spawning Recons
Area 21[edit | edit source]
|
P1: 1a. Clear 2 squids, go north 1b. Clear, go north 1c. Clear, go north 1d. Clear, go east and warp P2: 1f. Clear, go west P2+P3: 1g. Clear, go north 1f. Ignore enemies, go southeast P4: 1e. Wait for door to open, then go west P2+P3+P4: 1i. Clear, go northeast (Clear one Recobox in hall to continue) 1j. Clear, go west 1k. Clear active Recoboxes, then go north 1l. Clear, go west 2. Clear, go south 3. Clear Deldepths, go west to exit |
Area 22[edit | edit source]
|
1. Go west 2. Clear Squids, go south (skip Sinow in hall), warp 3. Clear everything but Recoboxes, then go south 4. Clear second Recobox on bridge to continue south (Clear hallway enemies) 5. Clear Sinows, go east 6. Break barrier, Clear Recoboxes that spawn Recons, then go east 7. Clear Squids and Sinows, then go north and warp 8. Clear Deldepths, then go north (skip Sinow in hall) 9. Clear active Recoboxes, then go north to exit |
Area 23[edit | edit source]
|
1. Clear, go east 2. Clear, go east, go south in hall and warp West team: 3a. Go west and kill hall enemies East team: 3b. Go east (ignore Recoboxes) 3c. Clear Squids, go northwest 4. Clear, go south, clear the hallway Sinow and warp 5. ALL PLAYERS HUG MIDDLE OF WEST WALL. Clear Squids and Deldepths to auto-warp. 6. Clear, go north (Clear the last hallway Recobox to continue) 7. Clear all except Recoboxes, go west and warp 8. Clear and take the warp that appears 9. Attack the terminal and go east through hall 10. Clear active Recoboxes and go east 11. Clear, go southeast. In the hall, let one player through the east gate so they can let the other players through the south one to warp 12. Clear, go south, warp (warp should appear for solo player too) 13. Clear, go south to exit |
Area 24[edit | edit source]
|
West team: 1a. Clear, go northwest 1b. Clear Recoboxes, go east and warp. Go east in hall to press poison switch, then go south in hall East team: 1c. Go north 1d. Clear, go east 1e. Clear Delbiter, go north 1f. Clear all except inactive Recoboxes, go north (skip Sinow in hall) 1g. Clear Squids and Sinows, go north 2. Clear, press switches, go north 3. Clear squids, go north 4. Clear Sinow, go east (break hall barriers) 5. Clear, go east to exit |
Area 25[edit | edit source]
|
1. Clear, go east 2. Clear, go east (ignore hallway enemies) 3. Clear, go south to press poison switch, then go east and clear Sinow in hall 4. Clear all but inactive Recoboxes, go west 5. Clear Delbiter, go south and warp 6. Clear Sinows, go west 7. Clear active Recoboxes, go west 8. Clear 2 Sinows, go west to exit (clear Sinow in hall) |
Area 26[edit | edit source]
|
*Open menu when going through x/o hallways. It prevents you from being auto-warped even if on the bad side 1. Go through hall, clearing Recoboxes 2. Clear, go northwest 3. Clear, go northwest 4. Clear, go west 5. Clear, go north 6. Clear Deldepths, go east, warp 7. Clear Sinows, go south, warp 8. Clear, go southeast, press switch, then return and go northeast 9. Clear, go northwest, use the north hallway to auto-warp (w5) to boss |
| Guides | |
|---|---|
| Basics | Classes • Mags (Basic Mag feeding guide) • Quests • Section IDs • Stats • Status effects • Teams • Techniques • Tekking • Weapons |
| Classes | Class comparison • Hunter • HUmar • HUnewearl • HUcast • HUcaseal • RAmar • RAmarl • RAcast • RAcaseal • FOmar • FOmarl • FOnewm • FOnewearl |
| Items | Adding Hit to enemy weapons • Adding ES/S-Rank weapon specials • Common weapon ATA equivalencies • Increasing weapon attributes • Sealed items (Unsealing) • Set effects |
| Hunting | Common weapons • Drop charts (Level 30 techniques) • Item boxes • Ragol Boost Road • Weapon attribute drop tables |
| Mechanics | Accuracy glitch • Beat time • Combo-locked weapons • Fixed-damage attacks • Game mechanics (Frame data) • Reduced-special weapons |
| Challenge | Challenge • Episode 2: Stage 1 • Episode 2: Stage 2 • Episode 2: Stage 3 • Episode 2: Stage 4 • Episode 2: Stage 5 |
| Other | Chat commands • Coren • Custom files • Music replacement • Price guide • Terminology |
